
Part 1: Measurements + supplies
Thank you for all the lovely comments on my Picnic Blanket Skirt! As promised, here are some instructions on how to make your own – also known as a button-down gathered skirt. Whether you choose to make yours in picnic blanket style fabric or not is up to you! Needless to say (I hope), don’t actually make this out of a blanket… gingham cotton or linen will work just fine ☺It would also look great with stripes, plains, polka dots, boats, cats... you name it!
If you make your own version I'd love to see it! And feel free to grab a button if you have a blog you want to share it on. Choose from 150px or 125px square images, copy the code in the text box next to the image and add it to an HTML gadget on your blog layout:


You don’t need a pattern to make this skirt. It’s made up of simple rectangle shapes - you will work out the dimensions of the pieces based on your own measurements, and mark them on the fabric. I used a large gingham fabric - the squares made it easy to cut out rectangle pieces with right angled corners without marking the fabric too much. But if you’re worried about getting it right or marking the fabric, you could cut the shapes out in banner or pattern paper first and use them as you would a regular pattern.
In this post I’ll explain how to work out the dimensions of the fabric pieces to cut out. Knowing these measurements will help you to work out how much fabric you need (as a guide, I’m little and used about 2.3m). In the next two posts I’ll go through how to sew it all together.
You will need:
- Fabric – see below for measurements
- Interfacing for waistband and plackets
- Thread
- 7 – 10 x ¾” buttons – depending on the length of your skirt
- Optional - Pocket pattern piece borrowed from another pattern
You will also need a tape measure, paper and pens to keep a note of all the measurements. And you’ll need your waist and hip measurements.
Okay, so let’s work the dimensions of the pieces that you need to cut out. Don’t be put off by the numbers below – it may look complicated but really it’s quite simple to work out, I promise! Personally when I’m learning something new I like to know why you do it a certain way, so I’ve broken down and explained the reason for all the dimensions for people who learn this way - which is why it looks so complicated. If, however, you’d rather cut straight to the essentials, just skip to the text in bold!
The skirt is comprised of 4 different shapes:
- Back piece x 1
- Front pieces x 2
- Waistband x 2 (inside and outside)
- Pockets x 4 (to make 2 pockets)
Please note that I’m adding ½” seam allowances (a standard often used in pattern drafting), but do change it to 5/8” if you prefer. Just remember to keep the size of your seam allowances consistent.

1) Back piece:
WIDTH:
(i) This is where you get to choose how full you want the skirt to be. To help you decide, first imagine a skirt where the fabric fits tightly round your hips – a full skirt could have somewhere between two or three times this amount of fabric, allowing it to stand out from your body with lovely folds of fabric hanging down. Three times the width is pretty crazy gathered – you could find that amount of fabric heavy to wear, plus that length of gathering could be difficult to achieve without breaking the thread. I went for about 2.1 times my hip measurement to make a lovely casual yet full skirt.
(ii) To get the width of the back piece (half of the skirt), divide your chosen number by two. So for example I went for (2.1 / 2 x my 36” hips) = 37.8”, which I rounded up to 38”.
(iii) Add 2 x ½” seam allowance on each side = 1”
TOTAL WIDTH = (2.1 x hip measurement)/2 + 1”
LENGTH:
(i) Choose the length you want the skirt to fall. I usually drop a tape measure down from my waist to the top of my kneecap, but choose the most flattering length for you. To be on the safe side, you could always make it longer and cut it down at the fitting stage depending on how it looks when it’s on you.
(ii) Add ½” seam allowance to the top
(iii) Add 2” at the bottom for the hem (NB. some people add 4” hem allowance to skirts, but I always end up chopping 2” off before finishing. Do what is right for you.)
TOTAL LENGTH = (waist to knee) + 2.5”
CUT ONE BACK PIECE.

2) Front pieces:
WIDTH:
(i) There are two front pieces to one back piece, so take the width of the back piece excluding seam allowances [ie. (2.1 x hip)/2] and divide it by 2
(ii) Add 7/8” for the button stand
(iii) Add (7/8” x 2) = 1 ¾” for the back of the placket
(iii) Add 2 x ½” seam allowance for each side of the piece = 1”
TOTAL WIDTH = (Back piece width excl SA)/2 + 3 5/8”
LENGTH:
Same as back piece.
CUT TWO FRONT PIECES.
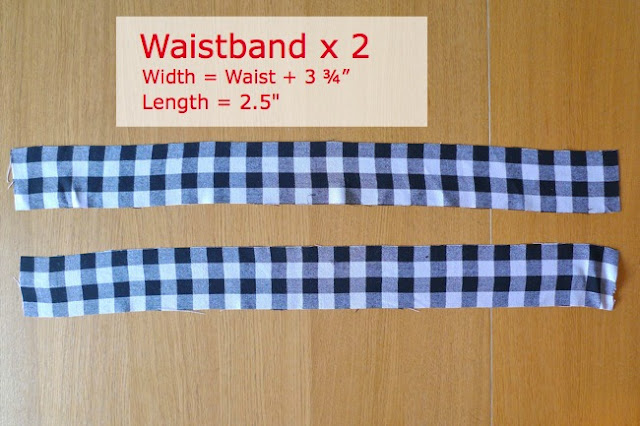
3) Waistband:
WIDTH:
(i) Measure your waist
(ii) Add 1” ease
(iii) Add (2 x 7/8”) = 1 ¾” for the button stand
(iv) Add 2 x ½” seam allowance for each side of the piece = 1”
TOTAL WIDTH = Waist + 3 ¾”
DEPTH:
(i) I want my waistband to be 1.5”. You can make yours a little bigger if you like.
(ii) Add 2 x ½” seam allowance for top and bottom = 1”
TOTAL DEPTH = 2.5”
CUT TWO WAISTBAND PIECES.

4) Pockets:
If you want to add pockets, grab a pocket shaped piece from another pattern.
CUT FOUR POCKET PIECES.

Interfacing:
You need three pieces of interfacing in total:
- One to the size of the waistband to go on the front waistband piece.
- Two to the size of the placket, ie. 1 ¾” x length of skirt, to go on the centre front edges of the front pieces (don’t forget to place them ½” in from the edge to account for the seam allowance).
Press the interfacing onto the fabric pieces now while you remember where they go.
Now that you have these measurements, note them down somewhere safe in case you want to make more and more of these skirts! You should now be able to cut all the pieces out, ready to sew – I’ll explain how to do that in the next post. Now go and make yourself a cup of tea, you deserve it ☺
Next up: Part 2 - Sewing the pockets, plackets and waistband.
