Garments made in jersey and other knit fabrics generally don't require many fit adjustments, thanks to the stretch in the fabric. Having said that, if you find that your me-mades feel tight across the bust, with excess fabric pooling above, you may benefit from doing a full bust adjustment.
How do I know if I need a full bust adjustment?
Generally speaking, knit garments are much more forgiving than woven garments when it comes to fitting. The stretchy fabric means we often don't need to worry if things are a little bit tight, and stretch garments are also often relatively casual in style and fit, meaning fitting is usually relatively simple overall. Because of this, you might not need to do a bust adjustment on these types of garments, even if you often do a full bust adjustment for woven garments - yay!
However, if your boobs are on the larger side and you usually find that even easy-fitting t-shirts and sweatshirts are either too tight in the bust area, or fit across the bust but have a lot of excess fabric pooling above, then you probably need to make a full bust adjustment. Luckily the adjustment I'm going to show you today is super easy and you'll be done in no time :)
Help! How much do I have to add to the bust?
I'm going to briefly cover how you would work out how much to add or subtract from your bust in the adjustment, but do remember this is just a rough framework rather than an exact science, and you might not need to do it at all.
Measure your high bust (your upper chest, just under your armpits). If you're making a pattern in our sizes UK 6-24 size band, or sizes UK 6-16 in our 6-34 size band, add 5cm (2in). If you're making a pattern in our sizes 16-34 size band, or sizes 18-34 in our 6-34 size band, add 10cm (4in). If you're making a pattern by another designer, you may need to add a different amount. Choose the pattern size with that bust measurement – this is the size you’ll do your bust adjustment on.
Now measure your full bust (fullest part, around the nipples) and compare it to the bust measurement on the pattern size you just selected. If your full bust is 5cm (2in) bigger than the pattern, you’ll be adding 5cm (2in) to the pattern; if it’s 7.5cm (3in) bigger, you’ll be adding 7.5cm (3in) and so on.
For bust adjustments on woven fabric, you only need to make the adjustment to the front bodice only. For knits and stretch fabric, you make the adjustment to the side seam and armhole of both the front and back piece. It might sound a bit strange but trust me, it works!
To do this adjustment you'll need:
- two pieces of paper that are a little bigger than your front and back bodice pattern pieces
- pencil
- a pin
- scissors
- a cup of tea and your favourite sewing snack (not essential but highly encouraged)
How to do a full bust adjustment
(1) Lay the front bodice pattern piece over a piece of paper and draw around it. Transfer all notches and markings.
The front bodice represents one-quarter of the bodice - to work out how much extra to add to this piece, divide the amount you wish to add to the bust by 4. For example, if you worked out you need to add 5cm overall to the bust (see above), divide 5 by 4 - this gives us 1.25cm (1/2in).
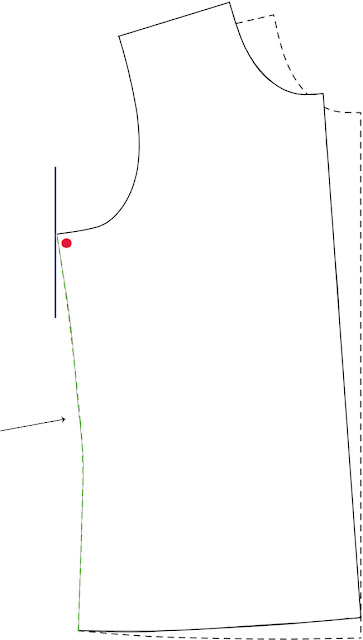
On the piece of paper with the new front bodice you've just drawn, measure a point this far outside the top of the side seam and level with it (1.25cm (1/2in) in this example), and mark with a vertical line on the lower sheet of paper (the blue line in the diagram).
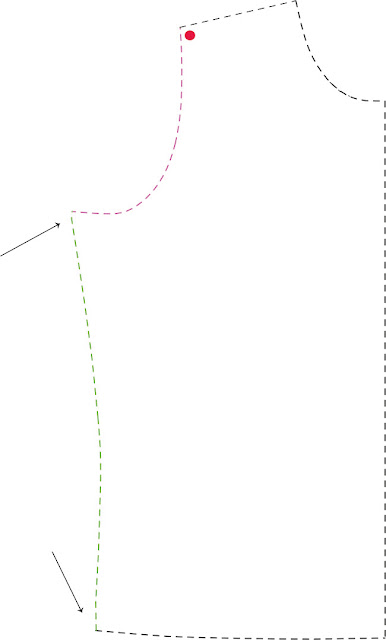
(2) Poke a pin through the top corner of the armhole to secure the pattern to the paper below - put a cutting mat down underneath if you don't want to make any marks in the table! Pivot the pattern to the side so the top of the side seam meets the vertical line you just drew on the paper below. Draw around the armhole onto the paper below. This is shown in the diagram with a pink line.
(3) Move the pin to the top corner of the side seam. Pivot the pattern back so the bottom corner of the side seam meets the bottom corner of the side seam on the paper below. Redraw the side seam onto the paper below. This is shown in the diagram with a green line.
(4) Remove the pattern. The paper below is your new front bodice pattern. Smooth out the side seam and square off the top and bottom corners of the side seam into a right angle. Trace the new armhole and side seam onto the back bodice in the same way.
(5) Follow exactly the same process for the back bodice.
And you've done it! I hope you've found this post helpful and now feel ready to go forth and do a full bust adjustment on your favourite knit pattern.
Liked this post? Check out Full Bust Adjustment on a Dartless Bodice and How to do Bust Adjustments for a Bust Darted Bodice.
************


