
Do you like the idea of making trousers or pants, but feel a little nervous about the prospect of fitting them? Well, fear not, as help is here! This blog post will cover the most common fitting adjustments you may need to make when sewing trousers.
Now, before we go any further, please shake off any ideas you may have about making a perfect, crease-free pair of trousers. They simply don’t exist. Well-fitting trousers allow you room to sit down comfortably, breathe, eat, and to live your best life. They will crease where you bend and move, and will allow you space to do so. Basically, don’t get hung up on eliminating every crease and line – it’s impossible!
With that in mind, we've covered a few different fitting adjustments here, but don't feel like you have to try them all! You may not need to make any alterations to your pattern, or perhaps you feel you need to do just one or two tweaks.
If you're not sure whether you'll need to make some alterations, or even what adjustments you might need, it's a good idea to make a "toile" - a mock-up garment in a similar weight fabric you don't mind using to test the fit - so you can see how a particular pattern works on you. We have a comprehensive blog post about toile making. Go check it out if you want to find out more!
Making a toile is more important if you're making something with a close-fitting crotch and bum area, like the Thea trousers, but not always essential if you're making a looser fitting garment, such as the Esti trousers or shorts or the Safiya trousers - unless you know you usually need to make lots of adjustments. For looser fitting trousers, you might want to make a "wearable toile", perhaps in an inexpensive but pretty fabric that you won't mind wearing if it all works out beautifully.
Ready to dive in and learn how to do some common trouser fitting adjustments? Let's go...
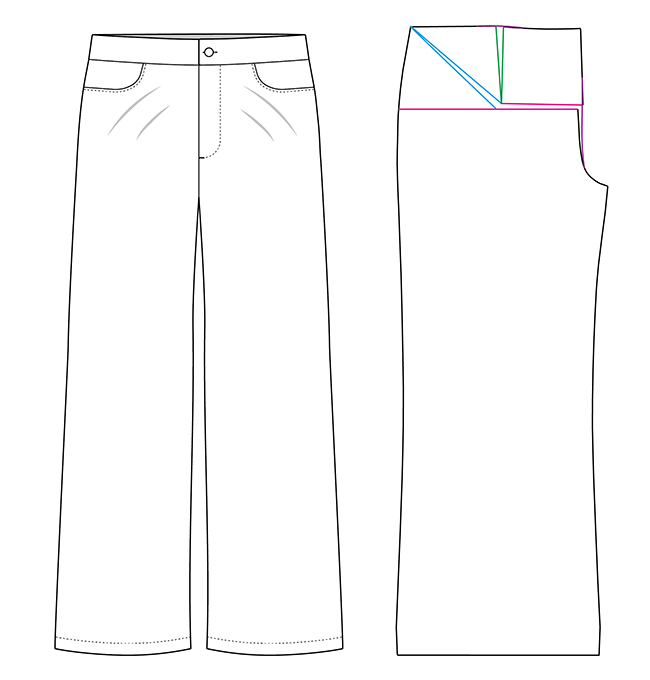
Draw a horizontal line across the front leg, and a vertical line from the waistline to the horizontal line. Draw a diagonal line from the point where the horizontal and vertical lines meet, and the top corner of the side seam. Mark the seam allowance point at the corner.
Starting at the crotch, cut the horizontal line and stop where it meets the vertical line. Pivot and cut up the diagonal line, stopping at the seam allowance marking. Snip from the outside edge, stopping a smidge before the seam allowance line. From the waistline cut down the vertical line and stop just before the cut lines. Slide a bit of paper underneath and spread the pattern piece until you’ve added the desired width and length, and stick down.
Draw a smooth, curved line connecting the new and old crotch positions. Smooth out the waistline, drawing a new line to connect the gap in the waistline.
Check out our dedicated blog post with video, which explains how to do a full tummy adjustment in more detail.
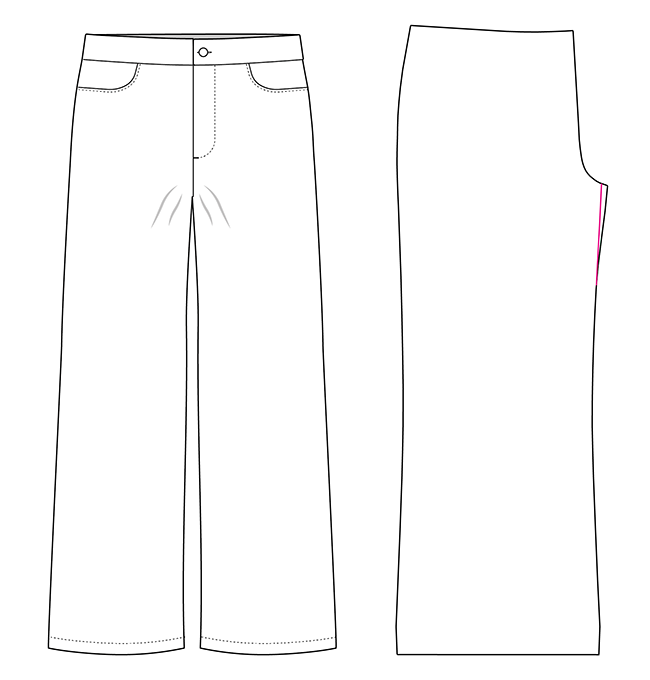
On the front leg, mark around 10mm (3/8in) from the end of the crotch seam and, with a ruler or steady hand, re-draw the inner leg seam so that it gently tapers into this point. Cut away the excess.
A little removed goes a long way with this alteration, so don’t rush into taking off too much – it can be a process of trial and error!

On the front leg piece, stick or tape some paper next to the end of the crotch seam and extend the cutting line. A little goes a long way, so around 10-15mm (3/8-5/8in) should make a big difference. With a ruler or steady hand, re-draw the inner leg seam so that it gently tapers into the original cutting line.
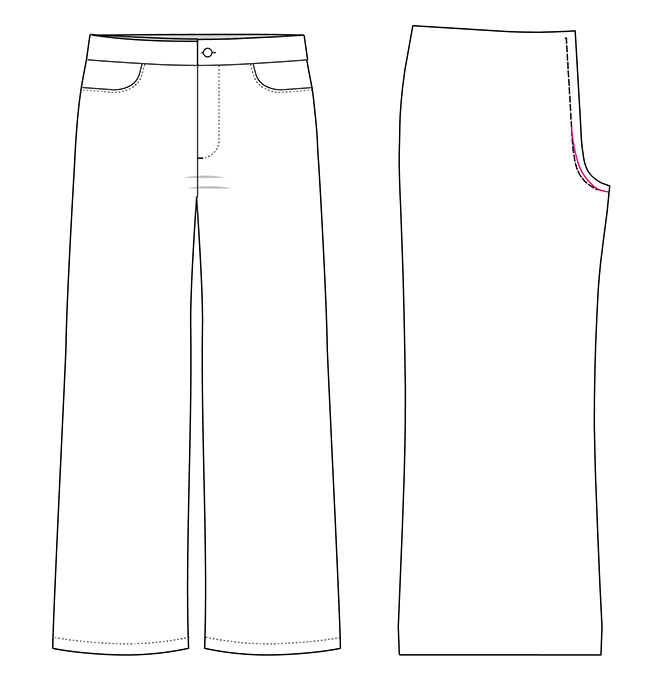
On the front leg, draw a slightly shallower crotch curve – you don’t need to do much here to make a big difference! This will change the seam allowance slightly, so stick a piece of paper underneath and draw a new cutting line from the crotch curve.
This is also an easy adjustment to do on the sewing machine. Draw a new stitching line on the wrong side of the crotch seam and simply follow it whilst sewing.
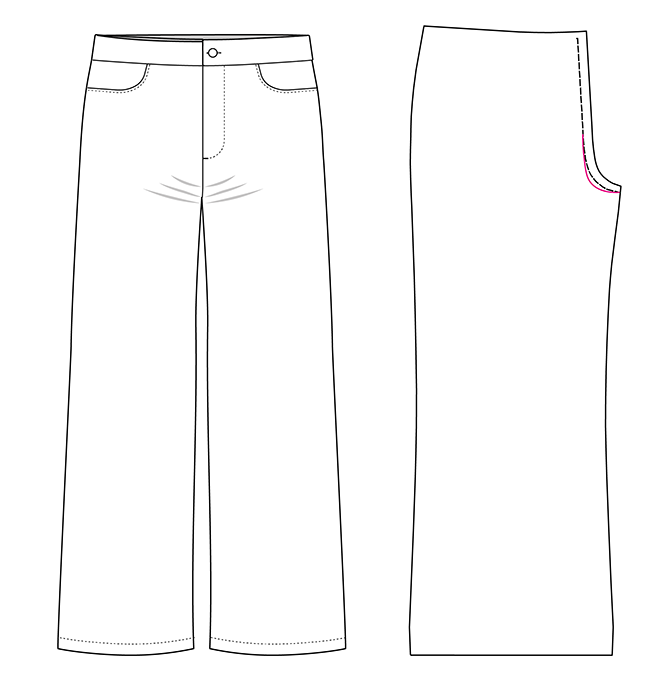
On the front leg, re-draw the crotch curve so it’s a little deeper. Add seam allowance from the new curve, and trim off the excess. Similar to the flat pelvis adjustment, you can also easily do this on the sewing machine. Draw a new stitching line on the wrong side of the crotch seam and follow it whilst sewing. You may also need to let out the trousers or pants a little at the side seams, to account for the changes you’ve made to the crotch.

Draw a diagonal line across the back leg from mid-way up the crotch to the side seam. Mark the seam allowance on the side seams. Cut from crotch seam to a smidge before the seam allowance mark at the side seam, and then cut from the side seam to just before this point.
Pivot the top section away from the bottom by the amount you would like to increase the crotch seam by – 10-15mm (3/8-5/8in) is a good place to start. Tape or stick down over a strip of paper, and then redraw the crotch seam with a straight line to neaten it out. Cut away the excess.
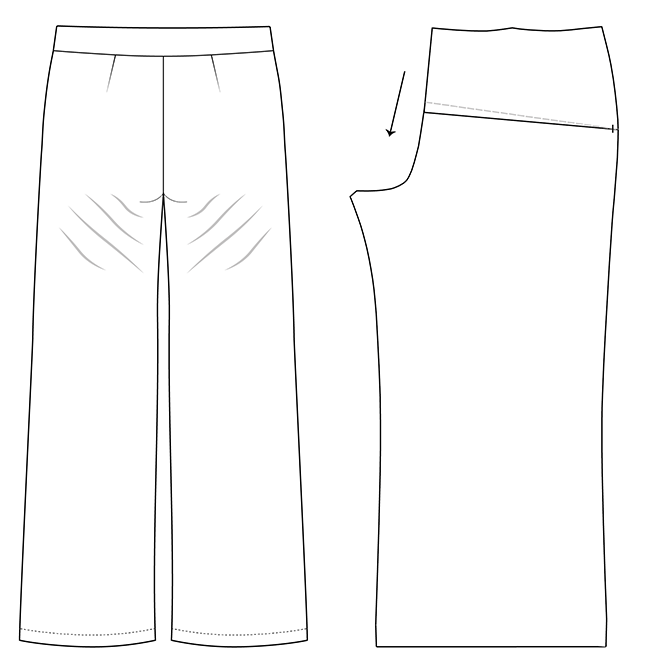
Draw a diagonal line across the back leg from mid-way up the crotch to the side seam. Mark the seam allowance on the side seams. Cut from crotch to a smidge before the seam allowance mark at the side seam, and then cut from the side seam to just before this point.
Pivot the top section over the bottom by the amount you would like to shorten the crotch seam by - 15mm (5/8in) is a good place to start. Tape or stick down and then redraw the crotch seam with a straight line to neaten it out. Cut away the excess.
 If you have lines from your back crotch radiating out towards the high hip and knee, this can indicate that you need to extend the back crotch. The trousers will also feel like they need more room across the back thighs.
On the front leg piece, stick or tape some pattern paper next to the end of the back crotch seam and extend the cutting line. A little goes a long way, so around 10-15mm (3/8-5/8in) should make a big difference. With a ruler or steady hand, re-draw the inner leg seam so that it gently tapers into the original cutting line.

On the front leg, mark around 10mm (3/8in) from the end of the crotch seam and, with a ruler or steady hand, re-draw the inner leg seam so that it gently tapers into this point. Cut away the excess.
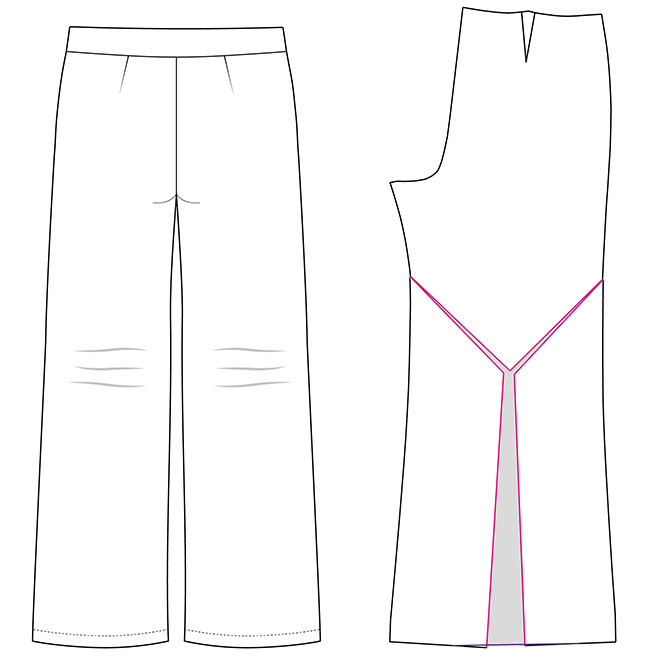
On the back leg, from the middle of the hem draw a line from the bottom to around the knee. At the top of this line, draw two diagonal lines to the side and inside leg seams. On the diagonal lines, mark the seam allowance. Cut from the end of the diagonal lines to just before the seam allowance. From the hem, cut up the vertical line, then cut up both diagonal lines, stopping just before the seam allowance marks. These will work as hinges.
Slide some paper underneath and spread the back leg to add the desired width to the leg. When you’re happy with the new width, stick the pattern piece down.
 If you don’t have a particularly small bottom and are still finding excess fabric at the top of your back thighs or underneath your bottom, it might be that the pattern is too large or long for your thigh.
Pin out the excess fabric in the back of your thigh from one side to the other. Identify where the excess fabric that you’ve pinned is situated on your pattern by measuring down the inner and outer leg seams. Draw a line between these two points on your pattern. Draw a second line starting a third of a way along this line and ending at the crotch seam.
Cut along the second line from the crotch to the first line, and then cut both ways along the first line, ending 15mm (5/8in) from the side seams.
Pivot and overlap the upper pieces over the lower leg by the amount that you pinned out of your toile. Tape or stick down. With a ruler or gentle hand, re-draw both legs and crotch seam to smooth them out.

Measure down the centre back seam by the amount you want to reduce it by and mark it. Draw a smooth line from this mark to the top of the side seam. If your trouser pattern has a dart, close it to draw this line, and then ‘true’ the dart afterwards so it’s the correct shape.
And there you have it! Remember, a pair of trousers that you wear are infinitely more valuable to you than a pair that fit perfectly. Have fun with the process and feel proud of yourself!
Liked this post? Check out How to Bust Adjustments For a Bust Darted Bodice and Five Ways To Fix a Gaping Neckline.
********
Author: Nikki Hoar
Photography: Jane Looker
Model: Sinead Deckker
Now, before we go any further, please shake off any ideas you may have about making a perfect, crease-free pair of trousers. They simply don’t exist. Well-fitting trousers allow you room to sit down comfortably, breathe, eat, and to live your best life. They will crease where you bend and move, and will allow you space to do so. Basically, don’t get hung up on eliminating every crease and line – it’s impossible!
With that in mind, we've covered a few different fitting adjustments here, but don't feel like you have to try them all! You may not need to make any alterations to your pattern, or perhaps you feel you need to do just one or two tweaks.
Do I need to make a toile?
Making a toile is more important if you're making something with a close-fitting crotch and bum area, like the Thea trousers, but not always essential if you're making a looser fitting garment, such as the Esti trousers or shorts or the Safiya trousers - unless you know you usually need to make lots of adjustments. For looser fitting trousers, you might want to make a "wearable toile", perhaps in an inexpensive but pretty fabric that you won't mind wearing if it all works out beautifully.
Ready to dive in and learn how to do some common trouser fitting adjustments? Let's go...
How do I add more room to the stomach area? AKA a full tummy adjustment

If you feel tightness around the tummy with drag lines radiating from your stomach to the trouser side seams, it’s a sign you need more room in this area.
Draw a horizontal line across the front leg, and a vertical line from the waistline to the horizontal line. Draw a diagonal line from the point where the horizontal and vertical lines meet, and the top corner of the side seam. Mark the seam allowance point at the corner.
Starting at the crotch, cut the horizontal line and stop where it meets the vertical line. Pivot and cut up the diagonal line, stopping at the seam allowance marking. Snip from the outside edge, stopping a smidge before the seam allowance line. From the waistline cut down the vertical line and stop just before the cut lines. Slide a bit of paper underneath and spread the pattern piece until you’ve added the desired width and length, and stick down.
Draw a smooth, curved line connecting the new and old crotch positions. Smooth out the waistline, drawing a new line to connect the gap in the waistline.
Check out our dedicated blog post with video, which explains how to do a full tummy adjustment in more detail.
How do I shorten the front crotch?

If there are drag lines coming down from the front crotch, it may be a sign that it needs to be shorter. You might also feel that you need to hitch your trousers up in the crotch/top of the front thigh area only.
On the front leg, mark around 10mm (3/8in) from the end of the crotch seam and, with a ruler or steady hand, re-draw the inner leg seam so that it gently tapers into this point. Cut away the excess.
A little removed goes a long way with this alteration, so don’t rush into taking off too much – it can be a process of trial and error!
How do I lengthen the front crotch?

If you can see lines coming up from the front crotch, it might indicate that the front crotch is too short for you. Alternatively, the crotch may just feel too short and uncomfortable (aka you might feel like you need to hoik it out your nether regions).
On the front leg piece, stick or tape some paper next to the end of the crotch seam and extend the cutting line. A little goes a long way, so around 10-15mm (3/8-5/8in) should make a big difference. With a ruler or steady hand, re-draw the inner leg seam so that it gently tapers into the original cutting line.
How do I do a flat pelvis adjustment?

If you have horizontal lines across your front crotch you, you might want to change the shape of the crotch curve to make it slightly shallower.
On the front leg, draw a slightly shallower crotch curve – you don’t need to do much here to make a big difference! This will change the seam allowance slightly, so stick a piece of paper underneath and draw a new cutting line from the crotch curve.
This is also an easy adjustment to do on the sewing machine. Draw a new stitching line on the wrong side of the crotch seam and simply follow it whilst sewing.
How do I do a round pelvis adjustment?

If you have vertical lines radiating from the front crotch, you might need to make the crotch curve a little deeper. You might also have a delightfully named ‘camel toe’.
On the front leg, re-draw the crotch curve so it’s a little deeper. Add seam allowance from the new curve, and trim off the excess. Similar to the flat pelvis adjustment, you can also easily do this on the sewing machine. Draw a new stitching line on the wrong side of the crotch seam and follow it whilst sewing. You may also need to let out the trousers or pants a little at the side seams, to account for the changes you’ve made to the crotch.
How do I do a full seat adjustment?

If you have a fuller booty, you might find that the back waistband pulls down, and drag lines radiate from the waist, sides, and legs towards the centre back seam. To rectify this, extending the back crotch seam will make the trousers fit better.
Draw a diagonal line across the back leg from mid-way up the crotch to the side seam. Mark the seam allowance on the side seams. Cut from crotch seam to a smidge before the seam allowance mark at the side seam, and then cut from the side seam to just before this point.
Pivot the top section away from the bottom by the amount you would like to increase the crotch seam by – 10-15mm (3/8-5/8in) is a good place to start. Tape or stick down over a strip of paper, and then redraw the crotch seam with a straight line to neaten it out. Cut away the excess.
How do I do a flat seat adjustment?

If you have a smaller derrière, you might notice drag lines under the bum, or the bum area looks a bit saggy. This indicates you need to reduce the back crotch seam.
Draw a diagonal line across the back leg from mid-way up the crotch to the side seam. Mark the seam allowance on the side seams. Cut from crotch to a smidge before the seam allowance mark at the side seam, and then cut from the side seam to just before this point.
Pivot the top section over the bottom by the amount you would like to shorten the crotch seam by - 15mm (5/8in) is a good place to start. Tape or stick down and then redraw the crotch seam with a straight line to neaten it out. Cut away the excess.
How do I lengthen the back crotch?

On the front leg piece, stick or tape some pattern paper next to the end of the back crotch seam and extend the cutting line. A little goes a long way, so around 10-15mm (3/8-5/8in) should make a big difference. With a ruler or steady hand, re-draw the inner leg seam so that it gently tapers into the original cutting line.
How do I shorten the back crotch?

If you have drag lines coming from the back crotch down your leg, and you feel like the top of the thighs feel too big for your frame, you may benefit from shortening the back crotch.
On the front leg, mark around 10mm (3/8in) from the end of the crotch seam and, with a ruler or steady hand, re-draw the inner leg seam so that it gently tapers into this point. Cut away the excess.
How do I do a full calf adjustment?

If your trousers or pants feel tight across the back lower leg, you can add width where you need it across the calf.
On the back leg, from the middle of the hem draw a line from the bottom to around the knee. At the top of this line, draw two diagonal lines to the side and inside leg seams. On the diagonal lines, mark the seam allowance. Cut from the end of the diagonal lines to just before the seam allowance. From the hem, cut up the vertical line, then cut up both diagonal lines, stopping just before the seam allowance marks. These will work as hinges.
Slide some paper underneath and spread the back leg to add the desired width to the leg. When you’re happy with the new width, stick the pattern piece down.
How do I adjust a saggy back leg?

Pin out the excess fabric in the back of your thigh from one side to the other. Identify where the excess fabric that you’ve pinned is situated on your pattern by measuring down the inner and outer leg seams. Draw a line between these two points on your pattern. Draw a second line starting a third of a way along this line and ending at the crotch seam.
Cut along the second line from the crotch to the first line, and then cut both ways along the first line, ending 15mm (5/8in) from the side seams.
Pivot and overlap the upper pieces over the lower leg by the amount that you pinned out of your toile. Tape or stick down. With a ruler or gentle hand, re-draw both legs and crotch seam to smooth them out.
How do I do a swayback adjustment?

If you have fabric pooling at the centre back waist, you may need to shorten the top of the centre back seam.
Measure down the centre back seam by the amount you want to reduce it by and mark it. Draw a smooth line from this mark to the top of the side seam. If your trouser pattern has a dart, close it to draw this line, and then ‘true’ the dart afterwards so it’s the correct shape.
And there you have it! Remember, a pair of trousers that you wear are infinitely more valuable to you than a pair that fit perfectly. Have fun with the process and feel proud of yourself!
Liked this post? Check out How to Bust Adjustments For a Bust Darted Bodice and Five Ways To Fix a Gaping Neckline.
********
Author: Nikki Hoar
Photography: Jane Looker
Model: Sinead Deckker
