28 January 2012

A Day in the Life of Fiona Douglas - Oh Sew Brixton

What's it like to run a stitching school? "And what does one wear when doing so?", you ask. Read this month's A Day in the Life and all will be revealed. Oh Sew Brixton holds a very special place in my heart because... well, if you haven't already guessed, I'll let you read to the end of Fiona's honest and hilarious account of her life as a sewing tutor to find out...

******


"Like I suspect many of the self-employed, my day starts with breakfast and a couple of hours on the email and doing general admin stuff. Before you know it, it is 11 o’clock and I am still in my dressing gown. I feel both pleased and guilty about this, pleased that I am my own boss and can get away with this and guilty for being so slovenly. Oh yes and as this is a sewing blog, I feel that the dressing gown deserves a special mention. It’s a Vogue pattern which I bought probably around 30 years ago. I have made it up in uncool but very comfy velour and worn it to destruction three times over.


Lunch is usually home made soup and a sandwich, I tend to eat it at home and then hit the studio some time in the afternoon. The studio is comfortable and feels like my second home, but I can’t be there all day, all night and all weekend too. Occasionally I will meet a friend for lunch - I really enjoy being ‘a lady who lunches’ as I work so much in the evenings.

Afternoons are usually more about sewing or planning classes. I have a beautiful, spacious, sunny studio which I am able to mess up completely in about half an hour flat. I realised very quickly that actual step-by-step samples work ten times better than handouts, but these are very time consuming to sew. I often get asked whether I make all my own clothes and my answer is that I don’t really have time any more and miss my hobby dreadfully.


We specialise in beginners dressmaking and our challenge is to get people new to sewing into a wearable dress in 6 sessions. Managing people’s different expectations and abilities, not to mention body shapes and fabric choices is really really difficult. Three years down the line, I think I’m doing pretty well, but I’m beginning to wonder about whether commercial patterns are the best way forward – they rarely fit that well and no-one except me can make head or tail of the instructions.

What am I working on at the moment? Still struggling to find a foolproof way of getting around those double G cups that keep on walking into my classes. I’ve about mastered the Palmer Pletch Full Bust Adjustment, but I’m not keen on the ‘tissue fitting’ stage (sellotaping the pattern together) as think this only works on a more relaxed fit. I’ve got a couple of software packages which are really interesting but I need to try them out on lots of different body shapes. And I’m saving up for a 3D body scanner – only £40,000 so I’m told!

Although I have sewn since the age of 12, before I set up Oh Sew Brixton I had a different career in marketing, specifically market research and strategic planning. I worked freelance for the last 15 years of this part of my life and also owned a couple of clothing shops (in Brixton and then Camden) which catered to my creative side. For my first year of trading at Oh Sew Brixton, I worked all day, all night and all weekend, I didn’t stop and I didn’t do anything else. My business background stood me in very good stead, but you also need a slightly obsessive compulsive personality to get a new business up and running. I didn’t set out to make a fortune from the school and it really isn’t possible to make more than a modest living, particularly with London rents.


Most of my students are professional women in their late 20s and early 30s, although I currently have an 11 year old in one of my classes and a 60 year old in another, so I remain true to my ‘everyone is welcome’ policy. Yes, the odd man passes through – they come often because they have something they want to make (usually something top secret made out of outdoor fabric), or have an interest in fashion, but my favourite student was an ‘occasional cross-dresser’ who was signed up by his wife. He was a little shy starting the class but when he confessed he was there to make dresses, his fellow students (bless them) all squealed with excitement!

What have I learned about myself? I have learned to rein back my naturally rather dry humour, encouragement and enthusiasm are much more productive, although ‘Do you really want to sew your armholes together?’ does very occasionally still pass my lips. Rather surprisingly, I have developed infinite amounts of patience. The point of teaching is to teach and if people don’t get it, it’s your fault for not explaining it clearly enough. So if you have to go over something three different ways, that’s absolutely fine. Lastly, I know I need to be Mrs Calm in all circumstances, as this is by far the best way to deal with high flying city bankers getting frustrated when all doesn’t go to plan.


If I’ve run an evening class, I drag myself across the road for the 5 minute bus journey back home. I eat something light and healthy for supper as I know I should, and then fill up on far too many biscuits. I have a HD recorder which means I can watch Home and Away at 10 o’clock at night which embarrassingly seems to be the perfect wind down viewing for me. I go to bed somewhere between 11pm and 12am, but know that I don’t have to use my alarm clock any more – one small advantage of my current lifestyle is that my earliest start is 10am and my studio is only 10 minutes away from my house.

Dressmaking is more difficult than people anticipate and not everyone gets it, or will make time for it in the future. But when you see that you have started someone on a hobby that will be with them for the rest of their life, it’s hugely satisfying. Oh and did I mention that I was the one who taught Tilly to sew?"

*****

Yes indeed, my friends - Oh Sew Brixton was the very place I first got behind a sewing machine... and miraculously ended up with a wearable dress! Err... and I was one of those students Fiona had to advise not to sew their armholes up...

21 January 2012

How Do You Store Your Vintage Sewing Patterns?


Where are your vintage sewing patterns right now? Are they carefully ordered and stored away in a box or filing system? Or are they out on display?

Why am I asking? Well, I've been doing a little reordering at home and was looking for some pictures to put up on a bare wall or two. It suddenly struck me that I LOVE ogling and swooning over my vintage sewing pattern collection, so why not put some of them up on my wall?

Eek! I can hear some of you gasping in shock! 

There seem to be two schools of thought on keeping vintage sewing patterns:


1) The Preservationists
These people cherish their vintage sewing patterns and look after them very carefully. They are precious historical artefacts, after all, often in a very delicate condition with paper that can be torn easily and images that are starting to fade. To preserve them for posterity, this camp keeps them in controlled conditions - acid-free envelopes and a covered storage container at the very least, dehumidifiers and treatment sprays for the more serious storage fiends. They sew with the patterns, yes, but trace a copy off first so they don't damage the original.

Image courtesy of A Beautiful Mess

2) The Users
These people cherish their vintage sewing patterns too, but would rather enjoy them now than keep them for posterity. In fact, it may not even have occurred to them to make an effort to look after their patterns... or maybe they have debated the issue at length and concluded that the patterns are there to be used. Their patterns are piled up on their sewing table, or even pinned up on their wall.


Of course I am totally stereotyping here, and you may not recognise yourself in either description, but the duality helped me think about how my attitude has started to shift recently from Preservationist to User. I would absolutely love to be able to pass on my vintage sewing pattern collection to a child or grandchild, but I'd also love to get as much pleasure out of them as I can myself (after all, the child or grandchild may not be interested!), and that means being able to see them every day. They bring me real aesthetic pleasure, plus having them on show may well inspire me to sew more. At the moment my patterns are stored in a covered box under my sewing table. But I plan to let them see the light of day - yay!


So now I've got to decide how best to display them, while also making sure I don't completely let them deteriorate. Initially I was thinking of framing them individually, but I'm not sure I want to separate the instructions and pattern pieces from the cover... hmm. Another idea is to get one of those wall-mountable perspex brochure holders that you see in hotels displaying leaflets for Viking museums and the like. That way I can flick through them when needed and keep my current favourites or next-to-sew at the front of the rack.

Knowing you lot, I'm sure you've got ideas and opinions on the matter. How do you keep your vintage sewing patterns? Are you a Preservationist, a User or something else entirely? Do you have any ideas for how I should display my patterns? If you've got any creative ideas or images of your own uniques storage or display system, do share!

[Soundtrack: 'I'd Rather Go Blind' by Etta James - RIP]

14 January 2012

What's On My Sewing Table... and a Tip for Slippery Fabric!


Pin It
I'm currently working on a third button-back blouse from my self-drafted pattern (the first was my lace refashion, the second my teal blouse). This version will have tucks on the yoke and simple bound neckline. I'm making it in a dreamy chocolate brown polka dot poly blend scored for about tuppence ha'penny from Walthamstow market. I found these gorgeous vintage pearl-effect buttons on a work trip to Nottingham (a girl's gotta take the occasional break!). I think they were about 30p a pack, whereas in London they would have been more like £30 a pack. It seems a shame to use them as they look so pretty on the card, but I have three sets of three buttons so should be able to keep one set intact. Do you feel the same dilemma about using your vintage notions?


Onto the aforementioned tip. Constructing the button stand on such a slippery fabric was proving a bit difficult, even having spray starched the fabric to death! Trying to press in two neat, straight, parallel folds is no mean feat. So I cut out a strip of card in the width of the button stand, folded the fabric round it and pressed it in place. Very easy and it turned out extremely neat!

What's on your sewing table?

[Soundtrack: 'Wild Honey' by The Beach Boys]

Pin It

PS. I know I'm a little late to the party, but is anyone else obsessed with Pinterest? Just experimenting with the "Pin It" buttons above - not quite sure the best way of using them in a blog post - anyone got any experience to share?

8 January 2012

Easy Sewing Projects for Beginners

Easy sewing projects for beginners - Tilly and the Buttons

You've got to grips with your sewing machine, and now you're itching to make something! What project should you choose to get started? There are so many sewing patterns out there, so how do you pick one that will start you off on your sewing journey without being overwhelming?

Here are my tips for choosing a sewing project that's nice and easy for beginners…

Update: We made a video to accompany this post - check it out on our YouTube channel now!

Easy sewing projects for beginners - Tilly and the Buttons
Jaimie pyjamas sewing pattern by Tilly and the Buttons

1) Start with simple construction

Ease yourself in gently with a project that doesn’t require tricky techniques or precision sewing. Look for straight lines and not too many pieces, and avoid details such as darts, gathering and pleating until you’ve got a few makes under your (homemade) belt. Start simple, and you can progress to the more complex projects later on.

Try these cute and easy-peasy projects to show you the basics of construction - the Dominique skirt, which is basically sewing straight lines, and the Jaimie pyjamas, which come together quickly and easily (plus there's a free video tutorial for sewing them from start to finish!).

6 January 2012

How to Stitch: Part 2

How to Stitch pt.2 - sewing straight lines, curves and corners - Tilly and the Buttons

I've shown you how to set up your sewing machine, thread it and start stitching. Now I'm going to take you through sewing straight lines, curved lines and corners.

How to Stitch pt.2 - sewing straight lines, curves and corners - Tilly and the Buttons

Stitching a straight line

Once you’ve got the hang of stitching willy-nilly, you’ll want to practise sewing in a straight line. To get started, try drawing a straight line directly onto a piece of cotton fabric. Use this line as a guide - take a bit of time getting used to controlling how the fabric goes through the machine, until you’re happy with your straight lines.

How to Stitch pt.2 - sewing straight lines, curves and corners - Tilly and the Buttons

Stitching a curved line

Once you’ve mastered stitching in a straight line, how about trying a curve or two? Draw a wavy line onto your fabric, keeping the bends of the curve nice and large for now (you can narrow them as your stitching gets more precise). Place the fabric onto your machine so the presser foot is lined up in the direction of the first bit of the curve.

How to Stitch pt.2 - sewing straight lines, curves and corners - Tilly and the Buttons

When you stitch, you’ll want to gently guide the fabric with your hands, keeping the presser foot lined up with the direction of the upcoming part of the curve. It helps to keep your eye on the part of the curve an inch or so in front of the needle, and keep that bit angled straight towards the needle. Go slow, taking as many pauses as you need to keep up with the twists and turns. It does take practice to get the hang of this, so have a few goes until your stitching line is following the drawn line.

How to Stitch pt.2 - sewing straight lines, curves and corners - Tilly and the Buttons

Turning corners

Draw a right angled corner onto your fabric to practise. Start machine stitching along one line until you reach the corner. You want the needle to be pushed down through the fabric right at the point of the corner, so you could use your hand wheel or needle up/down button to help you get to the exact point precisely.

How to Stitch pt.2 - sewing straight lines, curves and corners - Tilly and the Buttons

With the needle down, raise your presser foot so you can pivot the fabric so the next line to stitch is in front of you and pointing straight towards the needle.

How to Stitch pt.2 - sewing straight lines, curves and corners - Tilly and the Buttons

Lower your presser foot again and continue stitching the next line of the corner. Voila!

If you'd like some more help getting to grips with your machine, check out our online video workshop, Make Friends with a Sewing Machine.

5 January 2012

How to Stitch: Part 1

How to Stitch pt 1 - starting and finishing your stitching - Tilly and the Buttons

Set up your sewing machine? Check. Threaded it up? Check. Now comes the fun part - sewing!

Using a sewing machine for the first time can be a little daunting but just relax, take your time and have some fun with it. Practise stitching on some calico (unbleached cotton) or plain medium-weight cotton - basically you want something that’s cheap and not slippery. Pick out some brightly coloured thread that stands out against the fabric so you can monitor your stitches … and marvel at how your accuracy improves with practice!

2 January 2012

How to Set Up Your Sewing Machine


How to Set up Your Sewing Machine - Tilly and the Buttons


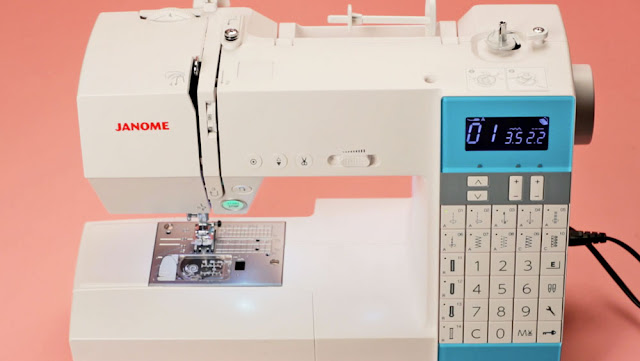
First time in front of a sewing machine? Sewn in the past but need a refresher? I'm going to walk you through the basic steps to set up your sewing machine - plugging it in, changing the needle and attaching the presser foot.

Machines vary, so some of the parts on my machine (a Janome DKS100) may be in different positions to yours, but nothing will be that different that you won't be able to work it out.

Ready to sew? Let's go!

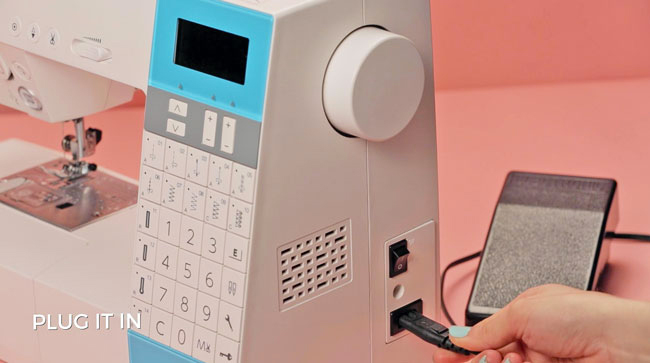
1) Plug it in!

How to Set up Your Sewing Machine - Tilly and the Buttons

Plug the cable into your machine and the power socket. Plug the pedal in too if it's on a separate lead. Position the pedal on the floor where you can comfortably reach it with your foot while seated.

(Note: You don't need to turn your machine on for any of the steps in this post - it's advisable to leave it off so you don't accidentally sew over your hand!)

2) Change the needle

How to Set up Your Sewing Machine - Tilly and the Buttons

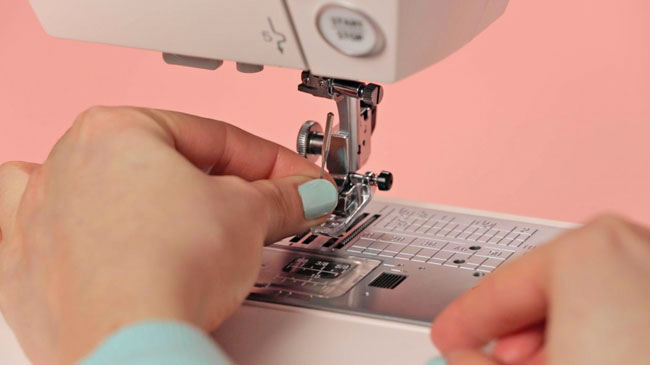
The needle may already be in place, in which case you can ignore this part if you like. But it's useful to know how to change it in case it snaps (eek!), if you want a different sized one (a thick one for thick material, a fine one for fine fabric, ballpoint for jersey...), or if you want to change to a fresh, sharp one every so often.

To remove the needle, twist the little knob to its right a couple of turns - this will loosen the needle so you can pull it out. You may need a small screw driver to do this.

To insert the needle, push it up into the hole and tighten the knob again. The top of the needle is rounded on the front side and flat on the back side so you should be able to tell which way to put it.

3) Attach the presser foot

How to Set up Your Sewing Machine - Tilly and the Buttons

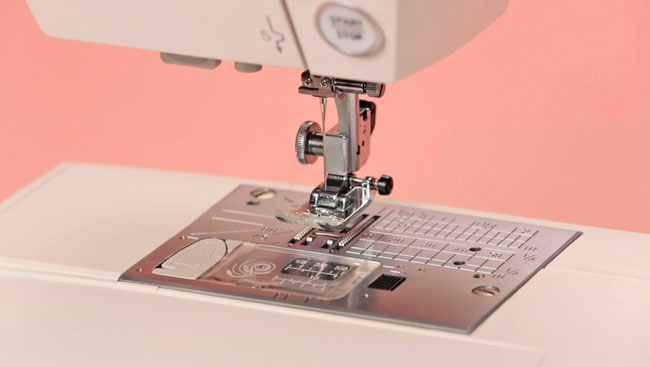
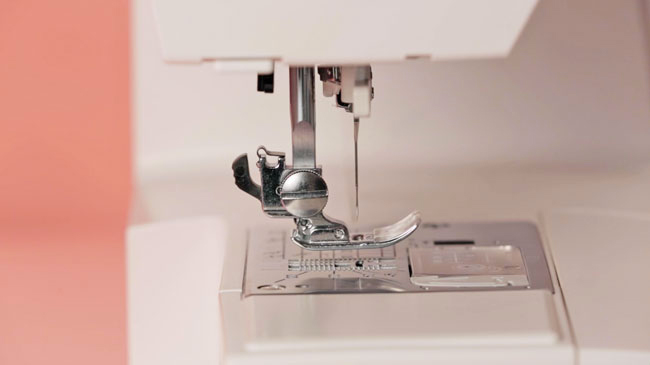
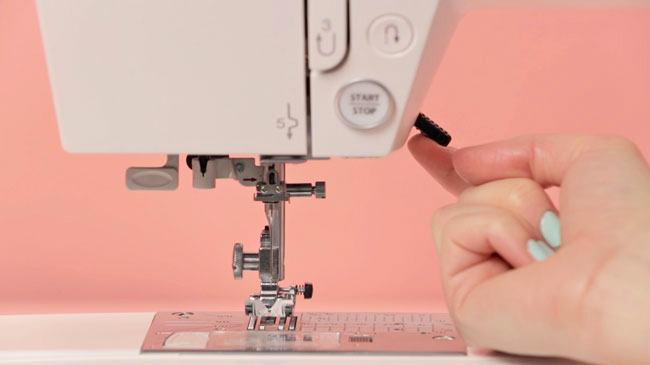
The presser foot is used to hold the fabric down and to guide the needle when stitching. You can get different kinds of feet designed for different stitches and notions, but you don't need to worry about that yet - a standard presser foot will get you far. The presser foot sits on the bottom of the bar behind the needle. There's a lever on the right which you can use to raise and lower it when you need to.

How to Set up Your Sewing Machine - Tilly and the Buttons

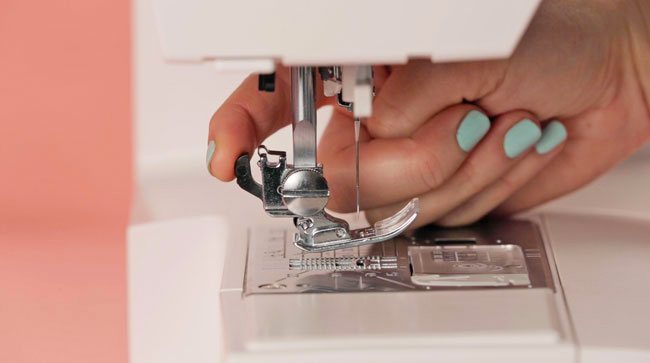
Some feet are attached with screws. My machine is a "snap on". To remove it, raise the bar using the lever on the right, then press the little lever or button at the back of the presser foot (or unscrew it) and it'll drop right off.

How to Set up Your Sewing Machine - Tilly and the Buttons

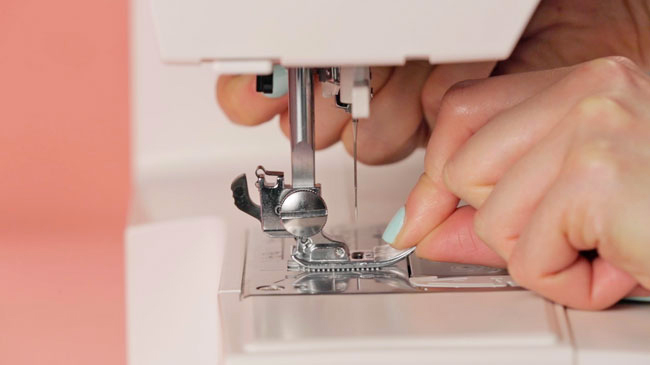
To put the presser foot back on, again you'll want the foot raised to start. Can you see there's a little bar on top of the presser foot? You want to position this bar directly underneath the little claw on the bar - take a look on the left-hand side if you can't see it from the front. Gently lower the presser foot as you shuffle it into the right position - it can take a few goes the first time you do this! Once it's clicked into place, you can raise the presser foot up again.

And now you're ready to thread your machine!

If you'd like some more help getting to grips with your machine, check out our online video workshop, Make Friends with a Sewing Machine.

1 January 2012

Learn to Sew: Introduction


Happily, more and more people are becoming interested in sewing. Sewing machine sales are at an all time high, craft cafes are popping up all over, DIY culture is on the rise. The number of blank or bemused looks I get when I say that I make my own clothes is diminishing. The number of friends asking me to show them how to sew is increasing. Yay!

Introducing Learn to Sew, a series of free online tutorials guiding you through the basics of sewing, from setting up your machine, to understanding sewing patterns, and finishing your seams. You’ll soon be on your way to DIY dressmaking heaven!

Of course, we all learn in different ways and online tutorials aren’t for everyone. There’s a lot to be said for face-to-face classes where you have access to instant feedback and a tutor on hand to get you out of any messes. In London at least there is a choice of sewing classes available at fashion colleges, sewing cafes and specialist schools, ranging in price from about £50 to £400. But not everyone has a class nearby and some people prefer to learn from home. Not everyone can afford the fees of attending a sewing school, and some may want to test the waters at home before making a commitment. Others may have sewn years ago and just need a refresher. And some people are self-starters who like to master new things themselves. For these people, I hope you’ll find these posts helpful.

I’ve aimed to make the tutorials easy-to-follow and encouraging, with step-by-step instructions and annotated photographs. No overly detailed or pedantic directions, although I do like to explain why you may choose to do something in a particular way. I’ve reached the point where I have a wealth of knowledge and passion to share, but not so much experience that I’ve forgotten what it’s like to be a beginner! I understand the potential pitfalls and frustrations of trying to get your head round something totally new, I won’t take any pre-existing knowledge for granted, I won’t expect you to understand the jargon, and I can tell you which entry level mistakes to watch out, as I still clearly remember making those mistakes myself! (Sewing up your armholes, anyone?)

My philosophy is that sewing can be as easy or as complicated as you want it to be. It doesn’t take too much skill or experience to make something lovely – just a few hours’ practice and you can whip up wonders. There’s always more to learn so you’ll never get bored. And it doesn’t have to turn out perfect – you made it yourself! Give it a go, learn at your own pace and make your own decision about what level of challenge you’re ready to tackle.

Let’s get the world stitching!

Read more Learn to Sew...

Wanna share? Grab a button!

250px

200px

[Post updated Jan 2013]