27 June 2014

Now Hiring!


Do you want to work with me in building Tilly and the Buttons? Do you know someone who would? My business has grown way beyond the capacity of one person and I’m looking to hire someone amazing to work with me part time.

This is a sales, shipping and customer support role - here's the job description. The main purpose of the post is to service new and existing customers’ needs and make them happy in the process. I need someone who is professional, friendly, organised, reliable, accurate, proactive, with a sense of humour and enjoyment in work - basically a superstar! It may not be glamorous, but it sure is fun and rewarding.

The post, based in South London, is for 2 – 2.5 days per week, to be spread over 3 days per week with flexible hours to be discussed.

If you think you’d be amazing at this job, or if you know someone else who would love to do it, you can take a look at the full job description. Please read through thoroughly before asking any questions ☺

This is an exciting time for the business, taking on the first employee to work alongside me and a small group of freelancers and suppliers. I’m really looking forward to working in a team so together we can do more to help spread the sewing bug!

24 June 2014

Stripes and the Sea: The History of the Breton Top


Do you love Breton tops as much as I do? Is your wardrobe brimming with Coco tops? I thought it'd be interesting to learn more about how the enduring fashion for the gorgeous striped staple emerged, so I asked my friend Amber Butchart, fashion historian and author, to write a guest post for us on their history. Amber has just finished writing her second book all about Nautical Chic, which comes out next year. Can. Not. Wait. [Update: It's out now!] In the meantime, lucky us, we get to read an abridged version of the section on stripes before anyone else...

******

"The relationship between stripes and the sea goes back a very long time. The striped top - what we know today as a Breton - has become a marker of effortless chic, but it started off life as a humble fishing shirt, an extra knitted layer that provided much needed warmth.

'Bateau pecheur', fishing boats off Naples, 1840, from the National Maritime Museum

Stripes were popular among mariners as they were highly visible if a man were to fall over board. 18th century seamen wore vertically striped trousers, and Nelson even had a pair of striped stockings in 1797 (below left). They weren’t even regulation uniform! But they fed into the fads for striped hose that had been in and out of favour for men of fashion since the 17th century. Thanks to breeches, men’s legs were on display at this time and just begging to be decorated.

Nelson’s stockings at the National Maritime Museum (left) + American stockings, c.1850 at the Met Museum (right)

Throughout the 19th century many technological innovations were made that meant knitting stripes in the round was easier than ever before. These stockings (above right) from the Met Museum are one of my favourite examples.


The link between stripes and the sea was cemented when the striped undershirt became part of the official French naval uniform in 1858. The uniform regulations for the ‘tricot rayé’ were meticulous, listing the exact number of stripes that could appear on the body and sleeves.

Swimmers in Denmark, c.1900 found at Photo History Sussex. Many more can be found on their Brighton Swimming Club page

By the end of the century stripes were a popular choice for swimwear (which was also knitted) along the coasts of Europe - no matter how cold!

If you search the internet, many histories of the nautical striped top will tell you that it first crossed into fashion via Chanel. However, this isn’t entirely true. Some of the very first clothing items that she made way back in 1913 were based on the clothes of local fisherman, but it didn’t include the striped top. For that, we have an American couple to thank called Gerald and Sara Murphy, 10 years later in 1923.

Gerald and Sara Murphy at Cap D'Antibes (left) + Zelda and F. Scott Fitzgerald, who in a genius move teamed his striped top with plus fours (right)

The Murphys had first visited the French Riviera the year before, as guests of Cole Porter. They liked it so much that they came back the following year and set up home. In doing this they started a summer ‘season’ (previously society had only visited during the winter months) and alongside that came the vogue for suntanning. Sara Murphy’s predilection for pearls at the beach foreshadowed Chanel. In 1923 Gerald took a trip to Marseille to get supplies for his boat, and returned with striped tops from the marine shop for himself and his guests. His guests variously included artists, writers and trendsetters such as Man Ray, Dorothy Parker, Stravinsky, Ernest Hemingway, Picasso, and Zelda and F. Scott Fitzgerald.

The popularity of the striped top spread like wildfire. Chanel herself was photographed wearing one the following year at a rehearsal of a Ballets Russes production, and by the end of the decade she proceeded to build her own Riviera home, La Pausa.


Nouvelle Vague: Jean Seberg

From Picasso to Andy Warhol, Brigitte Bardot, Anna Karina, Joan Baez, Patti Smith, The Ramones and Kurt Cobain, nautical stripes have an enduring appeal fuelled by their links to both French elegance and countercultural cool. Far from its beginnings as occupational clothing, today the top is a chic classic worn by everyone from rock stars to fashion editors.


Jean Paul Gaultier photographed by Pierre et Gilles in 1990

You can get traditional French marinières to this day from the following places: Saint James, who were founded in 1850 as a wool spinning and dyeing plant in Normandy. Armor Lux who originated in Brittany in 1938, or Orcival, founded the following year in Paris who even outfitted the French navy. For an updated version, try Petit Bateau who started life as a hosiery factory in the traditional textile centre of Troyes in 1893, and are now a complete lifestyle brand. (Even better, dear readers, make your own! - Ed.) For a high fashion take, Sonia Rykiel and Jean Paul Gaultier have made the marinière their own in a playful celebration of the kitschier side of this eternal marker of Gallic chic. For more, see the current Jean Paul Gaultier exhibition at the Barbican, and hear me talking on the app!

And for the full story, make sure to get a copy of my Nautical Chic book, out next spring (2015) published by Thames & Hudson in the UK, and by Abrams in the States. Anchors Aweigh!"

Author: Amber Butchart

20 June 2014

More of My Favourite 1970s Sewing Patterns (part 2)


Here are a few more of my favourite 1970s sewing patterns from my collection. The last pattern is the one I used to make this dress. I still wear it quite regularly so should probably make another one, probably in viscose this time rather than the double gauze I used for the first version. The top is quite cute as well, non? Sigh... so many lovely patterns, not enough time!

Do you have a favourite era for vintage sewing patterns?

[Soundtrack: 'Right Place Wrong Time' by Dr John]

17 June 2014

Photographing Your Sewing Projects


More and more of us are sharing photos of what we’ve made online. Maybe you write a blog, or are active on Instagram or Pinterest. Maybe you occasionally submit pictures to a sewing group on Flickr, a contest on a website or a sewing social on Twitter. However you choose to go about it, taking and publishing photos of the things you’ve made is a great way of not only documenting your progress but also keeping you motivated to make stuff. Plus, by adding to the online pool of sewing eye candy, you’re inspiring other people to get creative too!

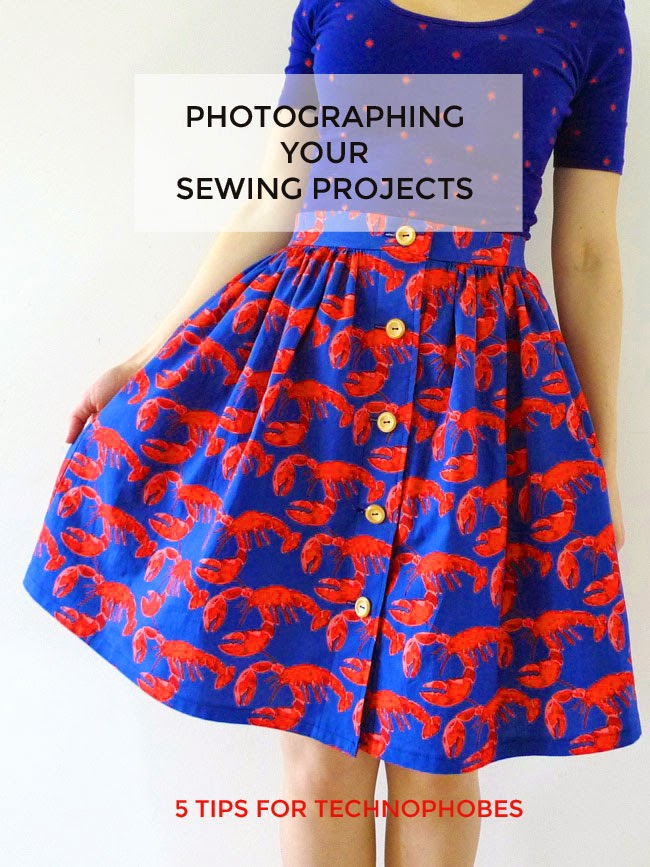
Today I thought I’d share some hints and tips on taking photos of your homemade clothes. Now, first off, a disclaimer. I don’t consider myself a particularly good photographer from a technical point of view. I love my camera (a Panasonic Lumix), but it's pretty much always set to the auto function. My brain begins to snooze at the mention of ISO levels and aperture f-stops. Yet despite my embarrassing lack of technical photography skills, I do feel that the photos I’ve published of my makes have improved over the years I’ve been blogging as I’ve picked up or worked out certain – simple, non-techy – tricks. So if you haven’t read your camera manual either (zzz…), these tips are for you. The kind of habits that anyone can put into practice that will make a world of difference to the photos you take of your sewing projects.


1) Choose your background

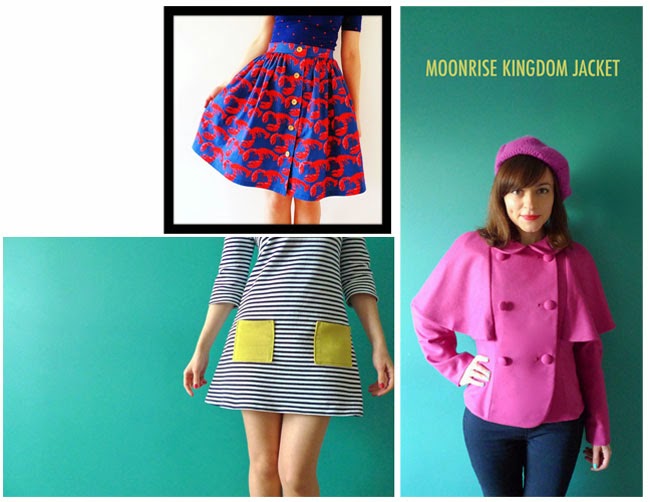
The background that you choose – or create – for your photos is super important to ensure that the star of the show – your finished garment – is showcased in its full glory. Busy or messy backgrounds can distract the viewer from what you really want them to look at – your lovely homemade outfit.

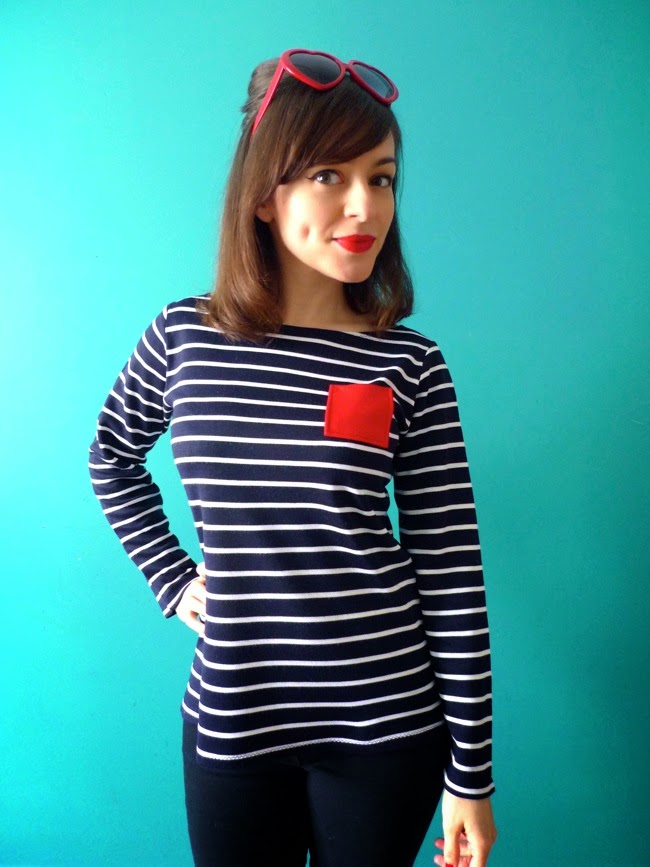
I like to photograph my makes against a plain wall. Sometimes it’s white, occasionally it’s slate grey, and a lot of the time it’s a gorgeous teal colour that complements the fabric and makes the finished photo pop.

Now, you may be thinking, “But I don’t have a massive house with a huge blank wall!” Nor do I. I live in a flat that’s full of stuff. That teal wall? It’s in my kitchen, usually with a table in front of it and pictures hanging on the wall. When I take my blog photos, I move everything out of the way to create a nice blank canvas. I also remove any little distractions, such as wires in the corner of the frame, which can draw the eye away from the garment.

It really is worth the effort of tidying up to ensure that the viewer is looking at your gorgeous homemade dress rather than the pile of washing in the corner.


2) Make the most of natural light

Lighting can make the world of difference to a photograph, but you don’t need to invest in a load of fancy kit. Harness the natural light of the sun to make your photos look gorgeous. Whether you’re photographing indoors or outdoors, get to know the times of day when there is enough light to take a decent shot but not so much that it creates harsh shadows.

I photograph the vast majority of my makes indoors and know that the best time to take pictures in my home is mid-morning. Yep, it’s a bit inconvenient if I’ve finished sewing in the afternoon or evening and am desperate to write up a blog post straight away, but it’s definitely worth the wait to get decent light.

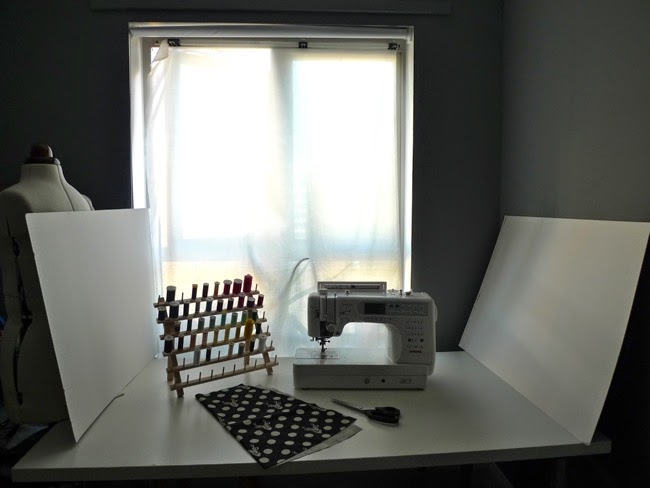
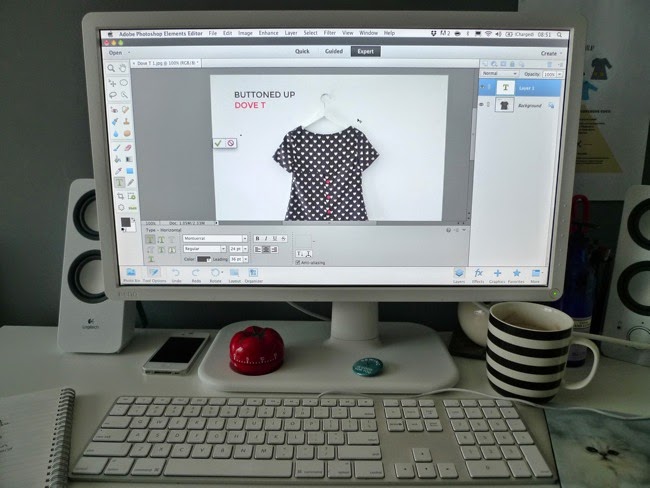
Sometimes I’ll use bulldog clips to hang a length of white cotton fabric over the window to soften harsh shadows. If I’m taking an “in progress” shot of my sewing on the table, or focusing on a small detail, I prop up larges piece of white card around the subject of the photo and hold another one against my body to bounce light into the area I want to shoot. This is a tip I learned from the designer who took the step photos in my book.

In the illustration above you can see that my office has dark walls and glaring light, yet the white card trick will make the finished photo (of what's on the table) look just the right amount of bright and lovely. Easy to do, and I can see an immediate difference in the quality of the image.


3) Strike a pose

This is the bit that makes a lot of people feel awkward – modelling your garments. Me too. But just find what works for you and get into it.

Embarrassed to have someone else take your photo? Get a tripod and take your own with your camera on self-timer – that’s what I do. Feel awkward? Put some music on that suits the mood you want in your photos and have a little disco. Music will animate your facial expressions! Don’t know how to pose? Play around with different positions and go with whatever makes you feel comfortable. You could also try holding a prop, such as a book or bunch of flowers, if that makes you feel more… erm… useful?!

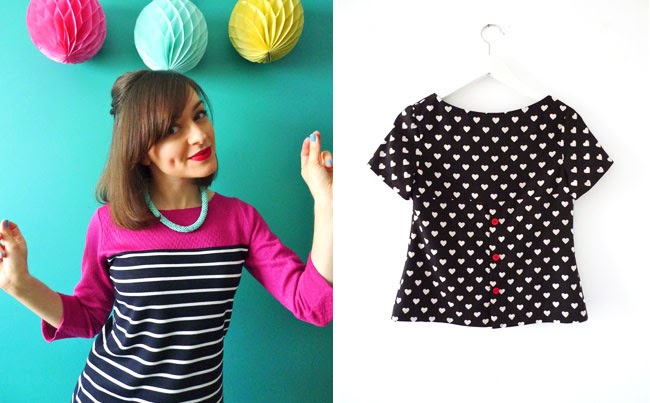
If you reeeeally hate having your photo taken, you can always just hang the garment on the wall or on a dress form. Personally I think these kinds of shots can look really cute.


4) Decide the shape and size

Where do you plan to share your photos? The answer to this question should inform what shape to make them.

If you’re posting to your blog, you may choose to shoot mostly landscape format photos, or a combination of portrait and landscape. If you’re sharing pictures on Instagram, they will be cropped to a square shape so think about that when you choose how to frame the image. Twitter tends to crop photos somewhere around the middle when they show up in a feed, so I like to use landscape or square images here.

As for Pinterest, the optimum platform for sharing gorgeous pictures of your homemade clothes IMHO, portrait photos work best. Pinterest displays photos at a fixed width but any length, so landscape pictures will get lost in the ocean of images. If you really want your picture to stand out, make it loooong.

The size that you store your pictures in is also something to think about. If you write a blog, keeping your photos a consistent width can make your site look more professional. Large enough that you can see the details of a garment properly, but not so large a file size that they take forever to load. If you’re only sharing on Twitter, Instagram etc, smaller photos are fine – as long as you can clearly see the garment. If you’re hoping to get some press attention, it’s worth storing some high res versions of your best shots so they can be printed upon request.


5) Finishing touches

Before you publish your beautiful photos, it’s worth taking a few minutes to tweak them in an editing programme. I’m not advocating airbrushing your body here, but there’s no harm in retouching anything that looks out of place or distracting.

For example, remember I said I take the pictures down from the kitchen wall before I take my photos? The nails that the pictures usually hang from get left behind, so I take a couple of seconds to retouch these random blobs out of the image, along with any random smudges on the walls (I’m not the only person with random smudges on my walls, am I?).

You can also use an editing programme to brighten your photos, adjust the colours or even add text. I use a combination of iPhoto and Photoshop Elements, which is a cheap-and-simple version of Photoshop for people like me who wouldn’t know how to get the most out of the whole (more expensive) programme. You could also try using a free online site such as PicMonkey for collages and adding text, although I find that it compromises the quality of the image.

I've promised myself that this Summer I will finally finish the Craftsy photography class that I'm half way through (which is great, by the way) and maybe even take a face-to-face photography workshop or one-to-one (any recommendations?). But, let's face it, I probably won't get round to reading my camera manual anytime soon. In the meantime, these tricks are helping me out and I hope you find them useful too.

Do you have non-techy photography tips of your own to share?

13 June 2014

My Favourite 1970s Sewing Patterns (part 1)


Ever since I started sewing I've been collecting vintage sewing patterns. My favourite guilty pleasure way to chillax on a Sunday night (if I'm not working) is to lie on the sofa with my laptop, browsing eBay for sewing gems of yore. In the last few years, my pattern collection has become dominated by the 1970s. I'm not sure exactly what it is about 1970s style that so appeals, but I just can't get enough of A-line denim skirts, clogs, casual blousey dresses and big bows. And oh those illustrations...

Here are a few favourites from my collection...


You might recognise this last one as the pattern I used for my Udon Dress.

Which is your favourite, please?

10 June 2014

Your Makes!

One of the most exciting parts of designing sewing patterns... no, wait... THE most exciting part of designing sewing patterns is seeing what you guys make with them! I'm oohing and ahhing multiple times a day (behave) as tweets, comments and emails pop up on the internets with your amazing creations. It's so great to see how you interpret a pattern and make it your own, whether it's simply through the choice of fabric or a clever design touch that you've added. Here are a few recent highlights...


The Mimi blouse pattern seems to be going down particularly well amongst Love at First Stitch readers. Lauren made this pretty version in mustard yellow bird print lawn, while Zoe added a contrast yoke and piping to hers. I love them!


Indulge me here, because I couldn't resist showing you one more Mimi blouse - Marilla drew a hand print onto hers. Isn't it just stunning? This totally blew me away. And Marie made her second Lilou dress, this time in a floaty viscose, which looks totally different to her first version in a more structured fabric. So pretty.


Luana made two short sleeved versions of the Coco dress for Summer - take a look at her gorgeous sixties style houndstooth print Coco too. Stevie looks stunning in her emerald green Coco dress - such an incredible colour. And Jeanne's Maritime Coco is just perfection... I want!


Louise made the Mathilde blouse in a gorgeous stripy fabric - she's wearing it here as a beach cover up! Take a look at her blog to see the amazing silver nautical knot buttons down the back. And how cute is Teri's Mathilde blouse hack? She shortened the sleeves and added a peplum. I'm very tempted to copy this!


Zoe - seen here with mini model Dolores - shared a tutorial for how to hack the Coco pattern for breastfeeding. Great minds obviously think alike, as Kaili sent me a photo of her own nursing Coco dress the same week!


A few more from Love at First Stitch... How awesome is Heather's panda print Megan dress? I mean, it's a PANDA PRINT Megan dress! Ooh and a lady called Megan made the Megan dress too - she looks so pretty in it. Ruth made the Clémence skirt in this summery seersucker - I love how she cut the waistband on the bias so the stripes (checks?) are diagonal.


Johanna made this pretty Miette skirt to go with her Miette cardigan for a full on Miette fest! And one of the ladies at the Spool Fabric shop made this gorgeous version out of indigo denim - swoooon...


Jane made her second Delphine skirt in Liberty twill - just gorgeous! And Debi looks beautiful in her two-tone Lilou dress - love these colours.

There are plenty more pics in the maker galleries on Pinterest - Love At First Stitch, Coco, Miette and Mathilde. Go take a look!

If you've made something from one of my patterns and would like it featured on the maker gallery, you can:
  • tweet me
  • leave a comment on a blog post or page about that pattern (your comment may not show up immediately as I monitor comments on old posts for spam, but I'll get to it!)
  • email lookwhatImade@... (my web URL)
Unfortunately I can't pin from Instagram (unless anyone knows a way of getting round this?). And not all images work well on Pinterest or my blog - large, bright, focused photos are bestest!


By the way, thanks for all the bag-and-badge set orders I've had to do TWO emergency restock operations to meet the demand! A batch of orders went out yesterday and another load will go out today. Remember you've got until Thursday 4pm GMT to get in any bag, book or pattern orders before I take a few days' business break (any orders placed after then will go out on 24th June).

Keep your maker gallery submissions coming in, you talented lot!

[Soundtrack: 'Why Can't We Be Friends?' by War]

6 June 2014

Bags and Badges Are in the Shop!


You asked for it, and your wish is my command... 'Dress Handmade' canvas bags and 'Sewing Is Good For You' badges are now available from my shop!

These goodies went down a treat at Makegood and, when I instagrammed them a few days ago, lots of you asked if you could buy them. Well now you can! Perfect for sewing lovers who want to proclaim their passion to the world, they come as a set which comprises:


1) 'Dress Handmade' Fair Trade canvas bag

A lovely quality, strong, sturdy and spacious bag, made from 100% cotton canvas, with long webbing handles that won't cut into your shoulders. The bag is made from a sustainable crop in a Fair Trade registered factory in India and screen printed in the UK using water-based ink.


2) A pair of badges in two designs

One design says 'Sewing is Good for You', the second design is a lucky dip out of 'DIY Dressmaker' or a bold scissors logo (sorry, I just don't have the resources to take specific badge requests at the moment).

The set is £10 and you can get it in the shop right now!


Also, just to let you know that I'm going to take a week off blogging and business from 14th - 23rd June. It's been a pretty wild year, with very little down time, so I just need to lie down for a bit and catch my breath (and maybe have a cheeky cocktail or two). I'll schedule some blog posts to go up during that week, and the shop will still be open, but any orders received after 4pm GMT on 12th June will be sent out on 24th June. So if you want to get your hands on a bag, order soon :)

Bon weekend, tout le monde!

[Soundtrack: 'I'm Coming Out' by Diana Ross]

4 June 2014

Me-Made-May Madness


Woah! May was INTENSE. In a good way. No wait, in an AMAZING way! From the launch of my book to Blogtacular and Makegood, it's been a crazy ride.

And thanks to Me-Made-May, I've documented what I was wearing throughout the best month ever! Me-Made-May, the brainchild of Zoe, is an online challenge whereby stitchers wear handmade throughout the month of May and, if they so choose, document each day. It's a great way of encouraging yourself to wear more of your makes, or simply to figure out whether the things you're sewing translate into everyday life. The project has been going for a few years now and I've definitely seen an increase in the number of wearable self-stitched items in my wardrobe (and fewer fancy dresses) as a result. Me-Made-May even got featured in the Guardian this year, thanks to sewing blogger-journalist Elena Cresci!

If you follow me on Instagram, you will have already seen this, but here's a recap. This month I wore, from left to right:
Row 1: Coco funnel neck + Brigitte scarf / Udon Dress / Scallop-pocket Miette skirt / Nautical Delphine skirt
Row 2: Sixties Coco top / Nautical knit dress / Megan dress / Mimi blouse + Brigitte scarf
Row 3: Colour block Coco top + Delphine skirt / Coco dress / Margot PJs / Ikat Tova blouse
Row 4: Dazzlingly Red Beignet skirt + Bow Belt + Brigitte scarf / Mathilde blouse / Chambray Clemence skirt / Colour block Coco dress
Row 5: Red linen Miette skirt / 1970s dress for Summer / Liberty Mathilde blouse hack / Scallop-pocket Miette skirt
Row 6: Denim Delphine skirt / Mimi blouse + Nautical Delphine skirt / Pussy bow blouse + Yellow Delphine skirt / Coco dress
Row 7: Lobster Picnic Blanket Skirt / Mathilde blouse / Colour block Coco top / Coco funnel neck + Brigitte scarf
Row 8: Colour block Coco top + Delphine skirt / Nautical Delphine skirt / Colour block Coco dress

Looking at these pics make me realise just how much I wear the Coco top/dress and Delphine skirt. I was just about to type that the nautical Delphine skirt (the one with the buttons) is my favourite make of all time, but then I remembered my Sixties Coco top. And my Coco dresses... sigh... Well, at least I know what I like! The other thing I realised during MMM is that I don't have any handmade jeans. I've been wearing jeans a lot recently as I spent three weeks taking huge deliveries to and shipping mammoth orders from the third floor while the lift was broken (ouch) and then another week shlepping stuff in and out of Makegood. Have you made your own skinny jeans? Do you have a favourite pattern?

Here are a few highlights from May:


So in early May, my book came out. Of course I always hoped that you liked it, but I never imagined such an incredible response. Thank you SO much to everyone who has written a review on Amazon, sent me a lovely email or helped spread the word about the book online. I really really appreciate it. You guys are the best! In fact, I talk about Me-Made-May in this section shown above on Dressing Handmade.


The night before the book was released, we had a little party with the publishers, people who worked on the book, family and friends at Drink Shop Do. Here I am with Me-Made-May Queen Zoe; Lilou dress twinsies Marie and Quadrille Craft commissioning editor Lisa; "on brand" tableware and a cocktail called The Dressmaker. Yum.

Photos by Will Ireland, with thanks to Mollie Makes
The day after the release, I headed to the Royal Institution for Blogtacular, a fantastic new conference for creative bloggers. I was there to give a talk about turning your blog into a book, and also took the opportunity to be inspired by the other speakers (kicking off with a keynote from Joy Cho from Oh Joy) and met lots of awesome people. Coco came out to play. Accessorised with a Madonna headset. I love conferences. I always leave with a stack of ideas and a huge sense of motivation.


A few days after Blogtacular, Lauren hosted a launch party at Guthrie and Ghani for Love at First Stitch. It was so much fun meeting all the people who came along. Jenni from GBSB 2 came! It was her birthday! We had matching outfits! We made her kneel down on the floor for photos to make us look less munchkin-like. I think it worked...


And then came Makegood! The festival of creative businesses at the Old Selfridges Hotel was... amazing. It was crazy busy at times, I met so many lovely blog readers who came along to say hi, and was so overwhelmed by all the wonderful things people had to say about the concept of making user-friendly sewing guides for the new wave of modern makers. Even people who never thought about sewing were really enthusiastic about it, which was so encouraging. There was one disappointment - I was meant to be in conversation with Cath Kidston on the Friday, but right at the last minute Cath had to leave because she was poorly. It was such a shame that we didn't get to hear her speak, and I know that no one was as upset about it as Cath herself - she was such a trooper, I can't believe she even turned up in the first place! Fingers crossed we'll be able to do something else in the future - of course you'll be the first to hear if we do. Apart from feeling bad for Cath, the rest of the event was amazing. From my own point of view it was a real confidence boost to see my business out in the world and to receive such positive feedback. I also felt so proud of all the other creative businesses who were also showcasing at the event - I've followed their progress for months now, so it was fantastic to see how far we've all come in that time. 


The book and patterns went down really well, as did the brand new 'Dress Handmade' Fairtrade canvas bags and the 'Sewing is Good for You' badges. Here they are modelled by School for Creative Startups course leader and former Dragon's Den star Doug Richard; Bake Off's Frances Quinn; Lauren Guthrie; and none other than Santa. Lots of you have been asking if you can buy the bags - I'm definitely going to put them in the shop soon, so watch this space...


Frances was such a babe - she baked button biscuits for the occasion and took this super cute photo! I've had a massive girl crush on Frances since watching the first episode of Bake Off and it was cemented by meeting her in public - she's the bestest.

Well, I'm exhausted just looking at my month, and I haven't even told you about all the envelope stuffing and post office-going that took place (unsurprisingly there are no photos from those parts of the month), so I'm off for a lie down. Ciao for now!

[Soundtrack: 'Have It All' by Pharell Williams]