30 September 2014

Your Makes!

When my own sewing is going slowwwly (Deer & Doe Bruyere coming soooon...), I love to live vicariously through other people! Here are a few of the gorgeous garments you've been creating recently...


A-line skirts are on trend right now apparently. And these ladies are rocking their homemade Delphines (the pattern included in Love at First Stitch). I love the button placement that Helen went with for her chic and classic version - WANT! Ela made a little fabric belt to go with hers - how cute is that?


Amy made this stunner of a Lilou dress (also from Love at First Stitch) to wear to Bestival music festival. The fabric is incredible! I wouldn't have thought to make the scallop neckline in a geometric print, but the contrast of bold design and softer lines really works. Shauni's on a roll with her sewing, and I love everything about her Mimi blouse, especially the way she's styled it.


It's starting to turn Autumnal in London, and I'm dreaming of making some snuggly funnel neck Coco dresses. These ones by Shannon and El are so lovely - chic and wearable is a win.


Rachel made two beautiful versions of the Mathilde blouse - the original design in this butterfly print fabric, and a short sleeved version in chambray.


In other butterfly news, the Clueless Seamstress doesn't seem so clueless in her pretty Megan dress (pattern here). And did you see this combo stitched by Fiona? She made a Miette skirt as a cover up for her By Hand London Holly playsuit. Adorbs!


Coco tops ahoy! Sometimes all you need is a speedy make and a casual fit top to make you smile. Here's Winnie modelling her nautical Coco top in Cornwall. Janet found this amazing camera print for her Coco - here's a how-to on making a contrast yoke version.

Loads more lovely sews to swoon over in the Maker Galleries on Pinterest. If you've made something with a T&TB pattern that you want to see up there, just tweet me a pic or send us a link through this page. Occasionally I see something flash by in my Instagram notifications but unfortunately they often disappear before I've had a chance to look properly and I can't Pin from Instagram, but do know that I'm looking and loving!

26 September 2014

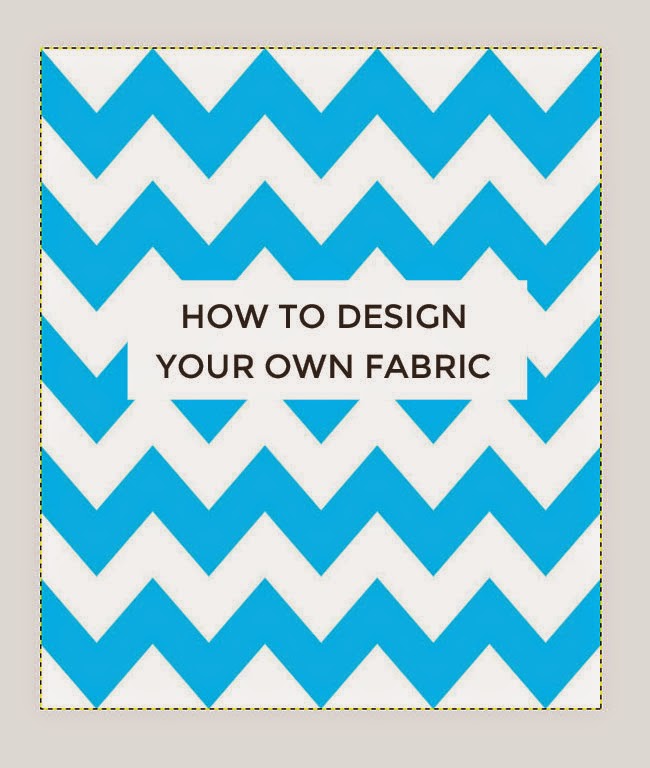
How to Design Your Own Fabric


Have you ever struggled to find the perfect fabric? Do you fancy personalising your sewing projects with fabric you've designed yourself? I know I do, but the world of fabric design can seem like a big - daunting - subject. The closest I've come so far was getting a banner made by bespoke fabric printer Woven Monkey for my stand at Makegood earlier this year. I was so impressed by the quality of both the printing and the fabric, and started chatting to Ed from Woven Monkey about how to get into fabric design. It turns out that getting started isn't as difficult as I imagined, so I asked him to share some tips with us on how to go about it. Over to Ed...

******

"Hi everyone, this is Ed from Woven Monkey. I’m going to share a tutorial on how to create a chevron design using free GIMP software. But first, here are a few simple tips which will help you to start creating your own amazing and completely unique designs...

1) Use a photo editor
There are several different ways to create your artwork. Some people prefer to draw or paint their designs before scanning them. Others photograph their work. If you decide to use any of these methods then we’d advise you to upload your artwork to a photo editor first - sites such as PicMonkey allow you to make any necessary alterations to your design before it’s printed.


2) Be aware of the "repeat"
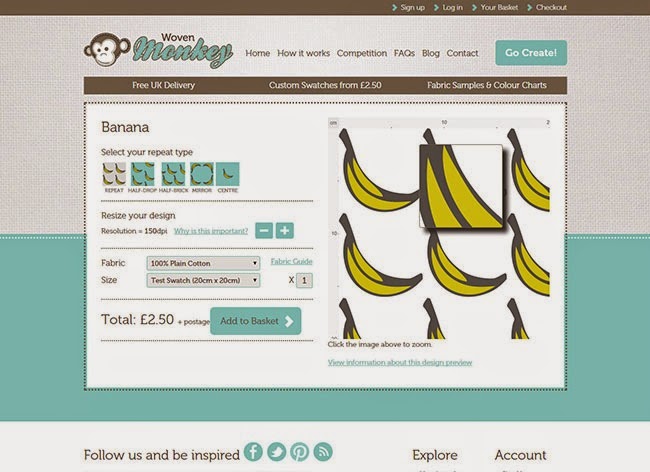
Most people who design their own fabric want to create a repeatable pattern, so at Woven Monkey we have five different repeat options to choose from on our site. It's easy to overlook tiny imperfections in your artwork, such as unintended white lines or borders, but these will also be repeated if you don't remove them first. Therefore it’s important to check for this by making use of the zoom tool in your design software. We also have a zoom function on our site in the design preview which you can use to examine your image in detail.

3) Order a test swatch
There will always be variations between the appearance of colours on a computer screen and how they actually look when printed onto fabric. So it's a good idea to order a test swatch of the fabric so you can see how the print and colours will appear in your artwork before committing to the final order. You may also find it useful to buy one of our colour charts. Hex codes (reference codes for RGB colours) are displayed on the charts which can be inputted into whichever design software you use. This way you will already know how colours will appear before you receive your fabric.


4) Set the correct dots per inch (DPI)
Dots per inch (DPI) is a measurement for image resolution. Put simply, the higher the DPI, the sharper the image. When you begin creating your artwork in a design package you will be asked to set this. To ensure the quality of any artwork printed with us we automatically select a DPI of 150 for any image uploaded to Woven Monkey. Therefore it’s important that you set the DPI to at least this amount before you start, otherwise your design will be printed to a different size than you intended. Don’t worry if you’ve created an image which is greater than 150, as you can make adjustments to the DPI on our site.

5) Preview your design
Our preview tool is a great way to check your design before committing to an order. Essentially, this is a mock up of how your image will appear on the fabric, thus enabling you to deal with any issues with the repeat (as previously mentioned). You can also use the rulers at this stage to make sure that the image is at the correct size. Using the preview should prevent mistakes occurring in your final design.

How to create a simple chevron pattern using GIMP


If this has tempted you to have a go at designing your own pattern, here's a tutorial to get you started...

I am using GIMP, free software which you can download here. Alternatively you could use Adobe Photoshop or Illustrator if you already have them, or Inkscape is another free download.

1) Choose the correct size


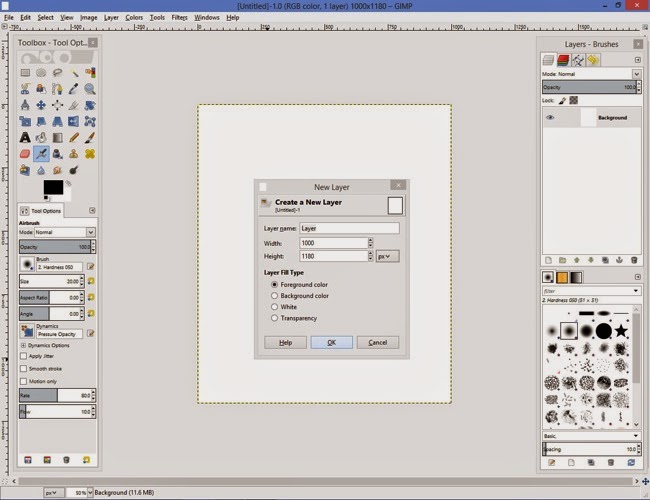
The first step is to decide on the size of your design. In this tutorial, we’re going to create a canvas of 1000 pixels width x 1180 pixels length. The size is important as it will determine whether you will be able to repeat your pattern on our site. Click File > New, then click on the dropdown box, select cms, and enter the measurements.

Next click on Advanced Options and enter 150 pixels for both the X and Y resolution. (Tip: It is important to keep it on the default setting of landscape and RGB colour space.)


2) Create your chevron pattern


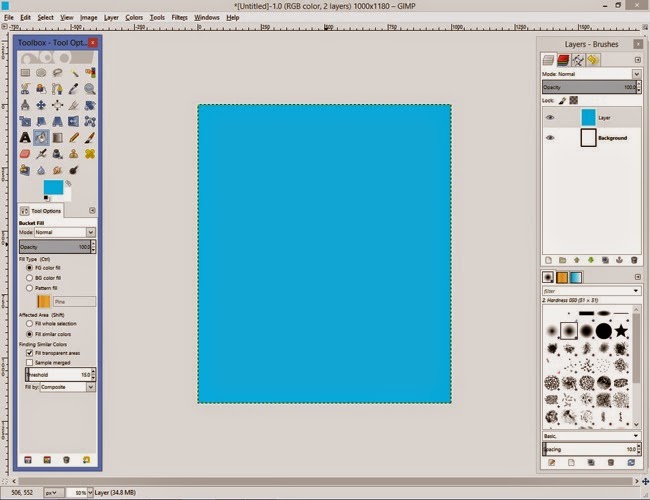
First you need to create a new layer. This can be done by selecting Layer > New Layer. Choose the foreground colour option then click ok. You now need to fill the canvas with colour. Click on the foreground colour located on the tool box. From here select the colour you want to make your chevrons. For this tutorial I’ve chosen blue. Next Select the Bucket Fill Tool from the Tool box and click this anywhere over the canvas.


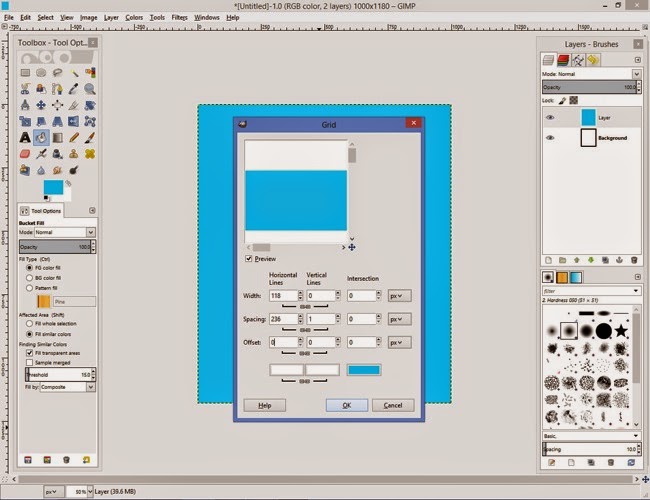
Now you’ll need to create your horizontal lines. To do this click on Filters > Render > Pattern > Grid

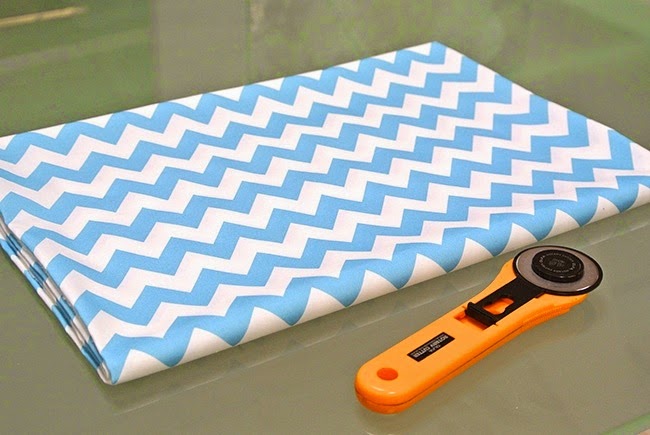
You’ll need to unlink the chains beneath the width and spacing options. The next step is to choose the colour, thickness and spacing between each chevron. I’ve chosen a width of 118 pixels and a spacing of 236 pixels and kept the colour as white. It is entirely up to you what you want to choose. However, the vertical lines and intersection should be left at 0, apart from the vertical line spacing which is 1 pixel.


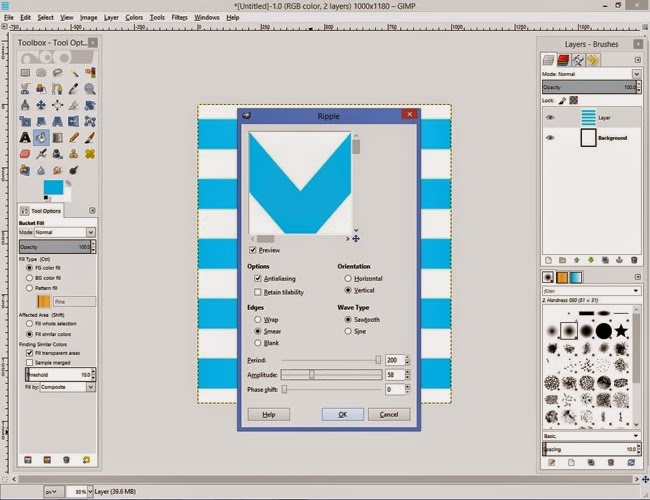
To convert our horizontal lines into v shapes, go to Filter > Distort > Ripple.

Next select the following options: Antiliasing, Vertical, Smear and Sawtooth.

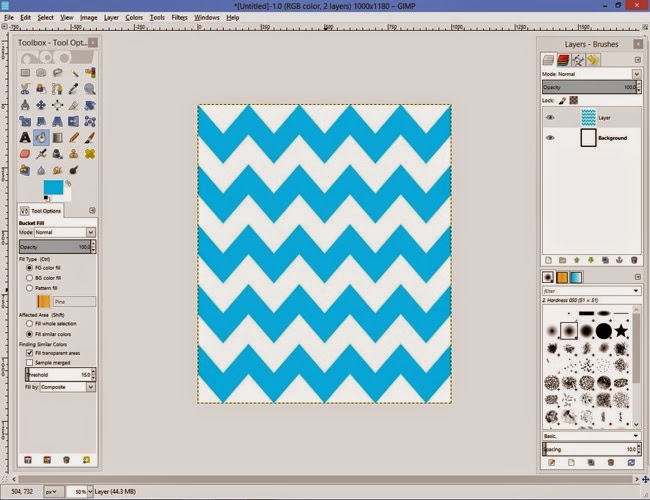
For the period I selected 200, amplitude 58 and phase shift 0. These will dictate the shape of your chevrons so it’s worth playing around with them until you’re happy with the pattern. Please be careful though as some selections will cause issues with your design.


Once you’re pleased with your chevron pattern you’ll need to save it. To do this go to File > Export As > select file type (by extension). Then select png and click export.

3) Upload your design to Woven Monkey


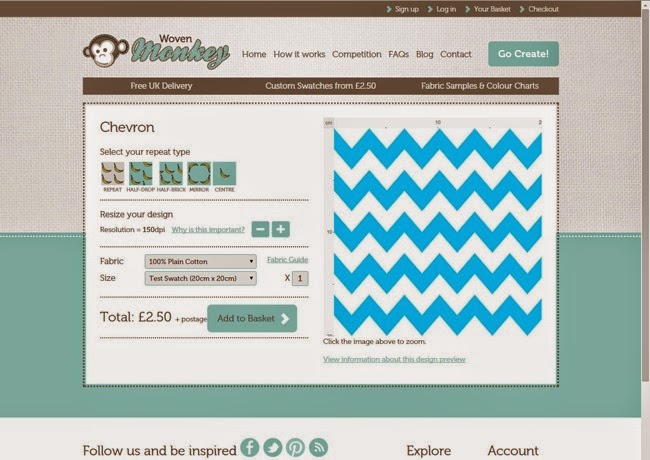
Now you can upload your design to Woven Monkey. Click on the Go Create button then follow the instructions to create your fabric. You have several repeat options available on our website, but just select the basic repeat for a chevron-style pattern, otherwise the pattern won’t line up. You also have a very handy preview of how your design will look on the fabric. (Read more about how our service works.)


Once you’ve created your design and placed your order then all you have to do is wait for delivery of your beautiful, custom-designed fabric! Usually your order will be despatched within 7 to 10 working days.

If this has inspired you to create more patterns, check out GIMP’s official tutorials for more ideas."

******

Thanks so much for your help, Ed! So whaddya think, readers - fancy designing some fabric of your own? I know I'm tempted! The question is - stripes or kittens?

23 September 2014

Five Common Sewing Machine Mistakes + How to Fix Them

Common sewing machine mistakes + how to fix them

When you first start using a sewing machine, it’s inevitable that you make mistakes. It’s easy to forget – or just not realise – all the little things that can cause your machine to throw a tantrum if you’re not careful. 

This weekend I taught 240 people to use a sewing machine in a series of 12 workshops at the Handmade Fair. When you’re showing lots of people how to do the same thing again and again, it becomes increasingly clear which are the most common mistakes that we make when starting to use a sewing machine. 

The good news is that these problems are super easy to solve – hooray! Here’s how…

Common sewing machine problems + fixes

1) The needle unthreads itself when you start sewing

You only just threaded the needle and as soon as you put your foot down on the pedal the thread decides to come out of the needle. Rats! 

Simple to solve though – firstly, make sure you have a few inches of thread pulled through the needle and out towards the back of the machine before you begin. 

Secondly – and this is something it took me a little while to discover when I first began sewing – check your needle is at the highest position before you start stitching. How can you tell if your needle is fully up? Check you can see the silver hook – or take up lever – at the top of your machine. If you can’t, simply turn the handwheel towards you until it emerges (or press the up-down button if your machine has one).

Common sewing machine problems + fixes

2) The fabric is jiggling around like crazy

Lower your presser foot! The presser foot holds the fabric in place so you can stitch neatly, not freestyle.

Common sewing machine problems + fixes

3) The stitching is really uneven

If the stitching looks loopy on one side and tight on the other, your first reaction might be to blame the thread tension setting on your machine. Sometimes you’d be right – in which case, try adjusting the tension dial and test sew on a scrap of fabric until the stitching looks even on both sides of the fabric.

Yet often it’s not the tension dial that needs changing – it’s the way you’ve threaded the bobbin, which also affects the tension. Take your bobbin out of the case and double check you’ve inserted it the right way round – usually with the thread unwinding anticlockwise, but do check your machine’s manual in case it’s different - and that the thread is pulled through the grooves in the bobbin case.

Common sewing machine problems + fixes

4) Your stitching is crazy tight on the top side

Again, this could mean you need to adjust the tension dial, but before you go doing that, just check that your spool thread isn’t caught on the little silver tension discs on top of the machine. You would have put the thread here earlier to wind the bobbin, but when you thread the machine you need to take it off otherwise it creates too much tension in the spool – and thus super tight stitches.

Common sewing machine problems + fixes

5) The threads are knotting up together

This is another really common issue – that your threads knot up either on your fabric, or worse, they get jammed in the machine and you have to yank them out or even unscrew the needle plate to get them out. 

Firstly, before you start sewing, check that both spool and bobbin threads are sticking out towards the back of the machine – otherwise they can get twisted up in the stitching. 

Secondly, start sewing a few mm in rather than right on the edge of the fabric (then backtack a bit so you don't leave any gaps in the stitching). If there’s not enough fabric under the needle when you begin stitching, the spool thread will get tangled up with the bobbin thread underneath it and cause knots. 

Sometimes the needle will push the edge of the fabric down into the bottom of the machine to join them in one big awkward mess. Yikes! For the same reason, when I finish a line of stitching at the end of a piece of fabric, I always backtack a few mm before the edge (and then stitch off the end so I don’t leave any holes) – otherwise, if you stitch off the end and then try to backtack over the end, your threads will get tangled.

So those are some of the most common sewing machine mistakes and easy ways to solve them. I hope you found it useful!

And if you want some more help starting sewing, take a look at my online workshop Make Friends with a Sewing Machine.

Make Friends with a Sewing Machine - online workshop

19 September 2014

What's On My Sewing Table... (apart from Champagne)


As soon as I saw the Bruyère shirt (shirt? dress? shirt dress?) by Deer and Doe I knew I had to make it. I love wearing leggings and jeggings (sincerest apols if that word offends you), but on the other hand I don't think the world is ready for this jelly in lycra. So the tunic length booty coverage on this pattern seems like the perfect compromise between comfort and dignity. Plus I just love the overall design - a feminine shirt that isn't too girly. 


I'm making it in a deliciously soft cotton chambray by Robert Kaufman, which I bought from M is for Make. As I was cutting this out and stitching it up last Sunday, Rachel was sitting next to me making some trousers in a different colourway of the same fabric. For what better way to warm the new studio than to invite a bunch of sewing pals round to get the sewing machines out of the boxes for me for a social sewing session? Or, as Rachel called it in her best Cribs presenter style, Studio Takeoverrr! 


When I started this blog, I didn't know anyone who shared my passion for homemade fashion. Five years later I've met so many awesome people through reading sewing blogs, blogging myself, and going on fabric shopping meet-ups, many of whom have become real friends. Sewing solo is good enough as it is. But being surrounded by these lovely ladies, some sewing machines, Jane's homemade sausage rolls and an atmosphere of conviviality and giggles, was the perfect way to spend the day. Have you ever had a sewing social?


Ooh and finally - by the time you read this, I'll be at Hampton Court Palace for The Handmade Fair, teaching 240 people (mercifully not all at the same time) how to thread a sewing machine. If you see me there, please do say hello, I always love to meet blog readers! I'll be there Friday, Saturday and Sunday, in the Janome sewing tent for the majority of the weekend, popping up for air/food/the loo occasionally and definitely going to the Quadrille stand at 3.15pm on Saturday to sign some books. Hope to see you there!

What's on your sewing table, please?

16 September 2014

The Sewtionary: Interview with Tasia Sewaholic


Stop what you're doing! Have you seen Tasia Sewaholic's new book, The Sewtionary? Aaahhhh you need this baby on your book shelf!

I opened it one lunchtime and couldn't put it down - it's an alphabetised reference book jam-packed full of useful sewing terms and techniques. Even if you consider yourself an intermediate or advanced stitcher so probably don't use books much to help you sew, this is a seriously useful guide to have by your side if, say, you haven't inserted boning before or want to double check how to stitch a French tack but don't want to get the internet out. Just look at the wealth of knowledge covered...


If you've been reading Tasia's blog for a while (it's been one of my faves since before she began her pattern business), you'll know the story of how the Sewtionary came about. And for those of you who don't, you're about to find out, as I interviewed Tasia about her masterpiece, what went into making it, and what the future holds...

Congratulations on your wonderful book, Tasia! What's the idea behind the Sewtionary? How did you come up with the concept?

"The idea behind the Sewtionary is a sewing dictionary: sewing + dictionary = sewtionary! I'd originally started a page on my blog back in 2010 with all of the sewing tutorials and blog posts that were good reference posts. The more blog posts I wrote, the harder it was to find these posts and I didn't want all that useful information to get lost. (Here's the first post about the Sewtionary page.) Over the years I added more posts to the Sewtionary page, listing them in alphabetical order for easy reference.

Then in fall of 2012 I was contacted by a publisher who saw the Sewtionary page on my blog and thought it would make a good book idea! After the initial conversation with the publisher, the next step was to write a proposal for the book concept. I went to the local bookstores to see if there were any books like it, and there really weren't a lot of solid, in-depth reference books and none organized in an easy A-Z format. I added 'coil-bound format' as another important selling point, and 'pictures for all sewing steps' as another. Basically, I wanted it to be very easy to visualize yourself following the directions. I felt like photos of real fabric and thread would convey that message best."


Going from writing your own blog to working with a publishing team is an eye-opening experience. Was there anything about the publishing process that particularly surprised you?

"Absolutely! I think the two biggest surprises were: the short amount of time you have to write a book, and the number of people that are involved in the process. I'd originally thought that you get years to write a book! I had nine months from contract signing to final deadline. (I joked that it was like my baby, because of the nine month time period.) And that included time to do all the sewing for the samples, too! Such an eye-opening experience, like you said.

The other thing that was different was working with print format and deadlines. When you blog you have the luxury of posting whenever you like and deciding how long or short you want your posts to be. There's unlimited space on a blog to post as many photos as you want. With a book everything has to fit in the space allotted, you have to choose photos selectively rather than adding as many as you think will illustrate the point. Also with blogging, it's so informal and quick. I take a photo and post it the next day. With the book, I had to carefully prepare all of the sewing step samples, and then wait for the photographers to take the photo, and then wait weeks or months to see it in its place on the book layout. Organization is so critical for the book process."

What part of creating the book did you enjoy the most?

"The beginning and the end. I enjoyed the initial planning, including choosing the fabrics for the book samples, narrowing down the terms and definitions, thinking about all the cool things and examples I'd include. I like being organized and I set up all these methods to keep on track, such as a bulletin board with all the terms so I could move them from 'to do', to 'in progress', to 'done.' I was still so amazed that I was really going to be writing a book! That was a fun time.

The middle part was intense because once I'd decided to sew everything for the samples, I'd committed and there was no going back! That was a lot of sewing and a lot of preparation.

And now I am really enjoying the fact that it's out in the world! I love hearing feedback on the book. I enjoy the reaction when people open it up and realize what I was working on the whole time. This may sound funny but I'm so happy that it made it all the way through from start to finish! There's always a chance that your project could get cancelled or worst case, that you don't make your deadlines. I'm so glad that it's a real book now!"


What part did you enjoy the least?

"About three-quarters of the way to the end, when it was July and beautiful outside and I had four hundred samples still to sew and I was so worried I wouldn't get everything done on time! I was worried I'd taken on more than one person could possibly handle. It's a lot of pressure writing a book. It takes a lot of sacrifice in other parts of your life - I bet you know all about that too! I'm so lucky to have an understanding partner and family and friends who didn't hate me for disappearing for nine months or so. I wouldn't have changed a thing as writing a book has been a lifelong goal, but there certainly were challenging moments throughout the process."

Juggling running a business with writing a book is a huge challenge! How did you manage your time to ensure you could do both?

"You bet it is! Plus I was keeping the book a secret until it was ready for preorder, so I had to try and keep on going like things were normal and I wasn't working on this major project the whole time. I admit I probably didn't do the best job of managing my time to be efficient at both. Instead I worked every weekend and every night into the evening like a madwoman. If I were to write another book I'd do a better job of organizing my time so I could work more calmly! I'd ask for help sooner as well. I'm quite determined (or stubborn, whichever you prefer!) and it's hard to admit when I need help.

I also kept things going at a pretty hard pace for the first part of the year, putting out three patterns, and then I hit the point where I knew something had to give. The book was the priority so I put pattern development on hold until it was done."

What does the next few months hold for Sewaholic?

"We're hiring! I'm bringing on a Design Assistant to ramp up new pattern development. I'm super excited to have help because we have so many ideas, and not enough time to get them fully developed into complete patterns. We're also working on making all of our current patterns available in downloadable PDF format, so people can choose from printed or PDF patterns. We're restocking our popular 'Handmade with Love' and 'One of a Kind' clothing labels which I love and use in all of my projects. And lastly, we're working on exciting new pattern designs for 2015. Look for a line-up of patterns next year that range in skill levels and are designed for different parts of your life, from modern office wear to clothes you can wear on your bike!"


*****

Huge congratulations, Tasia! Readers, you can find out more about the Sewtionary on the blog tour that's happening right now, and you can order the book from Tasia herself, from Amazon UK and all sensible bookshops. Go acquire!

And if you enjoyed hearing about the process of book-writing, you might like my posts Behind the Scenes: Writing My Book and Getting a Craft Book Deal. Enjoy!

12 September 2014

Tatty + Tilly Giveaway!


It's giveaway time!

Iconic jewellery designers Tatty Devine are celebrating their fifteenth birthday this year - woop! It turns out they have a penchant for DIY fashion too - srsly, can they be any more awesome?! Check out some of their homemade creations.

Since we share a love of handmade wear, colour and fun, we decided to get together to bring you a crafty giveaway. One lucky person will win a bundle of Tatty Devine and Tilly and the Buttons goodies worth over £150:

Zip Necklace from Tatty Devine's 15th Birthday Collection - aaaaaahhhhh WANT!!!
A signed copy of my book Love at First Stitch
Coco sewing pattern
Mathilde sewing pattern
Miette sewing pattern

To enter the giveaway:
Simply like both Tilly and the Buttons and Tatty Devine on Facebook and comment on Tatty Devine’s Facebook competition post with your answer to the question they've posted there.

Hurry, you have until midnight on Thursday 18th September to enter. Tatty Devine will pick a winner at random and announce the result on Friday 19th September. Good luck!

*The small print: To enter, like both Tatty Devine and Tilly and the Buttons pages on Facebook and comment on the competition post with your answer. We will randomly select one winner from all comments posted before midnight on 18th September 2014 and the winner will receive one Tatty Devine Zip Necklace, plus one signed copy of Love At First Stitch by Tilly Walnes, one Tilly and the Buttons Coco Sewing Pattern, one Tilly and the Buttons Mathilde Sewing Pattern and one Tilly and the Buttons Miette Sewing Pattern. This competition is not open to Tatty Devine & Tilly and the Buttons employees, their families, agencies or anyone connected with Tatty Devine or Tilly and the Buttons. There is no cash alternative, and your prize is non-negotiable, and not refundable. We will notify the winner via Facebook and on this blog by 1pm on 19th September 2014 and if the prize isn’t claimed within two days of the winner being notified, Tatty Devine will randomly select another winner.

9 September 2014

Stripes + Stripes Coco

Coco sewing pattern

What's better than Florals + Stripes? Why, Stripes + Stripes, of course!

This is my eleventh (yes, eleventh) Coco - 1, 2, 3, 4, 5, 6, 78, and 9 and 10 unblogged. So I have more than enough options to wear for OWOP, One Week One Pattern, the challenge going on at the moment in the sewing community to wear garments made from a single sewing pattern for seven days in a row. (You can follow my OWOP week on Instagram.) Maybe I should make it OFOP? Or even OMOP?


This top actually began life as a Coco sample sewn up for the step photos in the pattern instructions. I already have a similar one with a single red pocket that was made for the cover image photo, so I decided to do something different with this one. Inspired by this Petit Bateau dress, I wanted to try out using two contrast stripe fabrics. The width between the stripes on the two fabrics I used was a little different so they don't completely match up, but that's okay - I really like the effect anyway.


Now I'm itching to make a dress version too...

Are you taking part in OWOP? If so, what are you wearing?

[Soundtrack: 'Always' by Bent]

5 September 2014

Behind the Scenes... Studio Tour!


Welcome to Tilly Towers!

If you've been paying attention, you may be thinking, "Hang on, didn't she just post a studio tour a few months ago?" For it was only in February that I gave you this tour of my home office/sewing room. At that point, I was very excited to move out of the sitting room and into a dedicated working space. And I didn't mind working from home - no extra rent to worry about, and I could cook spaghetti bolognese for lunch any time I fancied, woop!

And then Coco happened, a mountain of sewing patterns and books turned up and spread all over the flat, the kitchen table became the packing table, the sitting room and hall became the stock rooms, and I would work from 8am to often past 11pm at night answering emails and fulfilling orders without ever going outside. Basically, I was always at work. (And tripping over it.)


I knew I needed more space, some help, and to create some separation between work and home so I could get some rest occasionally. So I took a deep breath, hired Laura and signed a lease on this office. And I am sooooooooooooo happy I cannot tell you!

Right, enough talk - let me show you around...


Let's start with my favourite feature of the room - that window!!! Ehrmergerd... it's just so... big! And bright! The office is in Dulwich (read: West Norwood) in South London, yet we can see all the way to the BT Tower, the London Eye, the Shard, the Gherkin... plus lots of lovely trees. Our desks are by the window so it's very easy to just sit and stare at clouds all day. You can see the weather moving in from different parts of London - all very wonderous.


It's an inspiring space to sew in, with high ceilings and lots of room to spread out and make a mess. We'll move extra tables into the middle of the room on the days we run workshops so we can all sit around together and chat while we sew. For the sake of my relationship, I'm working hard to resist the urge to come into the studio every Saturday and Sunday to sew... sooo tempting...


Did you see the cutting table that Heather Lou made herself? Amaze! It made me well jell, yet my DIY skills aren't up to it (seriously - you do not want to put a power drill anywhere near me, I am too much of a klutz), so I bought this Stenstorp kitchen island from Ikea. It's got a gorgeous oak top, and it's the perfect height to stand at, with space for a high stool underneath when I get lazy tired. Plus it's got wide shelves which are perfect for stashing pattern blocks, pattern drafting rulers etc. It's pretty heavy though, so I was concerned that once it were built I wouldn't be able to move it. So, with help from my man, we added some castors onto it. Wheeee!


Here's my desk (spot the Pomodoro fan)...


Shop world...


Laura answering one of your emails...


There are lots of interesting creative businesses in the building, and Volcano Coffee is downstairs serving crazy strong coffee...


We've also got a little kitchen zone up here in the studio... (jaffa cakes not shown)


The colour coordination is getting a bit ridiculous now...


Speaking of which, check out our gorgeous new sewing machines! If you're coming to one of our workshops, you'll get to play on one of the delightful DKS100 models that Janome has kitted us out with. I'm in love!


I'm so so happy working in this gorgeous room and cannot believe my luck every time I walk into it (seriously, like even when I've just come back from the loo it's even nicer than I remember it being two minutes before). It's taken a crazy amount of work, but I've basically got my dream job and my dream office. I can't wait for the workshops to start so we can welcome you into the space!

[Soundtrack: 'Love Letters' by Metronomy]