Understanding sewing pattern sizes can give anyone a headache, especially if you're a newbie to all this, but this blog post will break it down into manageable chunks so you can confidently select your Tilly and the Buttons sewing pattern size and get your sew on the road!
Our sewing patterns are labelled with generic numbers from 1 up to 8, 10 or 15 (depending on the pattern), with the ready-to-wear sizing system (8, 10, 12 etc) listed as a secondary reference point only.
This is because the ready-to-wear sizing system can cause a lot of confusion and frustration, as the measurements vary between countries, between shops, and between sewing pattern companies - we all know the pain of going jeans shopping!
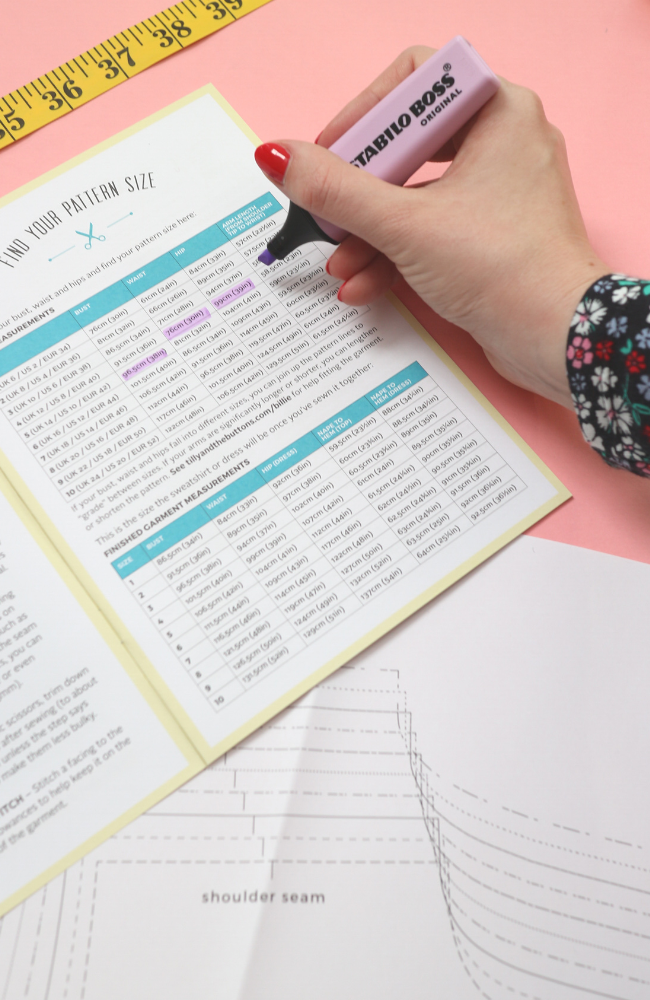
First things first - you need to know your vital statistics. It's best to measure yourself wearing your usual undies if that’s what you plan to wear under the garment you’re making (especially when it comes to bras as these can change your bust measurements), or wear tight-fitting clothing that doesn't add any bulk to you (such as fitted leggings and a vest top).

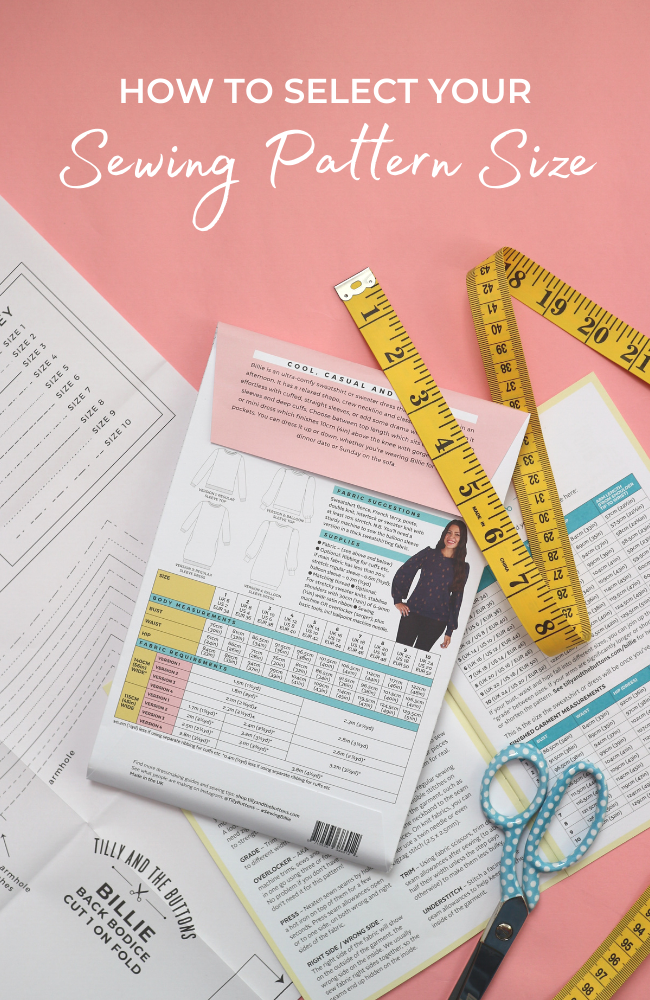
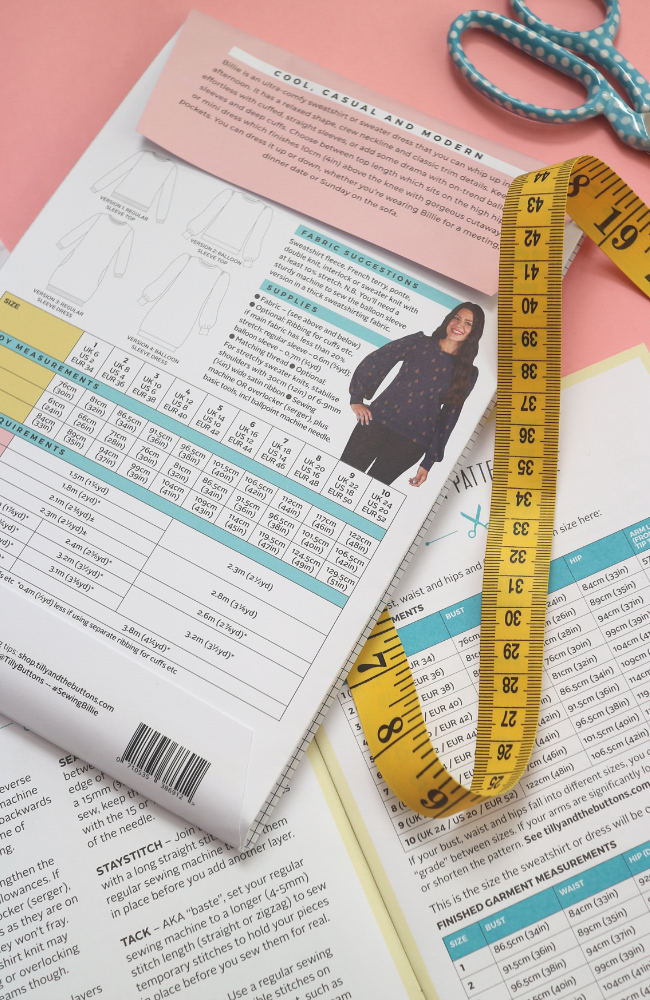
Find your bust, waist and hip measurements on the Body Measurements chart in the instructions (for example, above is our body measurement guide for our Billie sweater sewing pattern featured in this blog post) and highlight them. If you're between sizes, opt for the larger one - you can always take it in when you try it on.
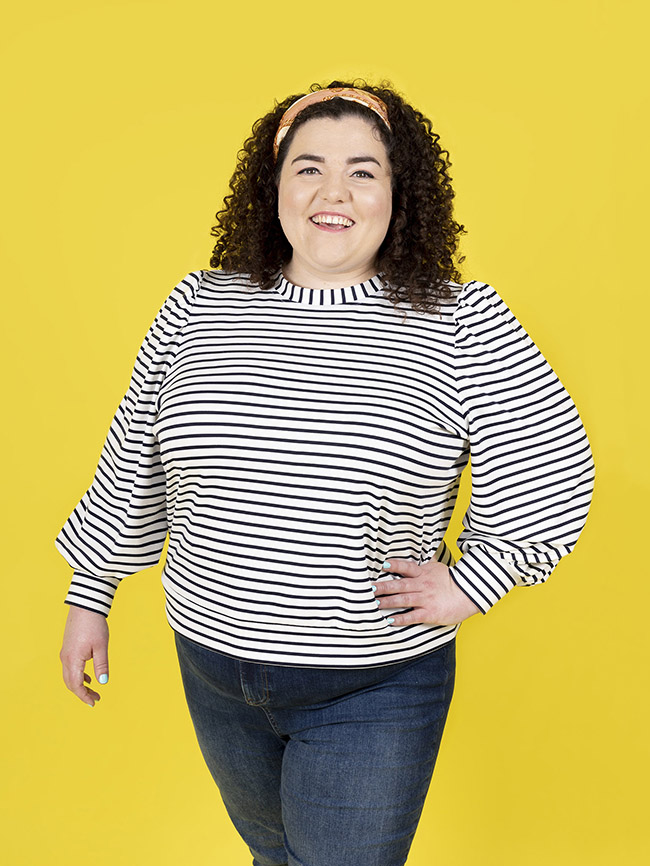
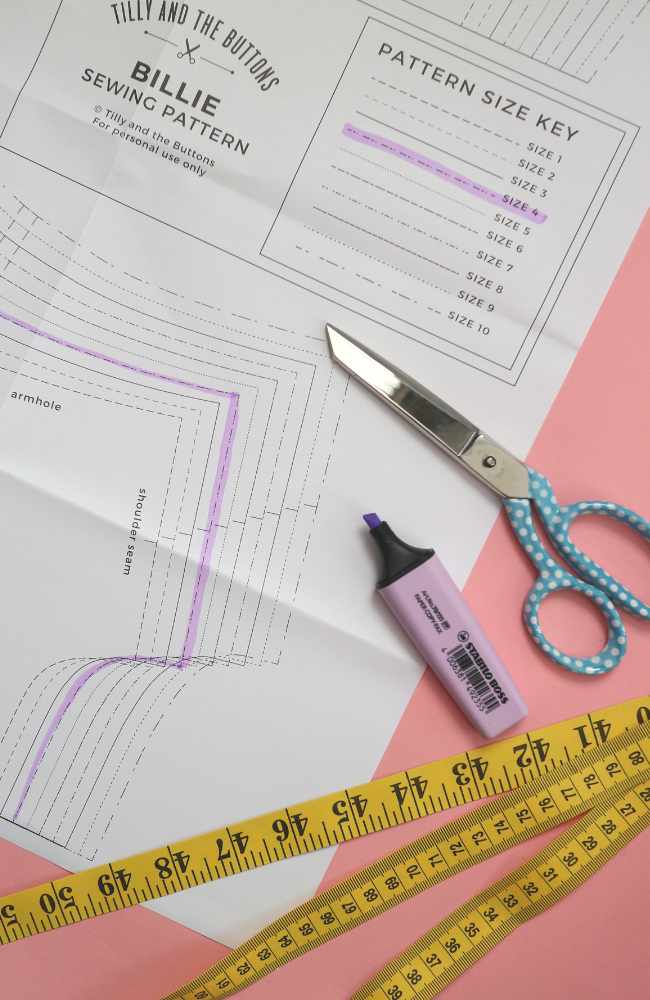
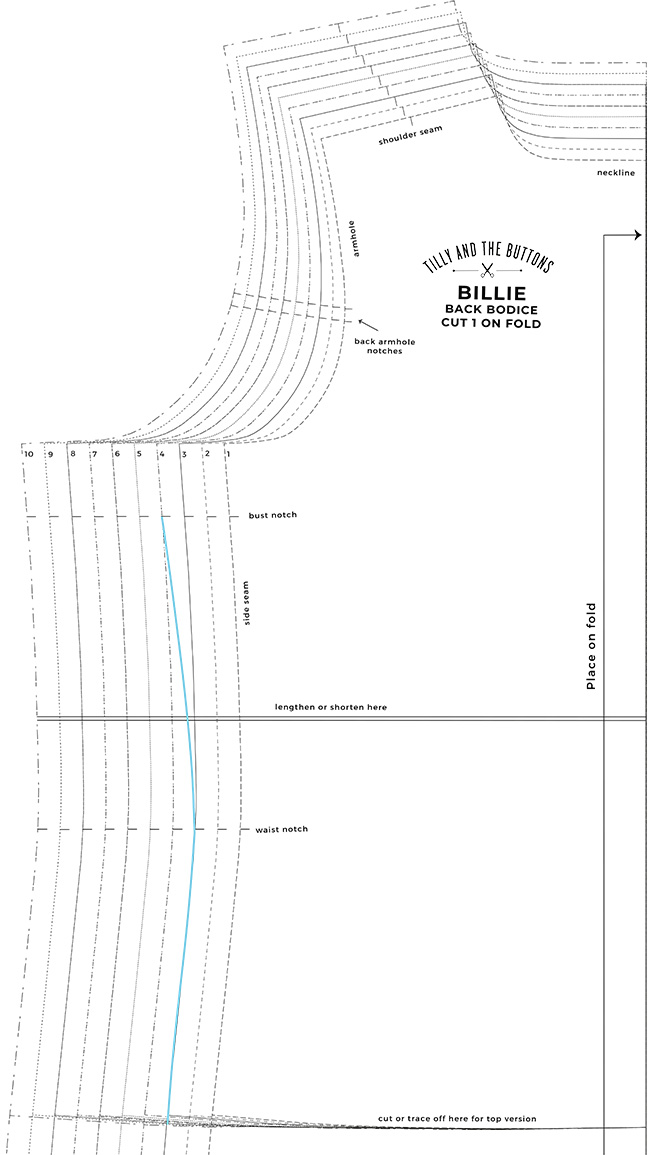
Does your bust-waist-hip ratio correspond more or less exactly to one of the sizes? Great! You’re pretty much done – find the corresponding lines on the pattern, which are marked with numbers and dashed style of line. If you like, you can draw over these lines in a coloured pen to make it easier to spot your size when you’re cutting out (especially helpful if your tracing patterns from one of Tilly's books).
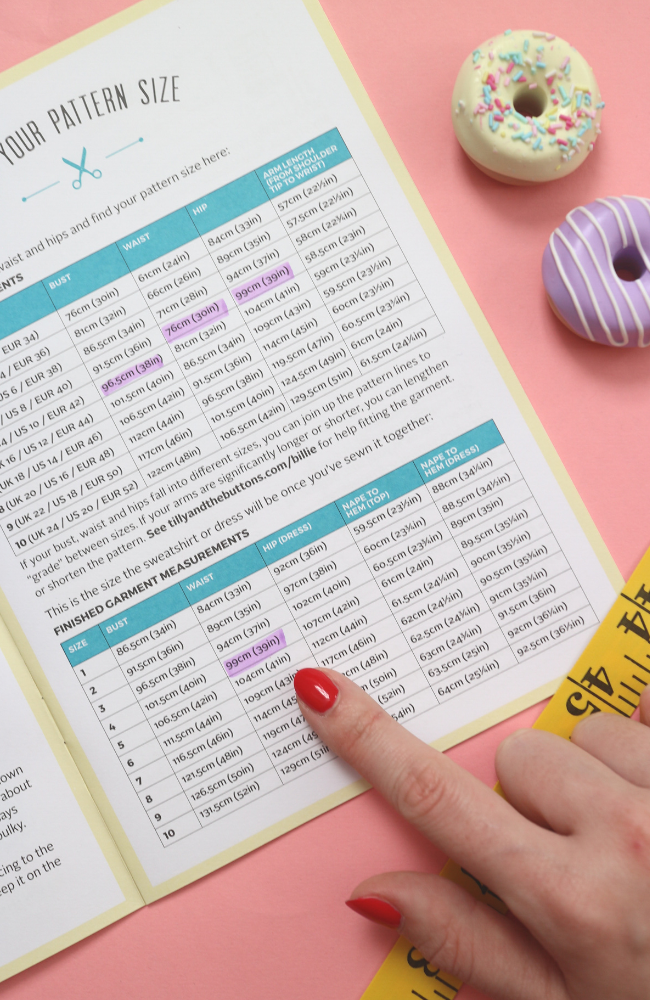
This bit is optional – you can trust the ease that’s been added to the pattern and get on with cutting out if you like. But if you often find yourself frustrated at patterns coming up much larger or smaller than you expected, it’s worth getting to grips with ease so you can adjust it to your own preference.
If you're making a garment in woven fabric, the garment measurements for your chosen size(s) will be bigger than your body, even on a close-fitting garment, to allow you to breathe and move around in it – this is the ease allowance. Some patterns may have lots of ease depending on the style of the garment, such as an oversize top or flowy skirt. For sewing patterns designed for stretch knit fabrics (such as jersey), ease may be added if the garment are designed to be loose, or there may be "negative ease" in some or all pattern pieces - in other words, the finished garment measurements may be smaller than your body measurements - in which case the fabric will stretch to fit your body closely.
You can work out the ease by subtracting the “Body Measurements” from the “Finished Garment Measurements” listed in the pattern instructions.
Now you know how much ease has been added, you may want to pick a slightly larger or smaller size depending on your preference. A loose-fitting garment, such as the Lyra Shirt Dress, will have a lot of ease as part of the design. If, on the other hand, you’re making a tighter-fitting garment, such as the Etta Dress it’s up to you how tight is tight, but the amount of ease you may want to go for could be:

But that's not all! Fitting is a massive topic and over the years on the Tilly and the Buttons blog we've covered a wide range of common fitting adjustments that might be applicable to you.

Whatever sewing pattern you're making, this post will outline how to choose the size that actually fits you, how to combine multiple sizes, and how to avoid patterns coming up larger or smaller than you expected. Along with handy links to our in-depth fitting blog posts including full bust adjustments, shoulder adjustments and more...


How do you work out which size sewing pattern to cut out?
Our sewing patterns are labelled with generic numbers from 1 up to 8, 10 or 15 (depending on the pattern), with the ready-to-wear sizing system (8, 10, 12 etc) listed as a secondary reference point only.
This is because the ready-to-wear sizing system can cause a lot of confusion and frustration, as the measurements vary between countries, between shops, and between sewing pattern companies - we all know the pain of going jeans shopping!
While it may be useful when you’re shopping for clothes, it doesn’t seem to make much sense when sewing our own clothes – when we should have more control over fitting to our unique shape, size and bust-waist-hip ratio. We'd encourage you to ignore “standard” sizes and instead look at the exact body measurements and the finished garment measurements listed on our sewing patterns. This way we have more control over getting a better fit rather than obsessing over a generic number. Hooray!

Take your measurements
First things first - you need to know your vital statistics. It's best to measure yourself wearing your usual undies if that’s what you plan to wear under the garment you’re making (especially when it comes to bras as these can change your bust measurements), or wear tight-fitting clothing that doesn't add any bulk to you (such as fitted leggings and a vest top).
Grab a soft tape measure and a full-length mirror, or at least one long enough to see your hips (so you know your tape measure is level), and make a note of the following:
- Bust - keeping your arms down, wearing the bra you intend to wear under your garment, take the measurement across the fullest point of your bust.
- Waist - place your tape measure around the narrowest part of your waist/torso.
- Hips - place your tape measure around the widest point of your hips/bottom.
Important: Check in the mirror that you are holding the tape measure parallel to the floor all the way around.
Depending on the style of garment you're making you might also find these measurements helpful to record; sitting waist, sitting hip, high bust, bicep & thigh.

Find your pattern size
Find your bust, waist and hip measurements on the Body Measurements chart in the instructions (for example, above is our body measurement guide for our Billie sweater sewing pattern featured in this blog post) and highlight them. If you're between sizes, opt for the larger one - you can always take it in when you try it on.
In 2019 we increased our size range from eight to ten sizes (up UK 24), then in 2021 we introduced an additional UK16-34 size band, drafted and graded specifically for bustier figures with additional room at the tummy too.
In 2022 we started to combine our 6-24 and 16-24 size bands into one UK 6-34 size band, in both printed and PDF formats. Read more about that here.
For this reason, you will see some of our patterns have two different size charts - if your size matches both charts and you're not sure which one to go for, choose the size band that more closely matches your specific bust, waist and hip measurements. Make sure to carefully read the product description to see which size band you are purchasing.
Read more about CHOOSING YOUR TILLY AND THE BUTTONS SIZE BAND


Does your bust-waist-hip ratio correspond more or less exactly to one of the sizes? Great! You’re pretty much done – find the corresponding lines on the pattern, which are marked with numbers and dashed style of line. If you like, you can draw over these lines in a coloured pen to make it easier to spot your size when you’re cutting out (especially helpful if your tracing patterns from one of Tilly's books).
Do your bust, waist and hip measurements span different sizes? That’s totally normal! Keep reading…
One of the best things about sewing is that you can create clothes that fit your unique body shape. If you have bust, waist and hip measurements that are different sizes, you'll probably have stood in a clothes shop fitting room before, surrounded by a pile of clothes that are too loose on top and too tight across your hips, or vice-versa. Luckily, when it comes to making your own clothes, you can combine pattern sizes to make parts of the garment bigger or smaller to give you a truly bespoke fit.
Combine multiple sizes
One of the best things about sewing is that you can create clothes that fit your unique body shape. If you have bust, waist and hip measurements that are different sizes, you'll probably have stood in a clothes shop fitting room before, surrounded by a pile of clothes that are too loose on top and too tight across your hips, or vice-versa. Luckily, when it comes to making your own clothes, you can combine pattern sizes to make parts of the garment bigger or smaller to give you a truly bespoke fit.
Read more about HOW TO COMBINE PATTERN SIZES

Check the ease
This bit is optional – you can trust the ease that’s been added to the pattern and get on with cutting out if you like. But if you often find yourself frustrated at patterns coming up much larger or smaller than you expected, it’s worth getting to grips with ease so you can adjust it to your own preference.
If you're making a garment in woven fabric, the garment measurements for your chosen size(s) will be bigger than your body, even on a close-fitting garment, to allow you to breathe and move around in it – this is the ease allowance. Some patterns may have lots of ease depending on the style of the garment, such as an oversize top or flowy skirt. For sewing patterns designed for stretch knit fabrics (such as jersey), ease may be added if the garment are designed to be loose, or there may be "negative ease" in some or all pattern pieces - in other words, the finished garment measurements may be smaller than your body measurements - in which case the fabric will stretch to fit your body closely.
You can work out the ease by subtracting the “Body Measurements” from the “Finished Garment Measurements” listed in the pattern instructions.
Now you know how much ease has been added, you may want to pick a slightly larger or smaller size depending on your preference. A loose-fitting garment, such as the Lyra Shirt Dress, will have a lot of ease as part of the design. If, on the other hand, you’re making a tighter-fitting garment, such as the Etta Dress it’s up to you how tight is tight, but the amount of ease you may want to go for could be:
- Bust: 5cm (2in) – 10cm (4in) – you need the most ease here so your lungs can move in and out so you can breathe.
- Waist: 2.5cm (1in) – 5cm (2in) – one inch of ease should do, but we'd sometimes recommend two so you have room for a big lunch!
- Hip – 5cm (2in) – ease here will allow you to move about, sit down, bend or whatever else you get up to.
If you do decide to size up or down, bear in mind that other areas of the garment, such as the shoulders or forearm, will come up larger or smaller too.

Other fitting adjustments
If you want an in-depth fitting blog post dedicated to the Tilly and the Buttons sewing pattern you're making, well, we've got just that! Visit our SEWALONG tab for a round-up of blog posts applicable to each sewing individual pattern, including a detailed fitting blog post which we write for every sewing pattern we create! Yep, you read that right.
But that's not all! Fitting is a massive topic and over the years on the Tilly and the Buttons blog we've covered a wide range of common fitting adjustments that might be applicable to you.

Visit our FITTING ROUND-UP today for a breakdown of all our fitting adjustment posts, including full bust adjustments, lengthening & shortening sewing patterns, when to make a toile & loads more.
We hope this blog post has demystified the process of picking your sewing pattern size, so now you can create beautiful handmade clothes that fit like a dream every time!

