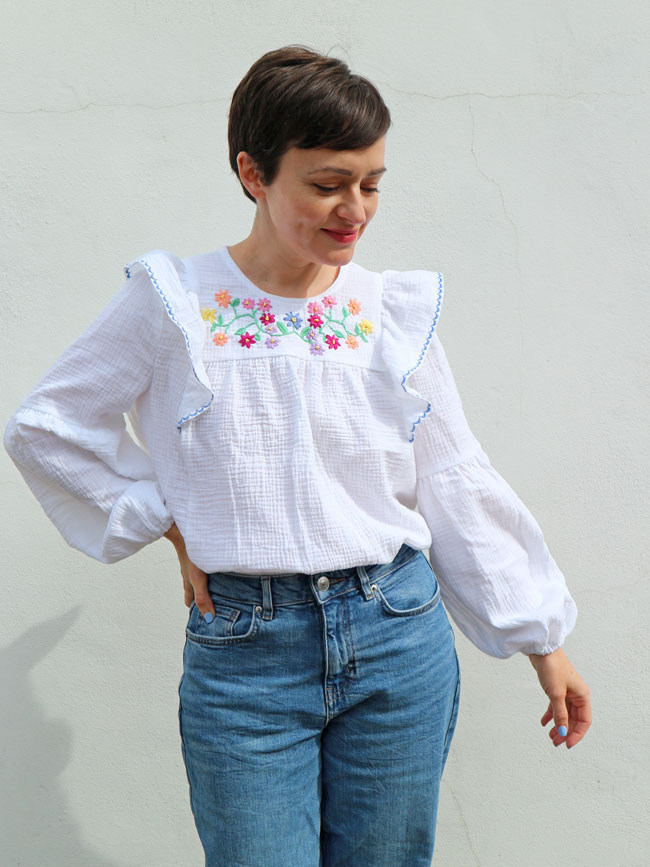

Have I ever told you how much I love embroidery? I find the process itself so soothing, and the perfect way to unwind after a long day. And the result is such a pretty way of embellishing both ready-to-wear and me-made clothing to make them truly special.
Ever since I first designed the Marnie blouse sewing pattern, I’ve had the idea in my head for a version with a flower-embroidered yoke – earlier this summer I turned this dream into a reality.
If you’d like to create a similar effect, I’m going to show you how to embroider flowers on your clothing. This tutorial is simple enough for embroidery beginners, and will teach you a few different stitches along the way – lazy daisy stitch for the petals, French knots for the centres, fishbone stitch for the leaves and back stitch for the stems.
Confession: I’m not the world’s neatest or most patient hand stitcher, but I adore the result regardless. So, even if you’re not the most confident embroiderer, I’d still encourage you to give it a go!
[In the intro I accidentally said "satin stitch" but I meant "fishbone stitch" - oops!]


Pretty much anything really! Some of my own recent embroidery projects include the pocket of my Jessa jeans, the sleeves of my Indigo dress, and this, the yoke of a Marnie blouse. Unless you have a lot of spare time on your hands, I would pick a small area like this rather than a larger pattern piece.


I often freestyle my embroidery designs, but for this project I plotted it out on paper first. I traced off a copy of the pattern piece, marked on the stitching lines (15mm or 5/8in from the raw edge) to get a sense of what the finished shape will be once sewn, then sketched out my design.
For my flowers, I drew a small circle for the centre, with eight lines for the petals surrounding it. For the stems, I drew simple curved lines, and for my leaves I sketched the outline plus central vein.

Once I was happy with the design, I transferred it onto the fabric. If the piece you’re embroidering is smaller than the hoop, you can draw the pattern piece onto fabric and embroider it before you cut the pattern outlines. This is what I did for the front yoke of my Marnie blouse.
Before you put it in the hoop, lightly draw or trace your design onto the right side of the fabric in chalk pencil or removable pen. Alternatively, you can use carbon transfer paper to trace a design onto the fabric. Whatever you use, make sure you test it on a scrap to check it comes out of your fabric!
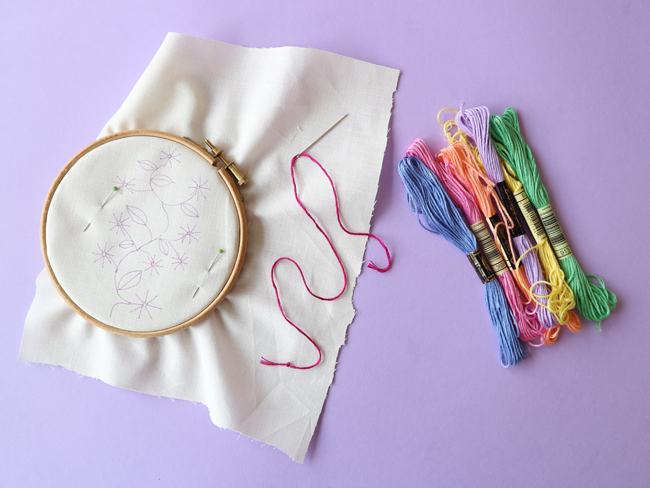
Cut some stabiliser a little larger than your design, and pin it to the wrong side of the fabric, behind the design.
Loosen the screw on the hoop until the inner hoop is loose enough to remove. Place your fabric right side up on the inner hoop, and place the outer hoop over it. Pull the fabric taut, but without stretching the fabric too much, and tighten the screw to hold it in place.
For my blouse I used double gauze and decided to keep the natural crinkle texture of the design, so I didn’t actually pull my fabric very taut at all. If you’re using jersey or another stretchy fabric, again, don’t stretch it out. If your design is bigger than the hoop, you can embroider one part at a time.
Cut a forearm’s length of embroidery floss in the colour you want for your first flower petals – any more than that and your thread is likely to knot up in the wrong places. Embroidery floss comprises six strands – you can sew with all six to create bold stitches, or separate them out to create finer stitches. For my flowers, I’m using all six strands.
Thread the floss onto the needle. If you’re struggling to get the ends through the eye of the needle, you can try the old snip-saliva-squish method, or a little trick I learnt from Nerrisa of The Bargello Edit is to put the ends in a tiny, folded strip of paper, then insert the paper through the eye of the needle. Genius! Tie a double or triple knot in the end. I’m using a triple knot as my fabric has a looser weave.
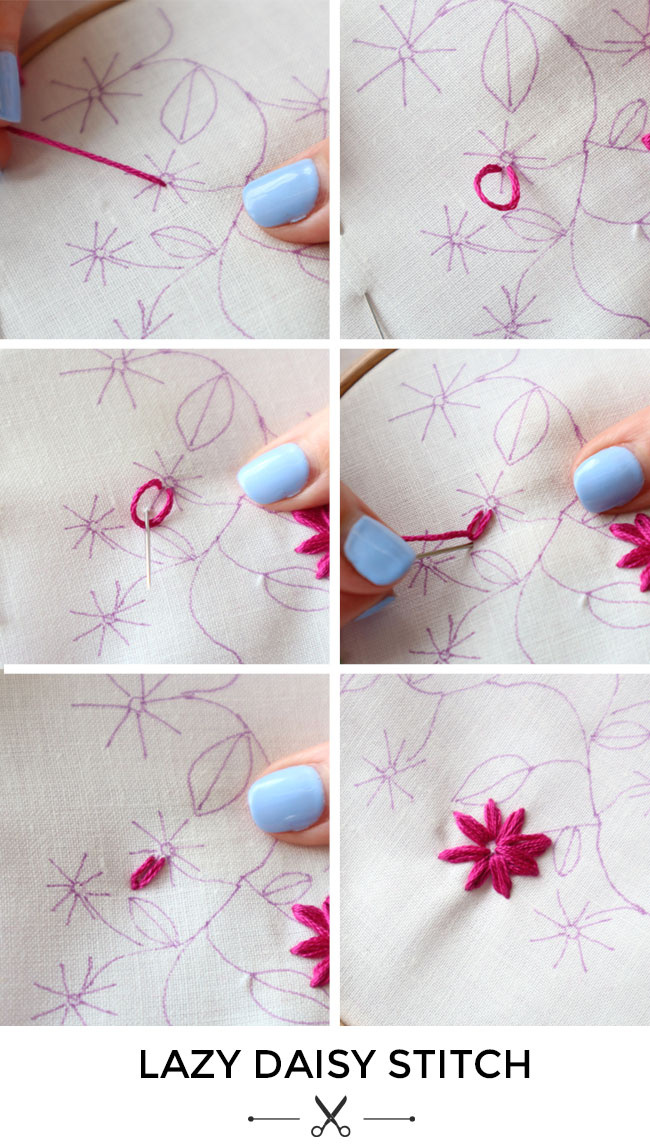
We’re going to sew the petals of the flower using “lazy daisy stitch”.
Starting at the base of one petal, insert the needle through the fabric from back to front – pull the floss all the way through so the knot is sitting taut at the back of the fabric.
Insert the needle from front to back next to the point where the thread comes out – pull it through, this time leaving a loop of thread.
Insert the needle from back to front where you want the tip of the first petal to be, catching the loop in the needle. Pull the thread taut, then insert it back through the fabric just above where the last stitch came out (the tip of the petal), to secure the petal in place.
You can leave the petal like this if you want just the outline, or take another stitch or three from the base to the tip of the petal to fill it in.
Make the second petal next to the first petal using the same technique, and continue around until you have your whole flower.
Make sure you’re pulling the floss right up to the back of the fabric each time, and take care not to catch another part of the fabric in the stitches. If you do make a mistake, you can pull out the threads and try again.
Once you’ve finished your flower, secure the thread with a double or triple knot at the back of the fabric and snip the end of the thread. I like to leave a little tail of thread to stop it unravelling.
You may want to sew the rest of your flowers’ petals now – particularly if you’re using the same colour floss – or you can move on to the centres of the flowers – the stigma (yes, I had to google that) – if you can’t wait…
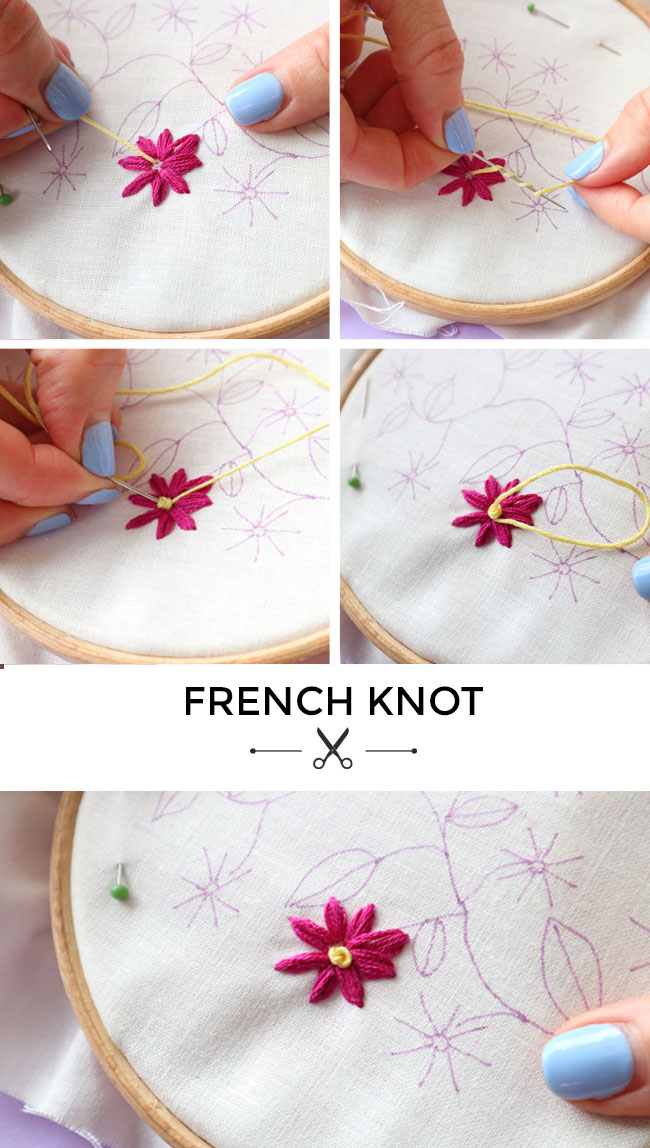
To make the flower centres, we’ll create French knots.
At the centre of the flower, insert the needle through the fabric from back to front, pulling it taut right up to the knot. Wrap the thread around the needle four to six times, depending on how big you want the knot to be. You can experiment here and snip it out if you’re not happy with your first attempt.
Insert the needle halfway back through the fabric just next to the point that the stitch came up through (not in exactly the same place or the thread will just come out).
Pull the thread wraps down to the bottom of the needle, then hold the thread taut as you pull the needle and thread all the way through the fabric.
You should be left with a cute little spiral knot on the surface of the fabric. This one can take practise to get right, but it’s worth it!
You may want just one French knot, or you could sew three, five or even a whole cluster next to each other for a fuller effect. Once you’ve sewn your flower centres, secure them in place with a double knot at the back and snip the thread.
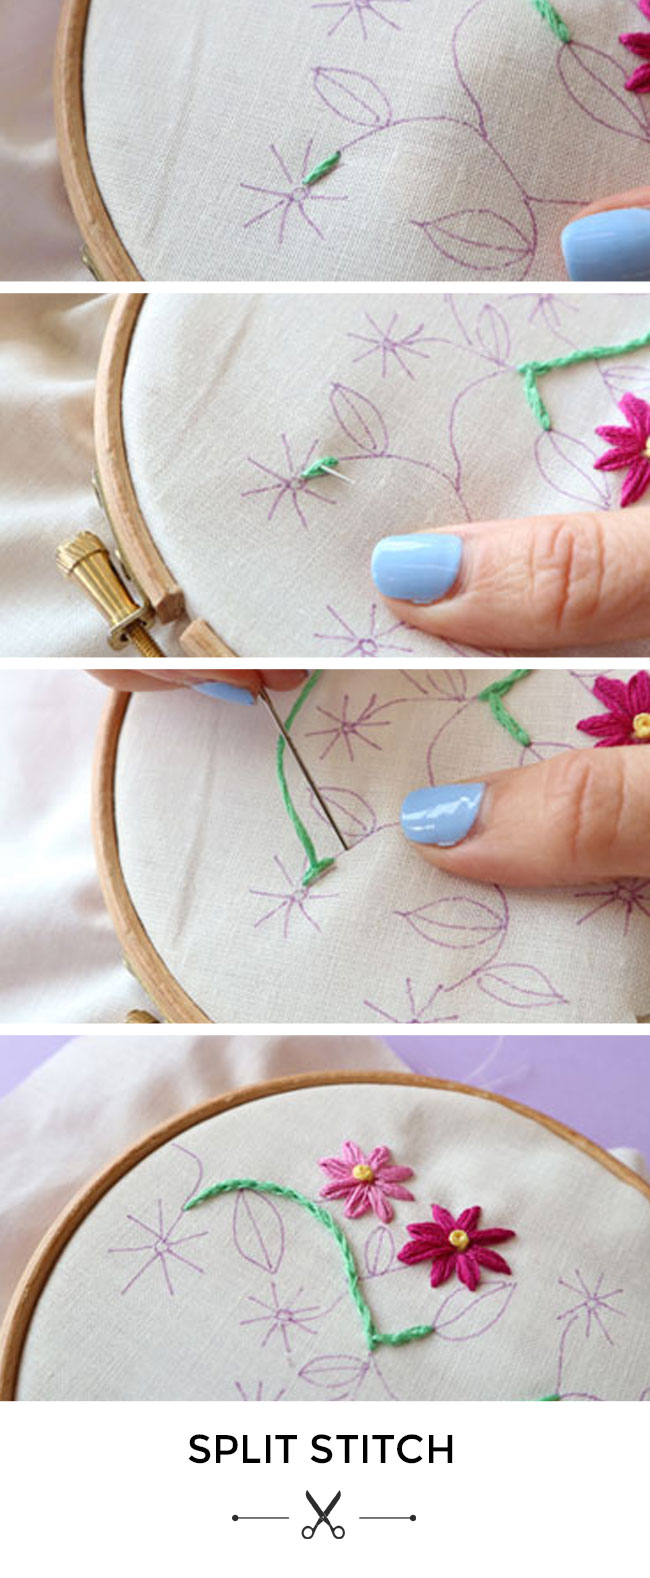
For the stems, we’ll use split stitch.
To start off the stem, make a stitch around 1cm (3/8in) or so. Bring the needle up from back to front in the centre of this stitch, so you have three strands of floss on either side of the needle – thus splitting the stitch.
Pull the thread right up to the top, then from here make a stitch the same length as the first – you can continue straight, or angle it slightly to the side to gradually create a curve with your stitches.
Split this stitch the same way you split the first, bringing the needle up through the centre of it, before sewing the next stitch. Carry on like this until you’ve finished your stem.

For the leaves, we’ll use a fishbone stitch, which creates an effect resembling the leaf veins.
Starting at the tip of the leaf, take a short-ish straight stitch down the centre/vein.
Bring the needle back up at the top on the right-hand side of the tip, right next to and slightly below it. Bring the needle down just under the bottom of the first stitch, slightly to the left of it.
Repeat on the left-hand side of the tip, this time ending just to the right of the bottom of the previous stitch.
Carry on like this, making stitches on alternating sides, keeping the top of each stitch following the outline of your leaf, and keeping the stitches close together to fill in the leaf.
Once you’re finished your masterpiece, you can remove the stabiliser by tearing, cutting or washing it out, depending on which type you used.
And don’t worry if it looks a bit messy on the back – no one is going to see it!


What areas of clothing can you embroider?
Pretty much anything really! Some of my own recent embroidery projects include the pocket of my Jessa jeans, the sleeves of my Indigo dress, and this, the yoke of a Marnie blouse. Unless you have a lot of spare time on your hands, I would pick a small area like this rather than a larger pattern piece.

What supplies do you need for embroidery?
- Embroidery floss (thread) in your chosen colours
- Embroidery needle
- Small embroidery hoop
- Embroidery stabiliser – to help stop the fabric stretching, puckering or otherwise distorting as you stitch it. You can use water-soluble, tear-away or cut-away stabiliser, and remove it once you’ve finished stitching
- Small scissors
- Optional: Pencil, chalk pencil, removable pen (such as Frixion pen) or embroidery transfer paper

How do you start your embroidery?
I often freestyle my embroidery designs, but for this project I plotted it out on paper first. I traced off a copy of the pattern piece, marked on the stitching lines (15mm or 5/8in from the raw edge) to get a sense of what the finished shape will be once sewn, then sketched out my design.
For my flowers, I drew a small circle for the centre, with eight lines for the petals surrounding it. For the stems, I drew simple curved lines, and for my leaves I sketched the outline plus central vein.

Once I was happy with the design, I transferred it onto the fabric. If the piece you’re embroidering is smaller than the hoop, you can draw the pattern piece onto fabric and embroider it before you cut the pattern outlines. This is what I did for the front yoke of my Marnie blouse.
Before you put it in the hoop, lightly draw or trace your design onto the right side of the fabric in chalk pencil or removable pen. Alternatively, you can use carbon transfer paper to trace a design onto the fabric. Whatever you use, make sure you test it on a scrap to check it comes out of your fabric!

Cut some stabiliser a little larger than your design, and pin it to the wrong side of the fabric, behind the design.
Loosen the screw on the hoop until the inner hoop is loose enough to remove. Place your fabric right side up on the inner hoop, and place the outer hoop over it. Pull the fabric taut, but without stretching the fabric too much, and tighten the screw to hold it in place.
For my blouse I used double gauze and decided to keep the natural crinkle texture of the design, so I didn’t actually pull my fabric very taut at all. If you’re using jersey or another stretchy fabric, again, don’t stretch it out. If your design is bigger than the hoop, you can embroider one part at a time.
Cut a forearm’s length of embroidery floss in the colour you want for your first flower petals – any more than that and your thread is likely to knot up in the wrong places. Embroidery floss comprises six strands – you can sew with all six to create bold stitches, or separate them out to create finer stitches. For my flowers, I’m using all six strands.
Thread the floss onto the needle. If you’re struggling to get the ends through the eye of the needle, you can try the old snip-saliva-squish method, or a little trick I learnt from Nerrisa of The Bargello Edit is to put the ends in a tiny, folded strip of paper, then insert the paper through the eye of the needle. Genius! Tie a double or triple knot in the end. I’m using a triple knot as my fabric has a looser weave.

How to sew lazy daisy stitch
We’re going to sew the petals of the flower using “lazy daisy stitch”.
Starting at the base of one petal, insert the needle through the fabric from back to front – pull the floss all the way through so the knot is sitting taut at the back of the fabric.
Insert the needle from front to back next to the point where the thread comes out – pull it through, this time leaving a loop of thread.
Insert the needle from back to front where you want the tip of the first petal to be, catching the loop in the needle. Pull the thread taut, then insert it back through the fabric just above where the last stitch came out (the tip of the petal), to secure the petal in place.
You can leave the petal like this if you want just the outline, or take another stitch or three from the base to the tip of the petal to fill it in.
Make the second petal next to the first petal using the same technique, and continue around until you have your whole flower.
Make sure you’re pulling the floss right up to the back of the fabric each time, and take care not to catch another part of the fabric in the stitches. If you do make a mistake, you can pull out the threads and try again.
Once you’ve finished your flower, secure the thread with a double or triple knot at the back of the fabric and snip the end of the thread. I like to leave a little tail of thread to stop it unravelling.
You may want to sew the rest of your flowers’ petals now – particularly if you’re using the same colour floss – or you can move on to the centres of the flowers – the stigma (yes, I had to google that) – if you can’t wait…

How to sew French knots
To make the flower centres, we’ll create French knots.
At the centre of the flower, insert the needle through the fabric from back to front, pulling it taut right up to the knot. Wrap the thread around the needle four to six times, depending on how big you want the knot to be. You can experiment here and snip it out if you’re not happy with your first attempt.
Insert the needle halfway back through the fabric just next to the point that the stitch came up through (not in exactly the same place or the thread will just come out).
Pull the thread wraps down to the bottom of the needle, then hold the thread taut as you pull the needle and thread all the way through the fabric.
You should be left with a cute little spiral knot on the surface of the fabric. This one can take practise to get right, but it’s worth it!
You may want just one French knot, or you could sew three, five or even a whole cluster next to each other for a fuller effect. Once you’ve sewn your flower centres, secure them in place with a double knot at the back and snip the thread.

How to sew split stitch
For the stems, we’ll use split stitch.
To start off the stem, make a stitch around 1cm (3/8in) or so. Bring the needle up from back to front in the centre of this stitch, so you have three strands of floss on either side of the needle – thus splitting the stitch.
Pull the thread right up to the top, then from here make a stitch the same length as the first – you can continue straight, or angle it slightly to the side to gradually create a curve with your stitches.
Split this stitch the same way you split the first, bringing the needle up through the centre of it, before sewing the next stitch. Carry on like this until you’ve finished your stem.

How to sew fishbone stitch
For the leaves, we’ll use a fishbone stitch, which creates an effect resembling the leaf veins.
Starting at the tip of the leaf, take a short-ish straight stitch down the centre/vein.
Bring the needle back up at the top on the right-hand side of the tip, right next to and slightly below it. Bring the needle down just under the bottom of the first stitch, slightly to the left of it.
Repeat on the left-hand side of the tip, this time ending just to the right of the bottom of the previous stitch.
Carry on like this, making stitches on alternating sides, keeping the top of each stitch following the outline of your leaf, and keeping the stitches close together to fill in the leaf.
Finishing off
Once you’re finished your masterpiece, you can remove the stabiliser by tearing, cutting or washing it out, depending on which type you used.
And don’t worry if it looks a bit messy on the back – no one is going to see it!
I hope this has inspired you to give embroidery a go. It's such a lovely way to spend some down time, and the result is a truly unique piece of clothing to treasure.
*****


