

You’ve got your heart set on a particular pattern and fabric combination… but then you check the pattern envelope and disaster strikes! You don’t have quite enough material to make it.
What do you do if you don’t have enough fabric for your sewing project?
Don’t ditch your dreams just yet – Tilly’s here with ten suggestions to try which may just help you make your me-made dreams come to life after all…
1. Take the cutting layout with a pinch of salt
When sewing pattern companies create cutting layout diagrams, we can’t include absolutely every scenario. For the sake of clarity and ease of use, as well as space limitations in instruction booklets, we usually bracket together a few pattern sizes, and include two common widths of fabric.
On Tilly and the Buttons sewing patterns, we also include a small amount of contingency for fabric shrinkage or distorted grainlines.
Depending on which size you’re making, how wide your fabric is, how much or how little it’s shrunk when you pre-washed it, and which variation of the pattern you’re making, you may well be able to cut your pattern pieces out of less fabric than the envelope suggests. So it’s worth laying your pattern pieces out on the fabric to see if you can fit them on – perhaps by shuffling them around a little and squishing them together a little more.
You could also try folding the fabric a different way – for example, rather than creating one fold by bringing the selvedges together, you may be able to squeeze more pieces on by creating two folds that bring the selvedges towards the centre, or closer to one side.
You’ll feel like a boss if you do manage to squeeze the pattern pieces on after all!
2. Try pivoting the grainlines
A particularly ingenious way of solving a fabric shortage dilemma is to see if you can pivot any of the pattern pieces 90 degrees, so that the grainline arrows run in a crosswise direction as opposed to lengthwise.
The important caveat to bear in mind here is that this can potentially alter the fit of the garment and how it hangs. The crosswise grain of (woven) fabric usually has a little natural give in it, whereas the lengthwise grain doesn’t (unless it’s knitted or has added elastane). So, if you’re cutting fitted bodice, trouser or skirt pieces, for example, I would stick with the grainline arrow running vertically so there is a little ease across the horizontal grain.
But, if a pattern piece isn’t fitted, or if it’s something like a patch pocket that doesn’t need to fit at all, then you can try pivoting the pattern piece on the fabric so you’re cutting it at a 90 degree angle to how it’s shown on the cutting layout diagram. This may allow you to fit your pattern onto a shorter length of fabric – hooray!
And, if your fabric is stripey, bonus points as you can make a design feature out of it, as we did on the Stevie add-on smock dress shown above.
3. Rotate pattern pieces 180 degrees
Still on the subject of cutting layouts, you could try rotating some of the pattern pieces 180 degrees if it allows you to fit more onto the fabric.
Many cutting layout diagrams assume that the fabric has either a directional print – for example, cats sitting upright or florals pointing in a particular direction – or “nap” – which is when there is a raised pile that looks and sometimes feels different when running up or down a garment. Nap is particularly noticeable on materials such as corduroy or velvet, and if you look closely at other fabrics you may notice a slight difference in the way the weave is sitting in one direction versus another.
If your fabric does not have a directional print or obvious nap, then you can rotate the pattern pieces 180 degrees so that some pieces are running upside down when you cut out the fabric. You may well find that this allows you to fit more pieces into a shorter length of material. Think of it like cutting layout Tetris – particularly satisfying if, like me, you grew up addicted to your Game Boy!

4. Use a different fabric for facings and linings
Are there parts of your project that won’t show on the outside of the garment? Think facings that finish the neckline, waistband or collar, and the inside of a self-lined bodice or pockets.
How about cutting these in a different fabric? It will make a cute feature to make your project extra unique!

5. Replace facings with a binding
Speaking of facings, these can sometimes take up a surprising amount of space on the cutting layout, particularly if they are a pronounced curve or diagonal shape. Consider replacing neckline, armhole or even hem facings with a bias binding.
Bias binding does need to be cut, as the name suggests, on the bias – i.e. at a 45 degree angle – which, yes, admittedly, can itself take up a lot of space. But you may find that you can piece together a few scraps of fabric to create a nice length of binding, or again, use an alternative fabric.
Fancy giving bias binding a whirl? Here’s how to make bias binding and how to sew with bias binding.

If your project includes gathered pieces, such as a skirt or ruffle, a simple way of saving space is to reduce their width. You then just need to gather the fabric in a little less when joining the pieces. I often do this when making tiered skirts such as the Indigo dress with midi length add-on and the Lyra shirt dress.
Making a long sleeve top? Make the sleeves short, three quarter or just bracelet length instead.
Making trousers? Try them cropped.
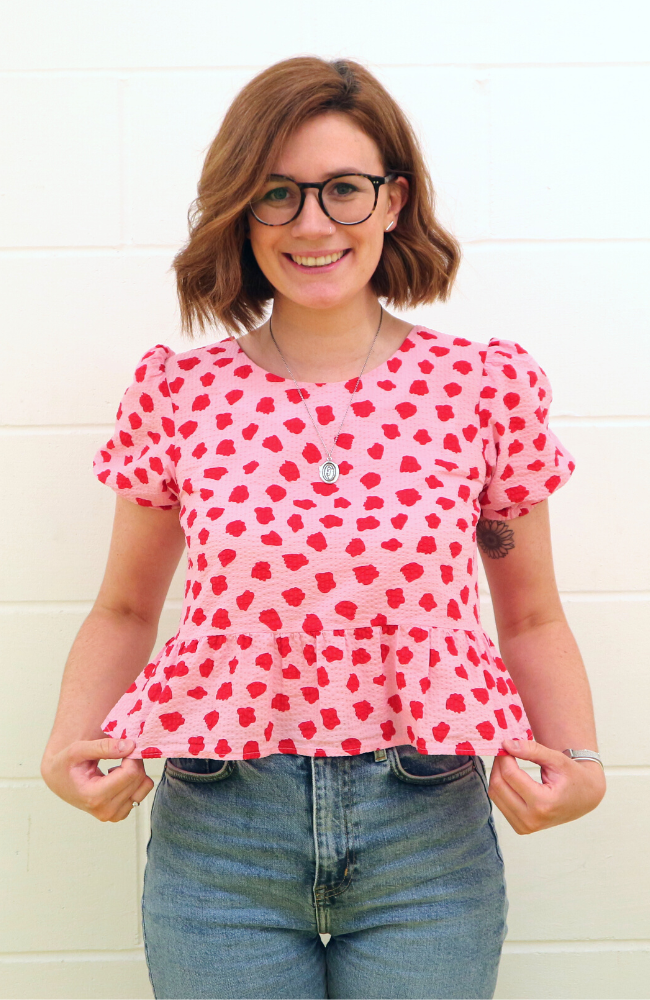
Making a midi dress? Cut it off at the knee instead – or if you’re really short on fabric, turn a gathered dress into a cute peplum blouse! Our Product Manager Frances did this with an Indigo dress and we are obsessed.
If you’re only a couple of centimetres off fitting your pattern onto the fabric, rather than thinking you need to make your garment shorter, you could reduce the hem allowance. In other words, when it comes to pressing up the hem of your trousers, top or skirt, only press it up a little bit to create a diddy hem. If the instructions tell you to press it under twice, you could finish the raw edge with an overlocker (serger) or zigzag stitch, and press it under once instead.
Another way to save hemming space is to finish the hem with a facing instead. This would involve a bit of simple pattern cutting – lay some paper over the hem of the pattern, trace off the hem, side seams and an upper edge of the facing, say 5cm (2in) or so up from the hem. Bear in mind you will still need a small seam allowance on the hem in order to be able to join it to the facing.
Alternatively, you could finish the hem with bias binding.
Speaking of seam allowances, whether your fabric is just a little too small widthwise or lengthwise, you can save fabric by reducing the seam allowance on the pattern. Like many home sewing patterns, Tilly and the Buttons include a 15mm (5/8in) seam allowance on most adult products (apart from lingerie and swimwear). You could cut the pieces 5mm (1/4in) smaller and sew with a 10mm (3/8in) seam allowance instead – or even cut the pieces down 10mm (3/8in) and sew with a 5mm (1/4in) seam allowance if you’re a confident sewist.
Just make a note of whatever seam allowance you decide on so you don’t end up with a garment that’s too tight!

Fancy giving bias binding a whirl? Here’s how to make bias binding and how to sew with bias binding.
6. Reduce any gather ratios
If your project includes gathered pieces, such as a skirt or ruffle, a simple way of saving space is to reduce their width. You then just need to gather the fabric in a little less when joining the pieces. I often do this when making tiered skirts such as the Indigo dress with midi length add-on and the Lyra shirt dress.
7. Shorten the sleeves, legs or skirt
Making a long sleeve top? Make the sleeves short, three quarter or just bracelet length instead.
Making trousers? Try them cropped.
Making a midi dress? Cut it off at the knee instead – or if you’re really short on fabric, turn a gathered dress into a cute peplum blouse! Our Product Manager Frances did this with an Indigo dress and we are obsessed.
8. Save space on the hem
If you’re only a couple of centimetres off fitting your pattern onto the fabric, rather than thinking you need to make your garment shorter, you could reduce the hem allowance. In other words, when it comes to pressing up the hem of your trousers, top or skirt, only press it up a little bit to create a diddy hem. If the instructions tell you to press it under twice, you could finish the raw edge with an overlocker (serger) or zigzag stitch, and press it under once instead.
Another way to save hemming space is to finish the hem with a facing instead. This would involve a bit of simple pattern cutting – lay some paper over the hem of the pattern, trace off the hem, side seams and an upper edge of the facing, say 5cm (2in) or so up from the hem. Bear in mind you will still need a small seam allowance on the hem in order to be able to join it to the facing.
Alternatively, you could finish the hem with bias binding.
9. Reduce the seam allowance on the pattern
Speaking of seam allowances, whether your fabric is just a little too small widthwise or lengthwise, you can save fabric by reducing the seam allowance on the pattern. Like many home sewing patterns, Tilly and the Buttons include a 15mm (5/8in) seam allowance on most adult products (apart from lingerie and swimwear). You could cut the pieces 5mm (1/4in) smaller and sew with a 10mm (3/8in) seam allowance instead – or even cut the pieces down 10mm (3/8in) and sew with a 5mm (1/4in) seam allowance if you’re a confident sewist.
Just make a note of whatever seam allowance you decide on so you don’t end up with a garment that’s too tight!

10. Try the patchwork trend
Take some inspiration from these gorgeous dresses above made by two of our lovely customers – Liz pieced together lots of different floral prints to make an epic Indigo midi dress, while Jen stitched up denims in various shades of blue to create the Rosa shirt dress of my dreams!
If you can make your fabric dilemma look like a deliberate style choice, you’ll be winning!
I hope this has given you some inspiration and ideas for how you can get around the pitfall of being short on fabric. Of course, if this list isn’t enough for you, you could always go ahead and buy some more!
*****
Author: Tilly Walnes
