Let's continue to sew the bib for our Erin dungarees or overalls! We're breaking down the Erin sewalong into manageable chunks, with support from Janome - so no matter how much time you have to sew today, you can make some progress with your project.
In this part of the Erin sewalong we'll cover:
- Making the straps (all versions)
- Attaching the straps to the bib
- Sewing the bib and bib lining together
- Edgestitching

Watch the video for this step of the Erin sewalong here:

MAKING THE STRAPS
Let’s start by making the dungaree straps. You’ll need four straps if you’re making the shoulder tie version or two straps for the buttonhole version. Fold each strap lengthways, right sides together, and press the fold.
Pin together the long raw edges. We’re going to sew across one short end, starting at the fold, pivoting at the corner, then up the long edge, leaving the other short end unstitched. Sewing machines love sucking narrow pieces like this under the needle plate so, if you find that happens, don’t worry - pull it out, unpick any knots, then start again, this time starting a little way in from the edge – then you can sew back over the gap at the end, starting from the other direction.
So, we’re sewing across one short end first - start at the fold, back tacking, pause sewing 15mm (5/8in) before the raw edge, keep your needle down to keep the project in place, then raise your presser foot and pivot the strap so the long edge is pointing towards you. Lower the presser foot, then sew up the long edge. Back tack just before the end. Remember to leave the other short end unstitched.
If you’re using an overlocker, you can simply overlock one seam at a time rather than pivoting at the corner.
If you used a regular sewing machine, trim and grade the seam allowances (remember, grading means trimming the seam allowances to different widths to cut down on bulk). Snip diagonally across the corners at each short, stitched end, taking care not to cut through the stitches.

Now we’re going to turn the straps right side out. You can use a blunt knitting needle, chopstick or something similar – hold the stitched short end of the strap against the blunt end, and smoosh it over it. This can be a bit fiddly, but hang in there! Eventually, you’ll see the stitched end emerge and you can gently pull it through, which is very satisfying!
The straps looks a bit of a mess at the moment so let’s neaten them up. First, we need to tidy up the corners – carefully ease out the fabric at the corners with a pin. Be careful not to poke a hole in the fabric. Press the seam line to neaten it up. Now roll the seam line to one side, and press the strap flat.
If your fabric doesn’t press well, you can edgestitch 2-3mm (1/8mm) around the long sides and stitched short side to keep the straps sitting nicely.

ATTACHING THE STRAPS TO THE BIB
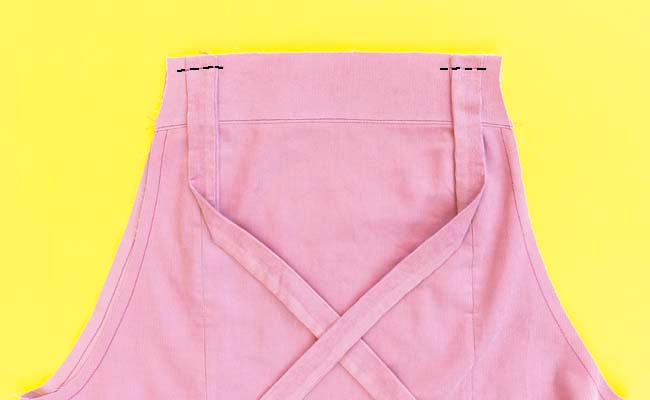
Now we can attach the straps to the bib. Take your back yoke/bib – remember, the back is the one without the princess seams, and we want the outer, which has the interfacing on the yoke, rather than the lining. Find the strap notches, which are a little way in from each corner. Pin the two straps to the right side of the back yoke, the raw (unstitched) short ends lined up with the top of the yoke, aligning the inside edge of each strap with the strap notch.
Using a regular sewing machine, staystitch in place. In this context, staystitching means sewing stitches to temporarily hold layers together before we sew them for real. You can use a longer stitch length for this, 4-5mm. Sew 10mm (3/8in) from the raw edge, so the stitches stay hidden within the seam, and start and stop a little way past each side of the strap to hold it securely.

If you’re making the shoulder tie version like me, attach the two remaining straps to the right side of the interfaced front yoke the same way.

ATTACHING THE OUTER BIB & BIB LINING
Turn the outer bib right sides out and the bib lining wrong sides out. Slip the outer bib inside the lining so they are right sides together, with the front bib seams together. Pin the bib to the lining along the top of the front yoke, around the curved armholes, and along the top of the back yoke – start by matching corners, side seams and notches. You’re pinning two layers together, not four! The straps should be sandwiched between the layers.
We’re going to start sewing at one of the side seams and sew all the way around this edge, pivoting at the corners. Stitch, taking care not to catch the free ends of the straps in the stitching. Pivot at the corners like you did for the straps, so stopping 15mm (5/8in) before each corner, keep the needle down, raise the presser foot, turn the project so it’s facing you, lower the presser foot, and continue sewing.
When you get back to the place you started, you can overlap the first few stitches with the last few stitches to secure them in place.
If you used a regular sewing machine, trim the seam allowances and snip diagonally across the corners at the top of the front and back bibs.
If you’re using a woven fabric, clip into the armhole curves every 2-3cm (1in) or so, almost up to the stitching line – you’re just making little snips, being careful not to go over the stitches. This will open out the seam allowance and help the armhole curves sit nice and flat once the bib is turned right sides out. If you’re using knit fabric, the stretch in the fabric means you probably won’t need to do this.

Turn the bib right sides out and pull out the straps. You can use a pin or point turner to ease out the top corners of the front and back yokes to neaten them up into more of a point.
Press the seams to neaten them up, rolling the seam line slightly to the lining side. Remember when we trimmed down the lining? This was to help this seam roll to the inside.
TIP: Now would be a good time to check the fit of the bib. Try it on and either tie the straps at the shoulders if you're making the shoulder tie version or pin them to front yoke if you're making the buttonhole version. Check you're happy with the fit on the side seams - do bear in mind that the style of these dungarees is intentionally loose-fitting, and you need to ensure your hips fit through the top. If you do want to take the side seams in, unpick a few stitches where the bib joins the lining at the top of each side seam, then take in the side seams on both the outer and lining, and join them together again.

EDGESTITCHING
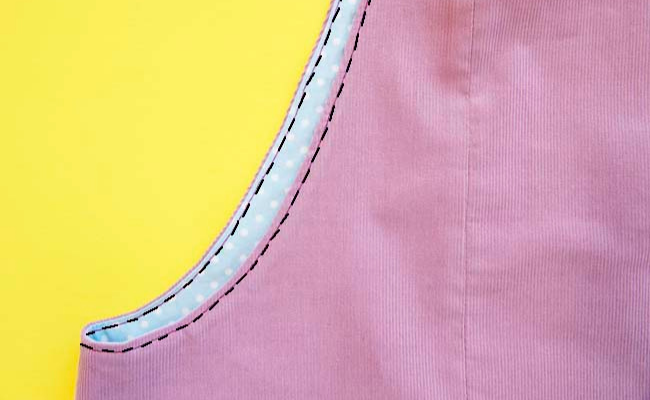
Next, we’re going to edgestitch (topstitch close to the edge) around the top edges and armholes. Remember, we're sewing through two layers (the outer and lining), not four! starting at one of the side seams, edgestitch 2-3mm (1/8 in) from the edge, pivoting at the corners. Try to keep the seam line rolled towards the lining side of the bib.
Press the bib to neaten it up.

FINISHING THE BIB
Last step for this part of the sewalong - we’re going to staystitch the bib to the lining along the waistline – or bottom edge – to keep the layers sitting nicely when we attach the legs.
Smooth everything down. If one of the layers has ended up slightly longer than the other, you can trim it down. With the bib still right sides out, pin the bib and bib lining together around the waistline, matching notches side seams and front bib seams – you’re pinning two layers together, not four. Starting at one of the side seams, staystitch 10mm (3/8in) from the edge. You can use a longer stitch (4-5mm), and don’t worry about back tacking as this is just temporary.

Looking good! In the next step of the Erin dungarees sewalong we’ll move on to the legs and pockets.
Share what you're making
We absolutely looove seeing all your Tilly and the Buttons makes, and we're especially excited to see your Erin dungarees throughout this sewalong and beyond. So let us know you're joining in by using #SewingErin when you share your posts on social media. Don't forget we love project planning and in-progress shots too!
Grab your copy of our Erin dungarees sewing pattern and meet us in the next blog post...
*****
Video sewalong: Abi Dyson
Photos: Jane Looker


