Showing posts with label fitting adjustments. Show all posts

5 April 2025

Fitting the Samara Top Sewing Pattern

Fitting the Samara top

Making the Samara top sewing pattern and need a helping hand choosing your size and fitting? Then you're in the right place 😊

Samara is available in printed and layered PDF formats, in sizes UK 6-34 / US 2-30 / EUR 34-62 / AUS 6-34.

We designed the Samara top to be suitable for beginners, which means it's not only simple to sew, but it's also relatively easy to fit too - yay! Here we'll go through some of the most common fitting adjustments you might want to make to your Samara, but it's most likely you'll only need to make one or two tweaks, if any. 

In this post, we're going to cover:

  • How the Samara pattern is designed to fit
  • Making a toile
  • Choosing your size
  • Lengthening or shortening pattern pieces
  • Combining pattern sizes at the bust/waist/hip
  • Making adjustments for a larger bust
  • Altering the neckline

30 January 2025

Fitting the Cece joggers + shorts

Fitting the Cece joggers and shorts
Are you planning to make the Cece joggers or shorts and have some questions on fitting? Then look no further as this post is for you!

Cece is available in printed and PDF formats, in sizes UK 6-34 / US 2-30 / EUR 34-62 / AUS 6-34 / 84-155cm (33-61in) hip.

I'm happy to report that the Cece joggers and shorts are designed to have a relaxed fit, so you might find you only need to make a couple of adjustments, or perhaps none at all! 

In this blog post, we'll cover:

  • Making a toile
  • Choosing your size
  • Lengthening or shortening pattern pieces
  • How to combine pattern sizes
  • Other common trouser fitting adjustments 
A model wears pink sweat shorts with a light blue t-shirt

8 November 2024

Fitting the Drew sweatshirt sewing pattern

Fitting the Drew sweatshirt

Making the Drew sweatshirt sewing pattern and looking for some advice on fitting? Then this post is for you!

Drew is available in printed and PDF formats, in sizes UK 6-34 / US 2-30 / EUR 34-62 / AUS 6-34.

The good news is, with its deep raglan sleeves and plenty of ease, Drew is designed to be oversized and easy-fitting, so you might find you only need to make a couple of adjustments, or perhaps none at all!

If you only take one thing from this post, remember that you're always going to see some folds and drag lines with this style of sweatshirt - it's all part of the slouchy style, so don't be tempted to overfit it!

How is Drew intended to fit? Modern oversized shape

In this post, we're going to cover:

  • Making a toile
  • Choosing your size
  • Lengthening or shortening pattern pieces
  • Combining pattern sizes
  • Making adjustments for a larger bust
  • Adjusting the raglan seams for narrow or wide shoulders
  • Raising or lowering the neckline
  • Adapting the cuff for differing wrist sizes
A model wears a colour block sweatshirt in white, turquoise, pink and burgundy with blue jeans

13 September 2024

Fitting the Ramona skirt

Fitting the Ramona skirt

Making the Ramona skirt sewing pattern and looking for some tips on how to get a great fit? Well, you're in exactly the right place. In this blog post, we're going to go through some of the most common fitting adjustments you might need for making a gorgeous, fitted skirt.

Ramona is pretty easy to fit, thanks to its four waist darts, centre back seam, and gently curved waistband - I know, we're spoiling you!

In this post we're going to cover:

  • Making a toile and fitting as you sew
  • Choosing your size
  • Lengthening and shortening
  • Combining sizes
  • How to do a full bum adjustment on a skirt with darts
  • How to do a sway back adjustment on a skirt with darts

A model wears a blue top with a bright pink, knee-length pencil skirt with faux pocket flaps and pearl buttons.

12 September 2024

How to do a full bum adjustment on a skirt with darts

How to do a full bum adjustment on a skirt with darts

Do you find that ready-to-wear skirts tend to feel tight around your bum, and that the waistband dips down at the back instead of sitting level all the way around? Or maybe the skirt hem lifts at the back, you have excess fabric pooling at your lower back, and the side seams point diagonally towards the back rather than straight down to the floor? If you're vigorously nodding your head then you might benefit from doing a full bum adjustment on your me-made skirts!

A full bum adjustment adds width and length to the hip area of the back skirt to accommodate a fuller booty. It's a great adjustment to know if you often find you need a little bit more room across your bum, but the skirt fits comfortably on your waist.

I'm demonstrating on the Ramona skirt pattern. You can also use this adjustment on any similar darted skirt pattern.

For this tutorial you’ll need a very quick toile of your skirt, a flexible tape measure, your back skirt pattern piece (trace this off so you're not chopping up your original pattern), a pen or pencil, a ruler, some scissors, some tape or a glue stick, and a bit of paper slightly bigger than your pattern piece. 

So, once you’ve got those handy, let’s get started!

8 June 2024

Fitting the Nell Blouse + Dress

Fitting the Nell blouse and dress

Ready to make our new Nell blouse + dress pattern and want to know how to get a great fit? Well, you're in the right place!

Nell is available in printed and layered PDF formats, in sizes UK 6-34 / US 2-30 / EUR 34-62 / AUS 6-34.

Nell is designed to be loose-ish fitting, with bust darts to give some shaping to the bodice, quite a bit of ease at the waist, and a swishy, gathered skirt. All of this means that the pattern is pretty simple to fit, and so you might find you only need to make a couple of adjustments, or perhaps none at all!

In this post, we're going to cover:
  • Making a toile 
  • Choosing your size
  • Lengthening or shortening pattern pieces 
  • How to combine pattern sizes 
  • How to do bust adjustments for a bust darted bodice 
  • How to do wide and narrow shoulder adjustments

A smiling model wears a v-neck peplum blouse with flutter sleeves. The blouse is made in a dark green viscose fabric with a pink geometric print.

31 May 2023

How to Do Bust Adjustments for a Bust Darted Bodice

Bust adjustments bust darted bodice bodice pattern fitting - Tilly and the Buttons

Do you ever wish your me-mades fit better across the bust? Do you find that excess fabric seems to pool around your bust, or that it's too tight? Ever think that the bust darts point in the wrong place on your garments? If you're finding yourself nodding enthusiastically in agreement to any of these statements, then you probably need to do a bust adjustment to your bodice pattern pieces.

It's Nikki here, Product Manager and fitting geek at Tilly and the Buttons, and I'm going to to talk you through how to do a full bust adjustment, a small bust adjustment and how to move the dart on a bust darted bodice.

Now, before we go any further I'd like to give you a little positive pattern pep talk. There are a few diagrams in this post, but whilst they might look quite daunting, they are relatively simple if you follow them step by step :)

How do I know if I need a bust adjustment?

There's a technical and a not-so-technical answer here! The answer depends on your own unique shape and the fit of the garment - you may not need to do a bust adjustment to a loose top or dress, but might have to do one on something more fitted. If you find that things are generally either too tight or too loose in the bust area, then I'd recommend making a quick toile of the bodice, or wearable toile of the whole garment to test the fit around the bust and take it from there. I'm going to briefly cover how you would work out how much to add or subtract from your bust in the adjustment, but do remember this is just a rough framework, and you might not need to do it at all.

Measure your high bust (your upper chest, just under your armpits). If you're making one of our patterns that comes in sizes UK 6-24, or which comes in sizes UK 6-34 and you're making size 6-16, add 5cm (2in). If you're making one of our patterns that is in sizes 16-34, or which comes in sizes 6-34 and you're making size 18-34, add 10cm (4in). Choose the pattern size with that bust measurement – this is the size you’ll do your bust adjustment on.

Now measure your full bust (fullest part, around the nipples) and compare it to the bust measurement on the pattern size you just selected.

If your full bust is 5cm (2in) smaller than the pattern, you’ll be subtracting 5cm (2in) from the pattern; if it’s 7.5cm (3in) bigger, you’ll be adding 7.5cm (3in) and so on. If you need to make the bust bigger, you'll need to do a full bust adjustment (FBA) and if you need to make it smaller, you'll need to do a small bust adjustment (SBA).

Since the front bodice pattern represents one half of the top, as the fabric is cut on the fold - or one boob - you'll be adding or subtracting half of that difference. So, if you want to do a 5cm (2in) full bust adjustment, you'll need to add 2.5cm (1in) to the pattern piece.

There are a few ways in which you can do a bust adjustment, but the method I'm going to show you today is the "slash and spread" method. It sounds a bit aggressive but this just means that you do the adjustment by cutting into your pattern piece and either spread it apart to create more space at the bust, or overlap it to make it smaller.

To do a bust adjustment you will need:
  • a ruler (or pattern master if you have one)
  • glue stick and/or sticky tape
  • pencil
  • paper scissors
  • extra paper

As you'll be merrily snipping into your pattern piece with wild abandon for these adjustments, I thoroughly suggest tracing off the front bodice pattern piece so you can keep the original one intact in case you need to make any further adjustments. Make sure you trace all the notches, the dart and 'lengthen or shorten here' lines onto the new pattern piece.

Got your scissors and ruler at the ready? Ok, let's go. And remember, you've got this!

Full bust and small bust adjustments


3 April 2023

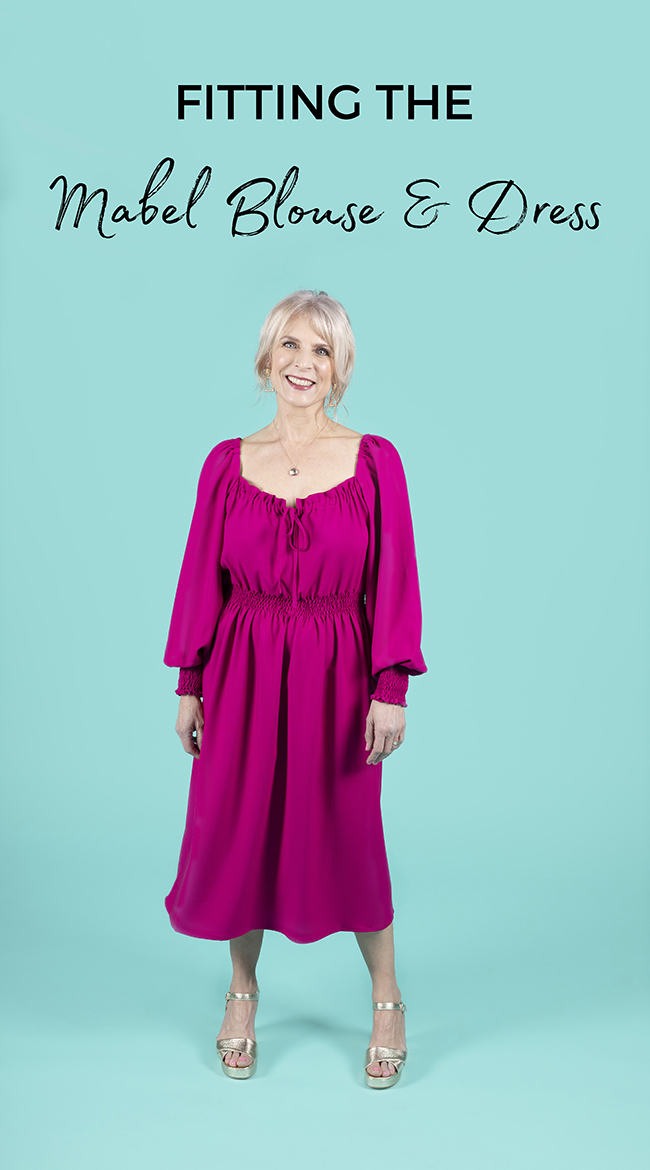
Fitting the Mabel Blouse and Dress

Fitting the Mabel Blouse and Dress


Crushing on the Mabel dress and blouse pattern but not sure how to get a great fit? In this blog post we're going to talk you through the most common fitting adjustments you might (or might not!) want to make. 

Mabel is a dream sewing pattern. Not only does it look sensational (OK, we might be a little biased), it's relatively easy to fit too. The blousey bodice, elasticated shirred waist, and wide skirt offer comfort and ease in the bust, waist and hip areas, so don't require close fitting. The areas that might need tweaking, depending on your body, are the elastic length in the shoulders and neckline, and we'll explain how you can do this below. 

In this post we're going to cover:

  • Making a toile
  • Choosing your size
  • Do I need a full bust adjustment (FBA)?
  • Lengthening or shortening pattern pieces
  • How to combine sizes
  • How to adjust the neckline and shoulders
  • How to adjust the sleeve shirring
  • Checking the hem balance
Plus size brunette woman wearing navy floral dress with shirring on waist and sleeves

Making a toile

A toile - or a "muslin"- is an initial mock up of your garment in fabric you don't mind using for testing purposes - pick something similar weight and drape to the fabric you have in mind for your final project. Making a toile is a great opportunity to test the fit of a sewing pattern, or practise a technique on sacrificial fabric before you cut into the nice fabric you have lovingly chosen and purchased for your project.

For Mabel, we recommend you make a toile to check the lengths of the elastic around the shoulders and neckline. Or how about making a "wearable toile" - this is a practice garment in fabric that you don't mind ditching if the fit isn't quite right, but you like enough to wear just in case it fits you well first time. You'll want to check the fit of the bodice, sleeves and peplum, so the top version is perfect for a wearable toile. 

Tilly has also written a fab blog post about toile making if you want to know more. 

Body form with bust, waist and hip areas highlighted

Choosing your size

Mabel includes all 15 sizes in our range. Pattern sizes 1-6 (UK 6-16) and 7-15 (UK 18-34) have been drafted, fitted and graded separately to create a better fit. For this reason, you may notice the proportions change in the measurements chart and the shaping is slightly different on the pattern pieces – sizes 7-15 include room for a larger bust (10cm/4in difference between high bust and full bust, as opposed to 5cm/2in difference on sizes 1-6) and a bit more room at the waist.

To find your size, using a flexible tape measure, measure the circumference of your:
  • Bust - take the measurement at the fullest point i.e. around your nipples 
  • Waist - where you bend at the side 
  • Hips - the fullest part - it helps to turn to the side and look in a mirror to see where this is 
Check the tape measure is sitting level with the floor - it can help to turn to the side and look in a mirror to check.

3 February 2023

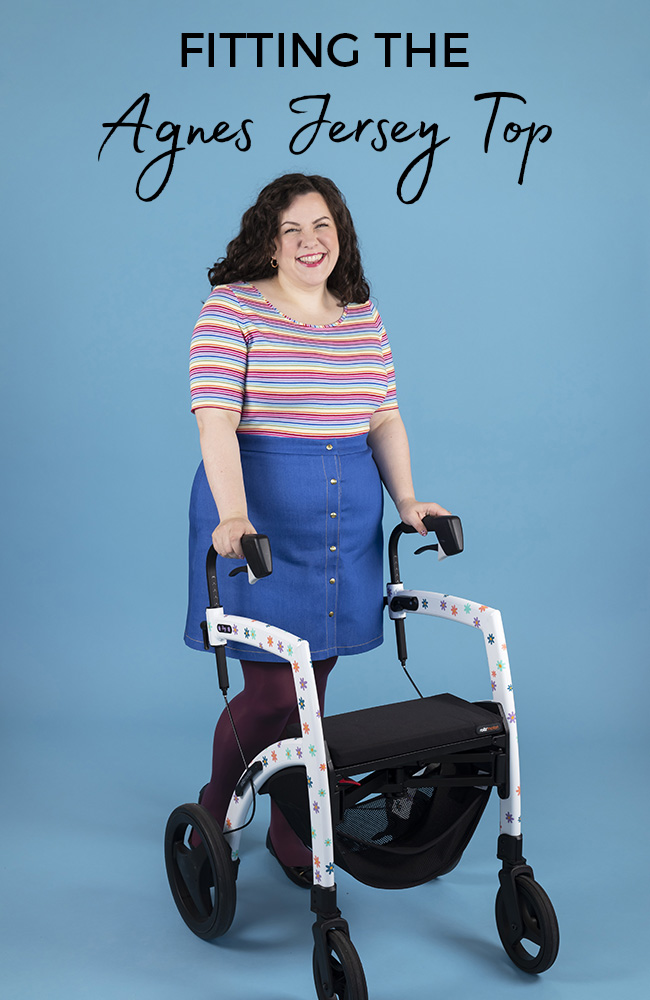
Fitting the Agnes sewing pattern

Fitting the Agnes Jersey Top - Tilly and the Buttons

Making the Agnes top and want some extra tips on fitting? This post will cover the most common fitting adjustments you may need when sewing Agnes.

Agnes is now available in printed and PDF formats sizes UK 6-34 / US 2-30 / EUR 34-62 / AUS 6-34. As it's designed to be made in stretchy jersey, it's relatively simple to fit. 

In this post we're going to cover:
  • Choosing your size
  • Lengthening or shortening the bodice or sleeve
  • Combining sizes or resizing the bust
  • Widening or narrowing the shoulder
  • Changing the neckline
  • Narrowing or widening the sleeve
However, don't think you have to make all of these adjustments - you may need one or two, or maybe none at all!

Model wearing a blue and withe striped Agnes top, with ruched sleeve details

25 January 2023

How to Combine Pattern Sizes


Do your bust, waist or hip measurements fall across different sizes? If so, you can "grade" between sizes to get a perfect fit. Hooray! It's Nikki here, Product Manager and self-confessed fitting nerd here at Tilly and the Buttons, and in this post I'm going to cover how to combine sizes on pattern pieces.

One of the best things about sewing is that you can create clothes that fit your unique body shape. If you have bust, waist and hip measurements that are different sizes, like me, you'll probably have stood in a clothes shop fitting room before, surrounded by a pile of clothes that are too loose on top and too tight across your hips, or vice-versa. Luckily, when it comes to making your own clothes, you can combine pattern sizes to make parts of the garment bigger or smaller to give you a truly bespoke fit. 


When should I combine pattern sizes? 

Now, it might be tempting to combine sizes for the bust, waist and hips on all your patterns, but depending on the fit of the garment you don't always need to do this. 

If you're making a looser fitting garment or a garment that is looser fitting in some areas, you might not need to combine sizes at all. A looser fitting garment will have a lot of "positive ease", meaning the garment (or parts of it) will be much bigger than your body, so a few inches difference in that area won't make much difference to the overall fit. 

So for example, if you're making something with a fitted bust and loose waist and hips, like the Indigo top and dress pattern, and your waist measurement is 2 or 3 sizes different to your bust, then you probably won't need to make any alterations here. The same applies to the hip measurement - the skirt is loose and flowy so a few sizes difference between your body measurements won't affect the fit of the garment. However, if your bust and waist span across more than 3 sizes you might want to consider grading between sizes.

On the other hand, if you're making a garment that is designed to have a closer fit, like the Ness skirt or Etta dress, you will want to grade between sizes at the bust, waist and hip, where applicable, as there is much less ease in these areas.

Please do bear in mind though, if your bust measurement is particularly smaller or larger than the body measurement of the size you have picked, then you might need to do a bust adjustment, as well as combine sizes. Check out our bust adjustments post (coming soon!) for more info!

Most sewing patterns will list the finished garment measurements in their instructions, so if you're a bit unsure whether you need to combine sizes, comparing them against your body measurements will help you decide :) 

14 September 2022

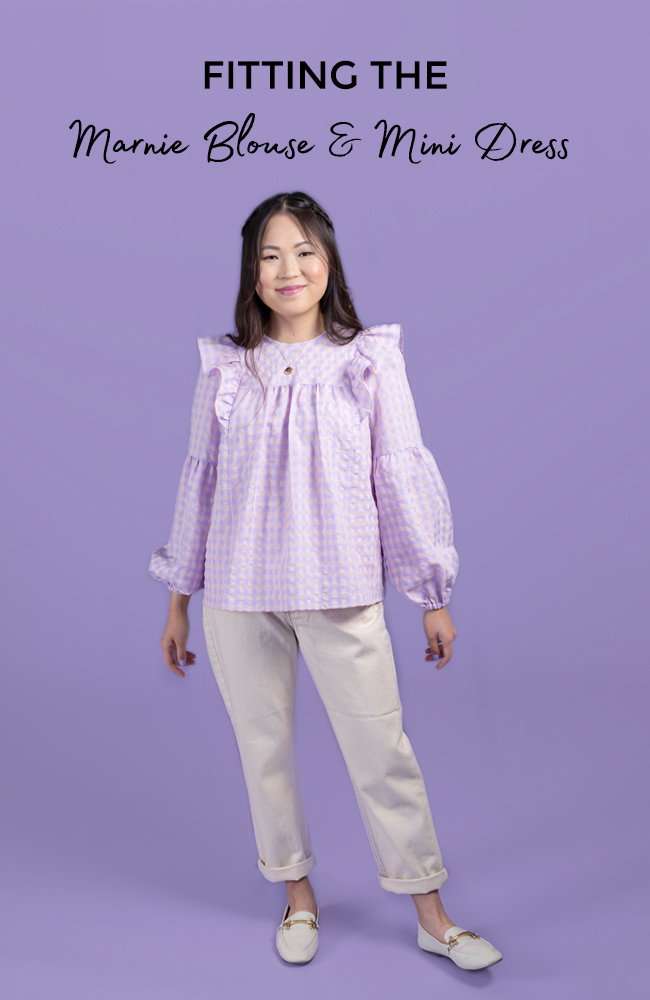
Fitting the Marnie Blouse and Mini Dress

Fitting the Marnie Blouse and Mini Dress

Fallen head over heels for our Marnie blouse and mini dress pattern and want a helping hand on how to get a great fit? You’ve come to the right place 😊

The Marnie blouse and mini dress is suitable for improver sewers and is available in both printed and PDF formats in sizes UK 6-34 (US 2-30 / EUR 34-62 / AUS 6-34). The easy-breezy, swishy design makes for a finished garment with lots of ease, which means not only is Marnie great for twirling in, it's also pretty simple to fit - yay!

Here, I'll talk you through the most common fitting adjustments you might want to consider for your Marnie blouse or dress. However, please bear in mind that Marnie is designed to be easy-fitting and floaty, so you might find you only need to make a couple of our suggested adjustments, or perhaps none at all!

In this post, we're going to cover:
  • Making a toile 
  • Choosing your size 
  • Lengthening or shortening pattern pieces 
  • How to combine pattern sizes 
  • Fitting the bust area
  • How to do wide and narrow shoulder adjustment
Fitting the Marnie blouse and mini dress - Tilly and the Buttons

21 July 2021

How to do bust adjustments on a pleated bodice

Tilly and the Buttons - bust adjustment on pleated bodice


Do you ever feel like your clothes would fit slightly better across the bust if there was a little bit more fabric, or conversely a little bit less fabric in that area? If this is something you agree with, then you might benefit from doing a bust adjustment to your bodice pattern pieces. 

You may already be familiar with doing adjustments on bust darted bodices, dartless bodices and even on pattern pieces for knit fabrics. But what about bodices with pleats at the waist?

After searching high and low on the internet and in my trusty fitting books, I couldn't find anything that covered how to do bust adjustments on a pleated bodice. As I wanted to do a full bust adjustment myself on my Skye sundress pattern, I knew that other people would want to do one too. So, I had a play around with the bodice, did some testing and came up with a system that has worked for me. I mean that's the best thing about sewing isn't it - you can make your own rules! 

How do I know if I need a bust adjustment? 

There's a technical and a not-so-technical answer here! The answer depends on your own unique shape and the fit of the garment - you may not need to do a bust adjustment to a loose top or dress, but might have to do one on something more fitted. If you find that things are generally either too tight or too loose in the bust area, then I'd recommend making a quick toile of the bodice, or wearable toile of the whole garment to test the fit around the bust and take it from there. I'm going to briefly cover how you would work out how much to add or subtract from your bust in the adjustment, but do remember this is just a rough framework, and you might not need to do it at all. 

Measure your high bust (your upper chest, just under your armpits). If you're making a pattern in our sizes UK 6-24 size band, add 5cm (2in). If you're making a pattern in our sizes 16-34 size band, add 10cm (4in). Choose the pattern size with that bust measurement – this is the size you’ll do your bust adjustment on.

Now measure your full bust (fullest part, around the nipples) and compare it to the bust measurement on the pattern size you just selected. 

If your full bust is 5cm (2in) smaller than the pattern, you’ll be subtracting 5cm (2in) from the pattern; if it’s 7.5cm (3in) bigger, you’ll be adding 7.5cm (3in) and so on. If you need to make the bust bigger, you'll need to do a full bust adjustment (FBA) and if you need to make it smaller, you'll need to do a small bust adjustment (SBA). 

Since the front bodice pattern represents one half of the top, as the fabric is cut on the fold - or one boob - you'll be adding or subtracting half of that difference. So, if you want to do a 5cm (2in) full bust adjustment, you'll need to add 2.5cm (1in) in total to the pattern piece. We're going to add this fullness, or subtract it inside the pleats, you'll need to divide the number of you wish to add to or subtract from one half of the bodice between the number of pleats you'll be adjusting - don't worry if this sounds a bit complicated, there is more info below!

12 November 2020

Fitting the Billie Sweatshirt and Sweater Dress

Fitting the Billie sweatshirt and dress sewing pattern - Tilly and the Buttons


Making the Billie sweatshirt and sweater dress and want some extra tips on fitting? Then this post is for you! In it, you'll find some shiny pearls of wisdom regarding fitting your sweatshirt or dress :)

Billie is available in printed and PDF formats sizes UK 6-34 / US 2-30 / EUR 34-62 / AUS 6-34.

The great news is Billie is relatively simple to fit - wahoo! The combination of the casual shape and knit fabric means that there's a lot more room to manoeuvre when it comes to fitting than a closer-fit woven garment. This post will cover the most common fitting adjustments you may need when sewing Billie. However, don't think you have to try all of them, or even any at all! We think sharing is caring, so the information is here for you just in case you need it. 

Fitting the Billie sweatshirt and dress sewing pattern - Tilly and the Buttons

We sometimes recommend that you make a "toile" (or "muslin") before you cut into your main fabric - a practice garment in cheap or spare fabric in a similar weight to the fabric you're going to use for the final garment to test the fit. As it's an easy-fitting top and dress, it's not necessary to do this with Billie. Sure, if you have some jaw-droppingly stunning and unique fabric that you're a bit nervous about using, or want to check if you need a full bust adjutsment, then by all means make a quick practice garment first to see how it fits on you. Otherwise, go for it! 

 In this post we're going to cover:

  • Choosing your size
  • Lengthening or shortening the bodice or sleeve
  • Lengthening or shortening the dress
  • How to combine different bust, waist and/or hip sizes
  • How to adjust the pocket to match graded side seams

Fitting the Billie sweatshirt and dress sewing pattern - Tilly and the Buttons

Choosing your size 

Using a flexible tape measure, find the circumference of your: 
  • Bust - take the measurement at the fullest point i.e. around your nipples 
  • Waist - where you bend at the side 
  • Hips - the fullest part - it helps to turn to the side and look in a mirror to see where this is 
Check the tape measure is sitting level with the floor all the way around. It can help to turn to the side and look in a mirror to check.


Circle your measurements on the ‘Body Measurements’ chart in the pattern instructions. If a measurement falls between two sizes (for example, if your bust is 37in rather than 36in or 38in), it’s usually better to choose the larger size as you can take it in more easily than you can let it out. 

If your bust, waist and hip measurements all fall into one size on the body measurements chart, that is your size. Take a look at the size key on the pattern sheets and find the corresponding size line. Each size has its own solid or dashed line to make it easy to spot and help you follow it easily.

If your bust, waist and/or hip measurements fall into different sizes, you can combine pattern sizes to create tailored pattern pieces that will fit your unique measurements - yay! This is super easy to do - see 'How to combine pattern sizes' below for more details. But, before you excitedly jump in and do this, you might want to consider...

Lengthening or shortening the bodice or sleeve

The best thing about sewing (aside from matching the perfect pattern with the dreamiest fabric) is that you can lengthen or shorten your garments so that they're the perfect length for your height, body and limbs. Our patterns are drafted for a height of around 5"5 (165cm), so if you're particularly taller or shorter than this, or if you have particularly long or short arms, legs or torso, then you might want to adjust your pattern pieces.

We have a dedicated blog post dedicated to explaining how to lengthen or shorten pattern pieces. It talks you through the process, step by step, so go check it out.

If you're lengthening or shortening the bodice pattern pieces, remember to adjust both the front and back bodices. 

We have included the following sets of lengthen or shorten lines on the Billie pattern pieces:

Fitting the Billie sweatshirt and dress sewing pattern - Tilly and the Buttons


1) Bodice

If you often find that tops and dresses  are a bit too long or short for you in the bodice, you can lengthen or shorten the front and back bodice pattern pieces using the lengthen or shorten lines. We've included the nape (nobbly bit at the bottom of your neck) to hem measurements for the top and dress in the finished garment measurements section of the booklet so you can compare them against your own measurements. 

The lengthen or shorten lines on the Billie sweatshirt are located between the bust and waist notch. You can adjust your pattern here if you feel like you need a bit more length, or conversely a bit less length - in the torso. If you'd like to alter the length of the dress (i.e. where it sits on the legs), check out the 'How to adjust the dress length' section below. 

Fitting the Billie sweatshirt and dress sewing pattern - Tilly and the Buttons

2) Sleeves (both versions)

Whether you're keeping it classic with the regular sleeves or adding some drama with the balloon sleeves, the process for altering the length is exactly the same. Both long sleeves are designed to sit just past the wrist, between the bottom of the hand and base of the thumb, and the three-quarter length sleeve sits midway between the elbow and wrist.  

We've included the arm length (from tip of the shoulder to the wrist) in the body measurements chart in the instructions booklet. You can compare this length to your own shoulder to wrist measurement to see whether you think the sleeve will need adjusting.  

Fitting the Billie sweatshirt and dress sewing pattern - Tilly and the Buttons


How to adjust the dress length

The dress is designed to sit 10cm (4in) above the knee. As the side seams at the bottom of the dress are straight, if you want to lengthen or shorten the dress to better suit your height or personal style, you can simply remove or add length to/from the bottom - it's as easy as that! We've included the nape the hem measurement for each size in the finished measurements chart in the instructions booklet so you can compare to your own measurements. 

If you want to shorten the dress, work out how much you'd like to remove and draw a horizontal line parallel to the hem, then fold it under or tuck it away. If you'd like to add length, stick the bottom of the bodice pattern pieces to a piece of paper and draw a new hemline. Easy peasy :)

Fitting the Billie sweatshirt and dress sewing pattern - Tilly and the Buttons

How to combine different bust, waist and/or hip sizes

If your bust, waist and/or hip measurements fall into different pattern sizes, you can draw a new line ("grade") between pattern sizes to get a bespoke fit for your exact body measurements. We have a blog post with step-by-step instructions and diagrams to show you how to do this is more detail, but keep on reading for some info specific to Billie.

As the Billie sweatshirt has a casual shape, there is a bit of leeway when it comes to fitting, especially at the waist. For example, if you're a size 7 at the bust and hips and a size 6 at the waist, it'd be simplest to cut a straight size 7. If you did want to take it in at the waist later, you could do that at the sewing stage.

If you feel like you need to do a full bust adjustment and are a little unsure how to do it, then check out our blog post that's just landed all about how to do a full bust adjustment on knit fabric sewing patterns

If you're making the dress with pockets and combine sizes at the side seams, you'll also need to adjust the pocket side seams to match. Scroll down a teensy bit to find out how...

Fitting the Billie sweatshirt and dress sewing pattern - Tilly and the Buttons

How to adjust the pocket to match adjusted side seams

As the cutaway pockets sit at the side seam, if you're changing the shape of the side seams then the pocket shape will need to change too. 

Let's pick up from where we left off above, after you've drawn a new side seam line. The green line in the above picture shows a grade from a size 7 at the bust and waist to a size 9 at the hips. 

Fitting the Billie sweatshirt and dress sewing pattern - Tilly and the Buttons


Stick a bit of transparent-ish paper to the bottom left-hand corner of the pocket facing - we're going to draw new side seams on the pocket and need to be able to see the shape of the bodice to do this. 

Lay the pocket facing piece over the front bodice, with the side seams above the waist notch lining up with the size that corresponds to your waist size. Line up the pocket opening on the pocket facing with the red line on the front bodice, matching notches, and pin it in place. 

You'll see that the edge of the pocket bag lines up with original size 7 side seam in this example, and not the new size 9 line in green. 

Fitting the Billie sweatshirt and dress sewing pattern - Tilly and the Buttons


Draw two new lines to extend the pocket bag side seam to meet the new side seam on your bodice. You'll see in the above example that I didn't quite follow the pocket opening seam and created a new line, as following this line until the side seam would make the pocket quite low. If you make any adjustments to the pocket opening seam on the pocket bag, transfer the new line to the front bodice piece so they'll match up. 


Fitting the Billie sweatshirt and dress sewing pattern - Tilly and the Buttons

Fitting the Billie sweatshirt and dress sewing pattern - Tilly and the Buttons


We're on to the last stretch! Stick another bit of paper to the left side of the pocket bag piece. Lay the pocket bag over the bodice and pocket facing, lining up the waist notch and the original outside edge. 

Following the new side seam on the bodice and bottom left outside edge on the pocket bag, draw a new pocket bag shape to match the adjustments you've made.

Trim away the excess from your new pocket pattern pieces, and you're good to go :)

And that's it! I hope you've found this post useful and feel confident about fitting your Billie sweatshirt and sweater dress. We love seeing your finished makes and progress shots. Tag us on Insta @TillyButtons using the hashtag #SewingBillie. 

*****************
Author: Nikki Hoar
Photography: Jane Looker
Makeup: Laura Anne
Model: Marcela Solarte (UK 6-24 range) and Sarah Baillie (UK 16-34 range)
Pink grid See You at Six French terry: Lamazi Fabrics (gifted)
Colourblock sweatshirt dress fleece back sweatshirt fabric (colours melange light blue, rose pink and yellow) and mint ribbing for the cuffs and neckband from Minerva Crafts (gifted) 
Striped balloon sleeve ponte roma fabric from Minerva Crafts (gifted)

14 September 2020

Fitting the Lotta dress

Fitting the Lotta dress sewing pattern - Tilly and the Buttons

Making the Lotta dress and want a few extra fitting hints and tips? Well, this is great timing, as this post is packed full of info about some fitting adjustments you might want to make to your Lotta dress pattern pieces.

The Lotta dress is suitable for stitching newbies as it’s easy to sew and fit – high-five! This post will cover the most common fitting adjustments you might want to consider for your Lotta dress. However, don’t feel like you need to do them all, or even any at all!

We sometimes recommend that you make a "toile" (or "muslin") - a practice garment in cheap or spare fabric in a similar weight to the fabric you're going to use for the final garment to test the fit - however, it's not strictly necessary here. If you're unsure about your sizing and have some expensive fabric lined up to make the dress in, you could make a quick toile of the bodice to check the fit, leaving off the skirt. However, if you don't feel overly precious about your fabric, then go for it!
 In this post we're going to cover:
  • Choosing your size 
  • Lengthening or shortening the bodice, sleeve or skirt
  • How to combine different bust, waist and/or hip sizes 
  • Bust adjustments 
Fitting the Lotta dress sewing pattern - Tilly and the Buttons

Choosing your size

Using a flexible tape measure, find the circumference of your:
- Bust - take the measurement at the fullest point i.e. around your nipples
- Waist - where you bend at the side
- Hips - the fullest part - it helps to turn to the side and look in a mirror to see where this is

Check the tape measure is sitting level with the floor all the way around. It can help to turn to the side and look in a mirror to check.

Fitting the Lotta dress sewing pattern - Tilly and the Buttons

20 September 2019

How to Do Narrow and Wide Shoulder Adjustments

How to do wide narrow shoulder adjustment - Tilly and the Buttons

Do you usually find that your garments are too small or too big across the shoulder? If so, you might want to consider doing a narrow or wide shoulder adjustment. It's Nikki here, Product Manager at Tilly Towers, and I'm here to show you two ways to adjust the shoulders on your pattern pieces to help you get a good fit - one "quick and dirty" method, and one more involved and more accurate method.

How do I know if I need a shoulder adjustment?

But first, if you want to know whether you need a narrow shoulder adjustment you'll have to know where the shoulder should actually sit. 

As with most things when it comes to sewing, the answer to this depends on the style and fit of the garment you're making. Some patterns are designed with a drop shoulder seam, like the Nora top, whilst others intend for the shoulder seam to sit directly on the shoulder socket, like the Indigo top and dress. If you're unsure, have a good look at the pattern technical drawings - this should tell you what you need to know. 

If the pattern is intended to sit on the shoulder socket, you'll need to know how to find out where this is on you. Luckily this is really easy to do. Bend your arm at the elbow and lift it up and down to the side (I like to imagine I'm playing the bagpipes if that helps!) and feel with the fingers on your other hand for where the "hinge" is, where the arm meets the shoulder socket. As you move your arm up and down you'll be able to feel where the socket moving. This point is where the shoulder seam should sit. 

To find out whether the shoulder seam will sit in an optimum spot for you personally, I thoroughly recommend making a toile (a muslin) first, or at least a wearable toile. Mark the armhole seam allowances on the toile and take a look in the mirror to see if the seam (the seam allowance line) is sitting roughly on your shoulder socket. 

If it's sitting beyond the socket and is migrating down your arm, this indicates that there is too much length in the shoulder seam and you need a narrow shoulder adjustment. If it's sitting further back towards your neck, and most likely feeling a bit tight, then this indicates that the shoulder seam on the pattern is too short for your shoulders and you need a wide shoulder adjustment.

Measure the distance between the seam line and the shoulder socket - that's the amount you either have to add or subtract from your shoulder seam. You can use the below methods to adjust the shoulder seam up to around 2cm (3/4in). If you want to add or subtract any more than this amount, you'll have to also adjust the sleeve head to make it bigger or smaller so it matches the new armhole shape.

I'm going to show you two different ways of doing a narrow and wide shoulder adjustment. The first method is super speedy, but may slightly alter the length of the armhole. Because of this, I'd recommend using this method for small adjustments made on knit garments, or for patterns that have ease or gathering in the sleeve head - you can ease in any excess fabric where needed.

For a more accurate technique, use the more involved "slash and spread" method outlined further down the page, which will keep the armhole seam the same length. This is best for sleeves in woven garments with little to no ease.

Narrow shoulder adjustment - the quick and dirty way