Showing posts with label make it your own. Show all posts

5 June 2019

10 Strap Design Ideas for Cleo

10 strap ideas for the Cleo dress

Hands up if you have made a Cleo dungaree dress? Hands up if you if you wear dungaree dresses? Now, hands up if you want make your very own dungaree dress? Yay - you are all with me!

It's Louise here from team Buttons and I am forever searching for the perfect detail to add to my handmade garments. I love the feeling you get when making the same pattern again and again. Feeling confident with the sewing process gives me the freedom to think about adding design details to make my clothes even more special.

The Cleo pinafore + dungaree dress has to be our most iconic pattern. With nearly 6,000 uses of #SewingCleo on Instagram and 10,000 copies sold, there is a lot of love for this pattern! So with that in mind, we thought you might like some inspo for your next Cleo with a focus on the small but mighty strap.

Let me count the ways a Cleo strap could be done, one, two...ten! Here's a bunch of design ideas that will mean you never look at the strap in the same way again - enjoy : )

10 strap ideas for the Cleo dress - plaits
Clockwise L-R: 1 + 2 / 3 / 4
The first idea is probably my favourite one - why not create plaits for your straps? Before you suggest that this idea is beautiful but totally tricky, I am pleased to tell you we have a video tute for creating this delectable detail! I predict myself putting plaits on everything.

10 strap ideas for the Cleo dress - double buttonhole
Clockwise L-R: 1 / 2 / 3 / 4

7 March 2019

Inspo for making your Eden coat or jacket

Inspo for making your Eden coat or jacket

Have you heard the news? Team Buttons launched our first ever coat pattern - Eden! She's not only gorgeous, she's incredibly versatile too. This will be a me-made garment that you will wear again and again and treasure for many years to come.

It’s Louise here, and I am going to give you a little inspo for making your dream coat. Eden is a chameleon and can look so different depending on what fabric, style, fastenings, and lining you opt for. I have spent many hours lusting over the possibilities on Pinterest, so thought I'd share some ideas for what you can do with this perfectly practical coat.


Inspo for making your Eden coat or jacket
Clockwise L-R: 1 / 2 / 3 / 4 / 5 / 6

5 November 2018

Free Coin Pocket Pattern! Add this to Your Ness Skirt

Free Coin Pocket Pattern - Tilly and the Buttons

Fancy adding a little something extra to your Ness skirt? A coin pocket will heighten the jeans-inspired detailing on this classic skirt. And there’s no such thing as too many pockets, amirite?

We’ve created a bonus pattern piece that you can download for free, plus instructions below on how to add it to your skirt.


Free Coin Pocket Pattern - Tilly and the Buttons

The pattern prints on one sheet of A4 or Letter size paper. You won’t need any extra fabric – the pattern piece is small and will fit on the fabric around the other pieces.

22 October 2018

Inspiration and fabrics for making your Ness skirt

Inspiration for making the Ness skirt - sewing pattern by Tilly and the Buttons


Have you fallen for the oh-so-stylish new pattern on the block yet? If you haven't, by the end of this post I guarantee our latest pattern, the Ness skirt, will have your heart skipping a beat!

Ness will slot into any wardrobe seamlessly. Make her in autumn-friendly fabrics, such as corduroy, gobelin, jacquard, or wool - or select a denim for a multi-seasonal piece! With to-die-for denim-inspired details, Ness is sure to build your dressmaking skills and have you creating me mades that look like they just walked out of a shop!

19 October 2018

Inspiration and fabrics for making your Nora top

Inspiration and fabrics for making your Nora - by Tilly and the Buttons

If you haven’t already heard, there’s a new knit top in town that is destined to become one of your favourite things to make! Just like our popular Coco pattern, Nora is quick and easy to sew and will slot into your wardrobe like it’s always been there.

You can make Nora from a multitude of knit fabrics - from single jersey, to sweater knits, double knits, and stretch velvet – there are so many lovely options to choose from. The best part is the fabric can transform the shape, from being more structured, to floatier and fluid.

12 July 2018

How To Print Fabric - with a Parsnip!


We've had lots of questions about this gorgeous pink fabric featured in our Stevie tunic pattern shoot. Where did we find it? Well, the model, Zeena Shah, hand-printed it herself - using a parsnip!

As you may know, rather than using model-models for our patterns, we like to hire non-professional models with other creative talents, most of whom we know personally. Zeena is a designer, print maker and author, as well as creator of the most inspiring Insta account - and today we have a special treat for you as she's going to show you how to print your own fabric. With root vegetables. As you do...


Hi guys, it’s Zeena Shah here for a special guest post celebrating the launch of Tilly’s newest patterns!

If you don’t already know me, I’m a London based print designer, maker, illustrator and author of the book How to Print Fabric and illustrator of Scandia, a colouring in book journey.  I’m a trained print designer and teach creative workshops in print and pattern design. I love sharing my skills and getting everyone making!

I was lucky enough to be asked to model these dreamy dresses and had such a fun day shooting in the studio with the team. I’m super excited to share with you a simple printmaking technique to create your own printed fabric at home that you can turn into this gorgeous Stevie dress I’m wearing!


29 July 2014

How to Make a Bow Back Nettie


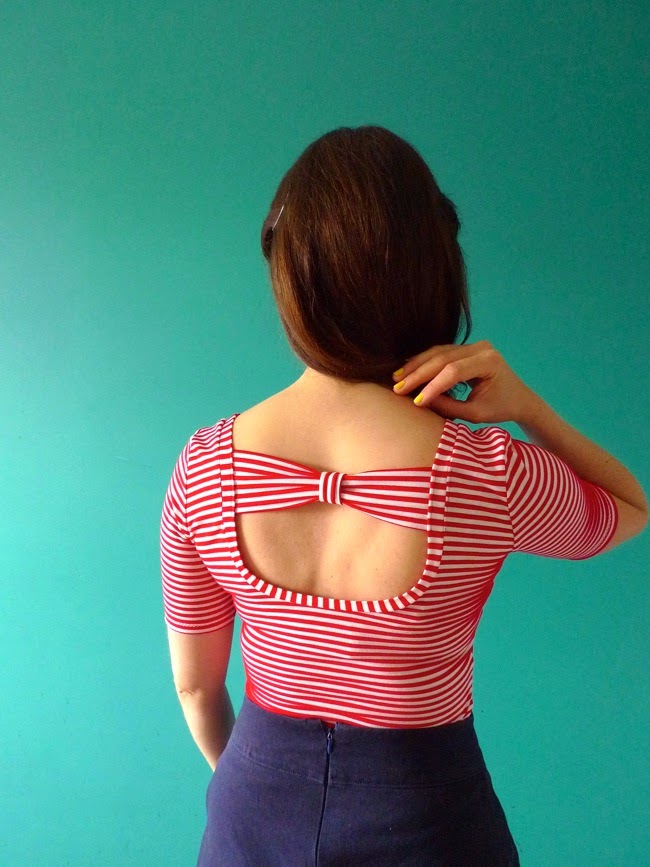
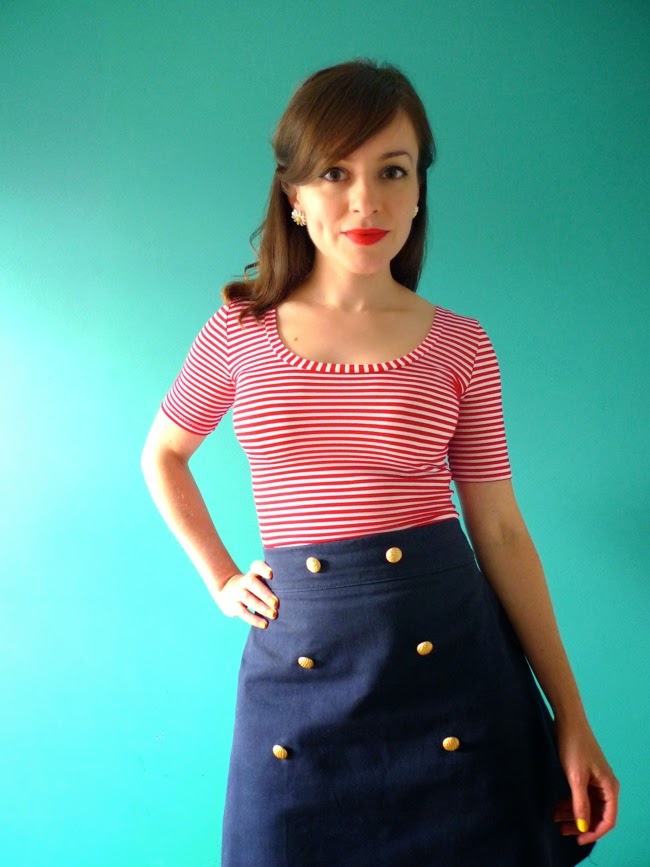
It's no secret that I love bows. And the Nettie pattern from Closet Case Files was just screaming out for a bow addition to that lovely scoop back. As promised in my previous post, I'm going to share with you how how I made this variation. Full disclosure - I totally ripped off this idea from a top by Louche that I have in my wardrobe (bought from Joy - love that shop). I'd tried to buy the same style in different colours from them, alas they were all too big for me at the shoulders and back. Hurrah for making it myself!


1) Make a scoop back Nettie, using Heather's wonderful instructions (the pattern is for a body suit or dress, but I just made it into a top). Decide where abouts on the back you want the top of your bow to sit and place pins in either side of the scoop back at this point - for reference, the top of my bow lies 5cm (2in) down from the shoulder seams. Measure the width between these two points across the scoop.


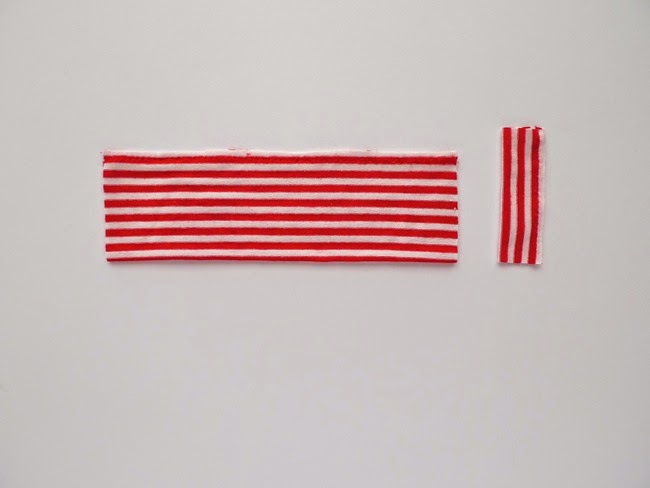
2) To make the bow, cut a piece of stretchy jersey fabric the width of [the measurement you just took + 3cm (1 1/4in)] x 14cm (5 1/2in) length/depth.

Now cut the knot piece that will go around the centre of the bow - 5cm (2in) wide x 8cm (3 1/4in) long/deep.


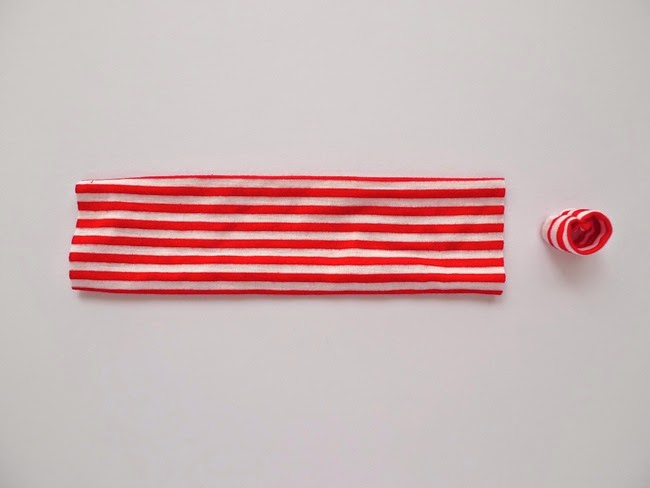
3) Fold the bow in half, right sides together, bringing together the longest edges. Pin them together and zigzag stitch. Now fold your knot in half, right sides together, bringing the longest edges together. Pin and zigzag stitch.


4) Turn the bow and knot pieces right sides out. Fold the bow in half the other way, bringing the short edges together, with the seam line on the outside of the loop. Zigzag stitch the short edges together.


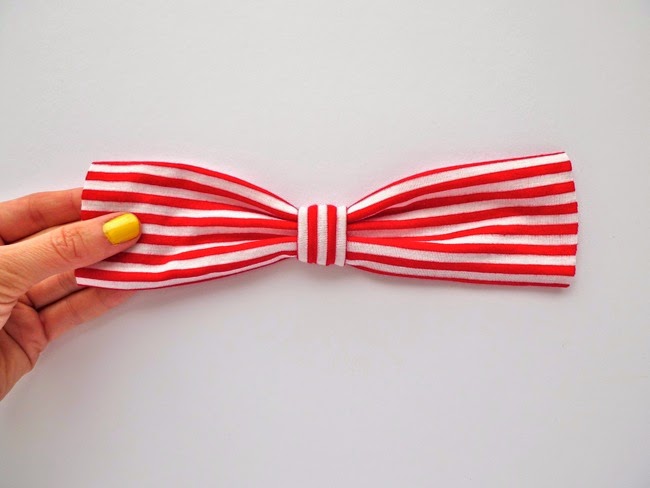
5) Slip the knot over the bow, positioning it in the centre, with the seam lines on both the knot and bow at the centre back. If you want to, you can secure the knot to the bow with a couple of hand stitches.


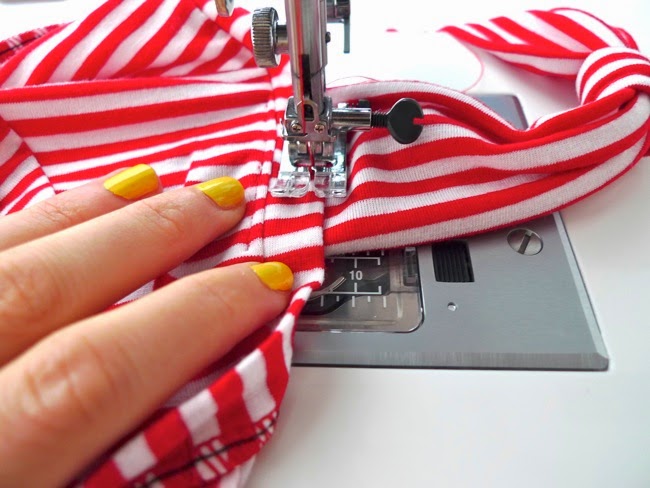
6) Turn your Nettie inside out. Line up the raw edges of the bow with the inside seam of the neckband just below your pin markings. Make sure the seam lines of the bow are facing up so they end up on the inside of the top. Try your Nettie on (be careful with the pins, obvs!) and check you're happy with the positioning of the bow. Depending on how stretchy your fabric is (and if you're using the same fabric as the top), you may also want to adjust how tightly the bow sits across your back (the bow will stretch when you wear it, as will the scoop of the back).


7) Once you're happy with the positioning of the bow, straight stitch the bow to the neckband using two parallel rows of stitching.


And there you have it! A lovely bow back Nettie for you to enjoy. Be sure to let me (and Heather!) know if you make one!

10 March 2014

Make It Your Own: Contrast Yoke Coco Variation


Meet my new favourite dress!

Breton tops and dresses with a striped bodice and contrast colour yoke and sleeves (or shoulders) seem to be all over the shops at the moment. And with good reason - they're absolutely gorgeous! Inspired by what I've seen all over Pinterest, and in an effort to use up the small amount of lovely striped fabric left over from my Nautical Dress, I thought I'd make a contrast yoke Coco dress... and show you how to make one yourself with a cheeky bit of pattern hacking.

You can make the yoke and sleeves - or just the yoke - in a contrast colour, or how about playing around with contrast prints too? Boden has some really cute striped tops with polka dot yokes... mmm... stripes and polka dots... Whatever your design, it's a good idea to pick fabrics that feel similar to each other in terms of thickness and stretchability.


You will need:
  • Coco sewing pattern
  • Large paper, pencil and ruler
  • Two different fabrics
  • Other Coco supplies as listed with the pattern (fabric, thread, sewing machine etc)
How to make the Contrast Yoke Coco:


1) On the Front Bodice piece of the Coco sewing pattern, draw a horizontal line, perpendicular to the grainline arrow, where you want the yoke seam line to be. I positioned mine about an inch above the bottom of the armhole. Add in a notch line about half way along this line - a small marking that will help us later when it comes to pinning the yoke and bodice together. Repeat on the Back Bodice piece if you want the contrast yoke on the back of your Coco too.


2) Trace off the Yoke and the Bodice pieces in your size lines on separate pieces of paper. (To trace, you can either lay semi-translucent paper over the pattern; or you can put a new piece of paper underneath the pattern, run a tracing wheel over the lines, and then go over the indentations the tracing wheel made on the new piece of paper with a pencil.)

Label the pieces so you'll remember what they are when you find them again in your pattern pile (eg. "Contrast Yoke Coco, Front Bodice, Size 3 etc"). Add in the notch lines and grainline arrows.

We need to add seam allowance to the seam lines that join the yoke and bodice. Draw a line 15mm (5/8 in) below the bottom edge of the Yoke piece(s) and join it up with the rest of the outline. Draw a line 15mm (5/8 in) above the top edge of the Bodice piece(s) and join it up with the rest of the outline. Move the notch lines so they are on the new lines you've just drawn.


3) Cut out your fabric, cutting the Front and Back Bodice pieces in one fabric and the Yoke and Sleeves in the contrast fabric. When it comes to sewing Coco together, begin by pinning the Front Yoke to the Front Bodice, with the right sides together, matching up the notches. Stitch and press the seam to one side. Repeat on the Back Yoke and Back Bodice if you're making them contrast too. Then follow the rest of the steps in the Coco sewing guide to complete the garment.

Lovely stuff! See y'all at the Coco Party!

20 February 2014

Designing Your Coco


Wow! What an amazing reception to the Coco sewing pattern! Thank you soooo much for all your sweet comments, tweets and, of course, orders! I've been so excited about sharing this pattern so it means a lot to me that so many of you love it too. Special thanks to the gorgeous Alana who has been helping out with getting your goodies in the post - I'm so grateful for her help!

Let's talk about one of my favourite parts of dressmaking - coming up with design ideas for your Coco. It's such a versatile pattern, there are so many different ways of making your Coco unique - and, of course, gorgeous.


If you're going for a classic Breton, may I recommend the blog La Marinière? It is jam-packed full of inspiration for stripey loveliness. Warning: it is highly addictive. Once you start scrolling, you may not be able to stop...

Coco by Tilly
Lots of you have fallen in love with the sixties funnel neck version of Coco (me too!!). It looks super chic in a solid colour. I'm definitely making one in red, or how about pastel pink, mustard yellow, or neutral beige? Lurrrvely. I've also had my eye on this gorgeous stripey number from Boden so may well make one just like it. Could be cute in polka dots too?

JaegerToast / ASOS
You could pick more than one fabric. As well as more traditional colour blocking, I love the idea of mixing up stripes with spots, stripes with stripes, solids with spots... Try adding a contrast print or colour or direction of print to the sleeves, pockets or hem.

via La Mariniere / Petit Bateau
How about adding an embellishment to your Coco? I like the idea of sewing something onto the shoulders - nautical buttons, bows, or sequin patches. Or how about customising the back with an exposed zip or large ribbon tie?

Boden / Zooey Deschanel for InStyle / Boden
Or maybe you'd prefer to keep it simple like these stylish ladies. I would wear these dresses every day!

I hope this has given you a few ideas for designing your Coco. There's plenty more inspiration in the Pinterest gallery, which I'm adding to all the time. In tomorrow's post we'll talk fabrics - what kind of fabric to choose and some suggestions of where to buy it - so you can get shopping over the weekend.

How are you going to design your Coco? Ooh I can't wait to hear your ideas!